
Unicorn cakes have taken the baking world by storm, becoming a must-have centerpiece for birthdays, baby showers, and fantasy-themed parties. With their whimsical designs, pastel colors, and magical details, these cakes bring a sense of enchantment to any celebration. From buttercream swirls and edible glitter to rainbow layers and fondant horns. Unicorn cakes offer endless creative possibilities for both beginners and experienced bakers.
Whether you’re looking for. A simple DIY unicorn cake or an elaborate multi-tiered masterpiece, this guide will inspire you with 10+ creative unicorn cake designs to try at home. Get ready to add some magic to your next cake-baking adventure!
1. Classic Buttercream Unicorn Cake
Pastel Buttercream Swirls – Using Multiple Colors for a Dreamy Effect
The soft, pastel buttercream swirls on a unicorn cake are a signature feature. Creating a dreamy, magical look that evokes the whimsy of unicorns and fantasy worlds. Using multiple colors to create these swirls gives your cake a beautiful gradient effect, making it appear ethereal and delicate. Here’s how you can master this dreamy effect for your unicorn cake:
- Choose the Right Colors
Pastel colors are the key to achieving that soft and magical unicorn aesthetic. Think pale pinks, lilacs, light blues, soft yellows, and mint greens. You can either use gel food coloring for more vibrant tones. Or go for pastel shades by mixing the food coloring with a bit of white frosting. For a more magical look, you can also add a touch of edible shimmer or glitter to your frosting. - Prepare the Buttercream
Start by preparing a batch of smooth and creamy buttercream frosting. The texture should be thick enough to hold its shape but smooth enough to spread easily. Once you’ve made your base buttercream, divide it into separate bowls depending on how many colors you plan to use. Add a few drops of each food color to create the pastel shades. Mix thoroughly to avoid streaking, but don’t overmix to maintain the soft, vibrant hues. - Using the Piping Bag for Swirls
To create the swirl effect. The best tool is a piping bag with a star-shaped or round tip. Load the piping bag with your different colored buttercreams in separate sections or layers. If you want a smooth and well-blended swirl, place each color side by side in the piping bag. Ensuring that they stay separate. You can also choose to load the piping bag with one color at a time. Adding a little swirl of one color and then another, layering them as you go. - Applying the Swirls to the Cake
Begin piping the buttercream on the sides of the cake, starting at the bottom and working your way up. Hold the piping bag at a 45-degree angle to create gentle, controlled swirls that overlap and blend together. You can either pipe large swirls to cover the whole cake or create smaller swirls, depending on your desired look. Continue until the entire surface is covered, making sure that the swirls look soft and whimsical. - Blend the Colors for a Smooth Gradient
If you want a smooth, seamless gradient effect, gently smooth the edges of the swirls with an offset spatula. This technique helps blend the pastel shades into each other without disturbing the swirls too much. The end result is a soft ombré look, with the colors melting together like the colors of a rainbow, creating a stunning visual effect. - Finishing Touches
To enhance the dreamy look, you can also add extra details like edible pearls, rainbow sprinkles, or edible glitter between the swirls. These little touches will make the cake feel even more magical and eye-catching. A few delicate unicorn-themed cake toppers, such as a golden horn or fondant flowers, can also complement the pastel buttercream swirls and elevate the design.
By using multiple pastel buttercream colors and applying them with the right technique, you’ll create a cake that looks like it’s straight out of a fairytale. These dreamy swirls add a touch of magic to any unicorn cake, making it the perfect showstopper for your next celebration.
Piping Techniques for the Mane – How to Create a Flowing Unicorn Mane
The unicorn mane is one of the most iconic features of a unicorn cake, giving it life and a whimsical, magical feel. Creating a flowing, vibrant mane with piping techniques is an art form that can transform a simple cake into a stunning showpiece. Here’s a step-by-step guide on how to create the perfect unicorn mane using piping techniques:
- Select the Right Piping Tip
The key to creating a flowing mane is choosing the right piping tip. A closed star tip (like Wilton’s 1M or 2D) is commonly used to create textured, voluminous swirls that resemble hair. This tip allows the frosting to be piped in soft, feathery waves, which is ideal for the flowing look of a unicorn’s mane. You could also use a round tip for more controlled lines or a petal tip if you want to add more dimension and create layered, ruffled effects. - Prepare Your Buttercream
For the best results, you’ll want to use buttercream frosting that is smooth and holds its shape well. The frosting should be thick enough to form structured swirls, but soft enough to pipe easily. Divide the buttercream into several bowls and color them with vibrant shades to reflect the unicorn’s colorful mane. Consider using colors like pink, lavender, light blue, mint green, and yellow to achieve that magical pastel rainbow effect. Make sure each color is well-mixed to avoid streaking but still vibrant enough to pop. - Fill the Piping Bags
Once you have your colored buttercream ready, fill multiple piping bags—one for each color. If you’re using a piping bag with a star tip, the frosting should be firm but not overly stiff. For a more blended and seamless look, you can pipe the colors into the bag using the striping method. Simply lay each color side by side in the bag to keep them distinct, so they create a smooth transition as you pipe. For a more bold and separate color design, you can also fill the bag with one color at a time. - Start at the Top – Creating the Flowing Mane
Begin piping the mane at the top of the cake near the unicorn’s horn or in the desired area where you want the mane to begin. Hold the piping bag at a 45-degree angle, and gently squeeze while moving your hand in a wave-like motion. Piping from left to right or right to left in small swirls helps create the flowing, natural look of the unicorn’s hair. To mimic the flow of a mane, allow the swirls to overlap and cascade down the sides of the cake, giving it a soft, flowing movement. - Layering the Mane for Fullness
For added volume, layer the piping. Begin by piping larger, more defined swirls near the top of the cake, then layer smaller swirls beneath. The overlapping swirls will help create fullness and texture, making the mane appear thick and luxurious. As you continue down the sides of the cake, the swirls should gradually decrease in size, creating the illusion of movement and softness. Don’t be afraid to pipe multiple layers of swirls over each other to achieve the desired thickness and volume. - Add Texture and Detail with Additional Piping
Once you have the general shape and flow of the mane, you can add more texture and detail. Use the piping bag with a small round tip to add individual strands of “hair” to the mane, gently dragging the tip along the cake’s surface. You can also use the petal tip for soft, layered curls that add dimension to the mane. These extra details will make the unicorn’s mane look more realistic and dynamic. - Blending and Finishing Touches
To ensure a seamless, flowing appearance, blend the colors of the mane together where they meet. You can use a soft spatula or a smoothing tool to gently blend the color transitions between each swirl, making the colors flow into each other naturally. However, avoid over-blending to maintain the distinct colors and textured look of the mane. Finish by adding little touches like edible glitter, pearl accents, or tiny fondant flowers along the mane for an extra touch of magic and sparkle. - Creating a Balanced and Balanced Mane Design
The flow of the mane should feel natural, like it’s blowing in the wind. This means that while the top of the mane might have more volume and structured swirls, the lower sections should be softer and more free-flowing. Allow some areas of the mane to hang loosely, while other sections can be fuller with more elaborate swirls and waves. This balance creates a more dynamic and realistic look.
By following these piping techniques, you’ll be able to create a beautiful, flowing unicorn mane that complements the dreamy pastel colors of your cake. With a little practice and patience, you can craft a mane that looks as though it’s straight from a fairytale, giving your unicorn cake an unforgettable, magical touch.
Unicorn Horn and Ears – DIY Edible Horn and Ears Using Fondant
The unicorn horn and ears are the iconic features that truly bring a unicorn cake to life, making it instantly recognizable and enchanting. Crafting these details out of fondant is an easy and fun way to create realistic, edible features that will take your cake’s design to the next level. Here’s a detailed guide to making your own unicorn horn and ears with fondant:
1. Making the Unicorn Horn
The unicorn horn is a key element that adds magic to your cake. Here’s how to create a simple yet stunning horn from fondant:
a. Roll the Fondant
Start by kneading white fondant until it becomes soft and pliable. If you’d like to give the horn a subtle shimmer or color, you can mix in a small amount of edible gold or silver dust. Then, roll the fondant into a long, thick cone shape, ensuring one end is pointed while the other end is wide enough to attach to the cake. The length can vary depending on the size of your cake, but around 4–6 inches is typically ideal.
b. Twist to Create the Spiral Effect
To achieve the spiral texture that is characteristic of unicorn horns, gently twist the fondant as you roll it into a cone. Starting from the wide base, twist the fondant upwards toward the pointed tip, making sure that the twists are even and not too tight. The result will be a beautifully swirled, textured unicorn horn.
c. Drying the Horn
Once the horn shape is complete, allow it to dry for several hours or overnight, depending on how firm you want the horn to be. To help it stand upright on the cake, insert a lollipop stick or dowel into the base of the horn while it’s drying. This will give it extra stability and ensure that it stays secure when placed on top of the cake.
d. Add Final Touches
After the horn has dried, you can use edible glitter or gold paint to add extra sparkle and shine, making it look even more magical. Some decorators also like to add a ribbon of fondant or a light dusting of shimmer powder around the base of the horn for a refined look.
2. Making the Unicorn Ears
The ears add a soft, cute touch to your unicorn cake, giving it a more playful and whimsical appearance. Here’s how to make them:
a. Shape the Ears with Fondant
Roll out some white fondant into small oval shapes that will form the base of the ears. Flatten them slightly with your fingers to create a natural, soft ear shape. To add dimension and make the ears look more realistic, gently pinch the tops of the oval shapes to create a subtle point at the top of each ear. This gives the ears the slightly rounded, perky appearance seen in most unicorn designs.
b. Add the Inner Ear Details
To create the inner part of the ear, roll out a small amount of pink or peach fondant (or any color that complements your cake’s theme) and cut out smaller ovals. Attach the smaller ovals to the center of the larger white ears using a tiny dab of water or edible glue to secure them. This contrast in color will make the ears appear more lifelike and detailed.
c. Shape and Dry the Ears
Allow the ears to dry slightly so that they can hold their shape. If you want them to stand out from the cake, you can gently curve the base of each ear or use a small piece of crumpled tissue paper underneath to hold them in place while they dry. Let the ears dry completely before attaching them to the cake.
d. Attach the Ears to the Cake
Once your unicorn ears are dried and ready, gently press them onto the cake around the base of the unicorn horn. For extra stability, you can insert toothpicks or small skewers into the back of the ears (making sure they don’t poke through the fondant) and then push them into the cake. This will keep them securely in place.
3. Finishing Touches for the Horn and Ears
After shaping and attaching the horn and ears, you can add extra decorative elements to enhance their appearance:
- Edible Glitter or Dust: To make the horn shimmer like it’s made of magical stardust, lightly dust it with edible glitter or gold dust. A soft brush works best to apply a thin, even layer of shimmer.
- Flowers or Leaves: For a more delicate touch, consider adding small fondant flowers or leaves around the base of the horn and ears. Use tiny cutters or molds to shape little flowers, or roll out fondant thinly and cut it into petal shapes for a whimsical look.
- Sparkles: If you want to elevate the overall magical aesthetic, you can use edible sparkle sprays on the entire horn and ears for a fairy-tale, glistening effect.
4. Tips for Success
- Keep the Fondant Fresh: When working with fondant, make sure to keep it covered with a damp cloth or plastic wrap to prevent it from drying out while you work.
- Use Edible Glue or Water: When attaching pieces of fondant together, always use a small amount of water or edible glue. This helps the fondant adhere better and gives a more seamless finish.
- Practice Makes Perfect: If you’re new to working with fondant, it may take a couple of tries to perfect the shape of the horn and ears. Don’t be afraid to experiment and have fun with it!
By creating your own fondant unicorn horn and ears, you can customize them to suit your cake’s color scheme and add a personal touch. These edible decorations not only enhance the visual appeal of your cake but also bring the magical unicorn theme to life. With a little creativity and patience, you’ll have a cake that’s as enchanting as the unicorn it represents!
2. Fondant Unicorn Cake Designs for a Smooth Finish
Using Fondant for a Sleek Look – Tips for Rolling and Covering a Cake Smoothly
Fondant is a popular choice for covering cakes because of its smooth, polished finish and its versatility in creating intricate designs. When applied correctly, fondant can give your cake a sleek, professional look, making it perfect for a unicorn cake that needs a magical, flawless appearance. Here’s how to achieve that smooth, fondant-covered look for your unicorn cake with some expert tips:
1. Choosing the Right Fondant
The first step to achieving a sleek fondant finish is choosing the right type of fondant. There are various brands available, with some offering pre-colored fondant that can save time on coloring and others offering fondant that’s more pliable and easier to roll. Look for a fondant that’s soft but still holds its shape well. Some brands also offer marshmallow fondant, which is known for its smoothness and stretchability, ideal for creating a sleek finish on cakes.
If you are making your own fondant at home, ensure the consistency is smooth and not too sticky. The fondant should feel elastic when kneaded and should not crack easily when rolled out.
2. Preparing the Cake
Before applying fondant to your cake, it’s important to prepare the cake itself for a smooth surface:
- Crumb Coat: Start by applying a thin layer of buttercream or ganache over the entire cake. This is called a crumb coat. The purpose of this coat is to trap any crumbs and create a smooth base for the fondant. It helps the fondant adhere better and prevents the cake’s texture from showing through the fondant.
- Smooth the Buttercream: Once you’ve applied the crumb coat, use an offset spatula or a bench scraper to smooth it evenly. Chill the cake for about 30 minutes to set the buttercream before moving on to the fondant. A cold cake is easier to work with and will help prevent the fondant from sagging or becoming too sticky.
3. Rolling Out the Fondant
The key to achieving a smooth fondant finish is rolling the fondant out to the right thickness and ensuring it’s large enough to cover the entire cake. Here’s how to do it:
a. Lightly Dust the Surface
Start by dusting your work surface with a small amount of cornstarch or powdered sugar. This will prevent the fondant from sticking as you roll it out. Avoid using too much, as this can cause the fondant to become too dry or flaky.
b. Roll the Fondant Evenly
Using a rolling pin, begin rolling the fondant out from the center, applying even pressure as you go. Roll the fondant to about 1/8 inch thick (or the thickness of a quarter). Aim to create a circle that’s large enough to cover your cake, allowing for some overlap at the edges.
c. Rotate the Fondant
As you roll out the fondant, rotate it 90 degrees every few rolls to ensure an even thickness and prevent it from sticking. If you notice the fondant beginning to stick, lightly dust your work surface again with cornstarch or powdered sugar.
d. Check the Size
Make sure your fondant is large enough to cover the height and circumference of your cake. A good rule of thumb is to have the fondant extend about 2-3 inches beyond the edge of the cake. This ensures you have enough coverage to work with when you move on to the next step.
4. Covering the Cake with Fondant
Now that your fondant is rolled out, it’s time to cover the cake. This is the crucial step in achieving a smooth, sleek finish.
a. Lift the Fondant onto the Cake
To transfer the rolled fondant to the cake, you can use a rolling pin or your hands. Gently lift the fondant and place it over the cake. If using a rolling pin, roll the fondant loosely around the pin and then unroll it over the cake. Be careful not to stretch or tear the fondant during this process.
b. Smooth the Fondant Down
Start smoothing the fondant gently from the top down, using your hands or a fondant smoother to eliminate air bubbles and wrinkles. Work your way down the sides, using light, even pressure to avoid pressing too hard. If you notice any creases, use the fondant smoother to gently pull the fondant into place.
c. Trim the Excess
Once the fondant is smooth over the cake, use a sharp knife or pizza cutter to trim the excess fondant around the base. Leave about 1-2 inches of excess fondant at the bottom for a neat finish. Once the excess is trimmed, use your fingers or a fondant smoother to gently press the fondant into the base of the cake, creating a clean, polished look.
5. Smooth and Perfect the Finish
After covering the entire cake with fondant, take your time to smooth out any imperfections. A fondant smoother is essential for this step, as it helps create that sleek, flawless finish. Gently smooth the sides and top of the cake to eliminate any remaining bumps or imperfections.
a. Use a Cake Scraper
If needed, use a bench scraper or cake scraper around the sides to ensure the fondant is evenly distributed and to remove any excess fondant near the base.
b. Tidy the Edges
For a polished edge, use a small, sharp knife to carefully trim any extra fondant at the base. Then, use the back of a spoon or a fondant tool to gently round out the base and make it look more refined.
6. Additional Fondant Techniques for a Sleek Look
If you want to take your sleek fondant-covered cake to the next level, consider the following tips:
- Adding a Glossy Finish: If you want a glossy, more professional look, you can apply a light layer of clear piping gel or a sugar syrup over the fondant to create a smooth, shiny surface.
- Stenciling or Airbrushing: For extra flair, you can use a stencil and edible airbrush colors to add intricate designs to the fondant. This technique gives your cake a polished and artistic appearance, perfect for a unicorn cake.
- Texture Effects: For added dimension, lightly press a textured mat or rolling pin with patterns (like a lace design or subtle pattern) onto the fondant before covering the cake. This can create a sleek yet textured finish that adds depth to your cake’s design.
By following these tips for rolling, covering, and smoothing fondant, you’ll be able to achieve a professional, sleek look for your unicorn cake. A well-finished fondant-covered cake provides the perfect base for your creative decorations, including pastel swirls, a unicorn horn, and other whimsical details. With a little patience and attention to detail, your cake will have a flawless, magical appearance that everyone will adore.
Adding Cute Unicorn Features – Eyes, Ears, and Horn Placement
The eyes, ears, and horn are the essential features that bring your unicorn cake to life and give it personality and charm. By carefully placing these elements, you can transform your cake into an enchanting and magical creation. Here’s how to add those adorable unicorn features to your cake:
1. Placing the Unicorn Eyes – Creating a Whimsical Expression
The eyes are the focal point of your unicorn cake, giving it a friendly and magical expression. Depending on your design, you can make the eyes large and whimsical, which is typical for unicorn cakes, or opt for a softer, more delicate approach.
a. Create the Eyes with Fondant or Edible Markers
You can make the eyes from fondant by rolling small pieces into circles or ovals for the sclera (white part of the eye). Use black fondant or edible markers to create the pupil, and add small white highlights to make the eyes appear more alive. For a more detailed look, you can pipe delicate eyelashes using royal icing or a fine piping tip, giving your unicorn a cute and playful expression.
If you prefer a quicker method, edible sugar eyes or pre-made fondant eyes can be purchased and simply placed on the cake.
b. Placement of the Eyes
The eyes should be placed on the face of the cake, just below the top, in a symmetrical and slightly curved position. A common approach is to have the eyes spaced about 1-2 inches apart, giving the unicorn a serene, wide-eyed look. You can position the eyes either straight ahead or tilt them slightly for a more whimsical, innocent expression.
c. Adding Lashes and Details
To enhance the cuteness, add some long lashes at the outer corners of the eyes, extending them slightly upward to give the unicorn a more exaggerated, adorable appearance. The eyelashes can be piped using black royal icing or fondant. You can also add a small, delicate eyebrow above the eye using fondant or royal icing to give it more character.
2. Placing the Unicorn Ears – Positioning for a Realistic and Cute Look
The ears are the next essential feature, contributing to the unicorn’s overall charm. They should look delicate and natural, giving the unicorn cake an innocent and magical touch.
a. Shape the Ears
As mentioned in the earlier section, you can make unicorn ears from fondant. Start with an oval or teardrop-shaped piece of white fondant, then pinch the top to create the pointed part of the ear. For the inner ear, you can use a different color, such as pink, lavender, or peach, to create a contrasting inner ear detail. Attach the inner ear to the outer ear using a small amount of water or edible glue.
b. Placement of the Ears
Position the ears carefully on the cake so that they look symmetrical. Traditionally, the ears are placed on either side of the horn, just slightly above and behind the eyes, creating the illusion that the unicorn is “listening” or looking out from between the ears. The exact placement can vary depending on the design, but they should align with the natural flow of the unicorn’s head.
c. Adding Ear Details
You can use an embossing tool or a small fondant tool to create texture on the inside of the ear to make it look more natural. Lightly pressing a pattern on the inner ear with an embossing mat can mimic the texture of an actual unicorn’s ear, adding depth and realism to your design.
3. Placing the Unicorn Horn – Positioning for Balance and Elegance
The horn is arguably the most magical feature of the unicorn cake, and it deserves a prominent, balanced placement on top of the cake. The horn should be positioned so that it complements the overall flow of the cake’s design and doesn’t overwhelm other elements, like the eyes and ears.
a. Creating the Horn
As mentioned earlier, the unicorn horn can be made from fondant by rolling a long, cone-shaped piece of white or gold-colored fondant and twisting it to create the characteristic spiral effect. You can also use edible gold dust or paint to give the horn a magical shimmer, making it stand out more.
b. Placement of the Horn
Place the horn directly in the center at the top of the cake. It should stand tall and slightly angled, pointing upwards, with the base of the horn tucked securely into the top of the cake. The horn should rest comfortably between the unicorn’s ears, making sure that it doesn’t block the eyes or other decorations. A typical rule of thumb is that the horn should be about 3 to 5 inches tall for a small cake and proportionally taller for larger cakes.
c. Stability and Support for the Horn
Since the horn is a prominent feature, it needs to be stable. To ensure it stays in place, you can insert a lollipop stick, dowel, or a skewer into the base of the horn. This stick can be placed deep into the cake to provide support. If your cake is large or the horn is particularly tall, a sturdy base helps prevent the horn from toppling over.
4. Final Touches for the Unicorn Features
Once the eyes, ears, and horn are placed on the cake, you can add finishing touches to complete the whimsical and magical look.
a. Edible Glitter or Shimmer
Lightly dust the eyes, ears, and horn with edible glitter or a shimmering spray to give your unicorn cake a magical, sparkling effect. This adds dimension and makes the unicorn features glisten, making it look as if it’s straight out of a fairy tale.
b. Flowers or Accessories
To add even more charm, you can embellish the base of the horn and ears with small fondant flowers, butterfly shapes, or sparkling gems. Buttercream flowers or fondant roses around the base of the ears or horn give your cake a whimsical, nature-inspired feel. These decorative accents enhance the overall design and can make your cake feel even more enchanting.
c. Soft Fondant Touches
You can also apply soft touches of fondant around the eyes or ears to mimic the look of blush on the unicorn’s face. A small touch of pink fondant can be applied delicately to the cheeks for a sweet, adorable look.
Tips for Success
- Use edible glue or a small amount of water to attach the eyes, ears, and horn to the cake for a strong, secure hold.
- Take your time with placement: Make sure the horn, ears, and eyes are evenly spaced, balanced, and proportionate to the size of the cake. The right placement ensures the unicorn looks symmetrical and magical.
- Work in layers: For a cohesive look, add the horn first, then the ears, and finally the eyes. This step-by-step approach ensures that the features don’t get in the way of each other and can be adjusted for the perfect placement.
By carefully adding these cute and essential features to your cake, you can give your unicorn a whimsical, endearing personality. The eyes, ears, and horn work together to create the magical, dream-like appearance of a unicorn, making your cake both charming and enchanting for any occasion.
Using Edible Glitter and Sprinkles – Enhancing the Cake’s Magical Appearance
One of the easiest and most effective ways to elevate your unicorn cake’s whimsical and magical appeal is by adding edible glitter and sprinkles. These sparkling decorations catch the light, giving your cake a dazzling, otherworldly finish that truly brings the fantasy theme to life. Whether you want a subtle shimmer or a full-on sparkle, edible glitter and sprinkles are versatile enough to suit any unicorn design. Here’s how to use them to create a magical unicorn cake that shines with enchantment.
1. Choosing the Right Edible Glitter
The first step to using edible glitter is selecting the right type. Edible glitter comes in various forms, including dust, flakes, and fine powders. These glitters are safe to eat and are specially made for use on cakes and other edible treats.
a. Types of Edible Glitter
- Fine Glitter: This type of glitter creates a smooth, sparkling effect when dusted on your cake. It’s perfect for giving the whole cake a delicate, magical shimmer without being too overwhelming. Fine glitter works well on both fondant and buttercream.
- Chunky Glitter: If you’re looking for a more dramatic sparkle, chunky edible glitter or glitter flakes are a great choice. These larger glitter pieces can be applied to specific areas of the cake, like the unicorn’s mane, ears, or horn, to create a more pronounced effect.
- Holographic Glitter: This type of glitter shifts colors in different lighting, creating a mesmerizing, multi-dimensional shine. It’s perfect for adding a dreamy, rainbow-like effect to your unicorn cake.
- Luster Dust: Similar to edible glitter, luster dust has a soft, reflective finish that gives a satin-like sheen. It’s often used for painting or dusting over fondant designs for a soft glow. Luster dust is available in a variety of colors, including gold, silver, pink, and purple, making it an excellent option for a unicorn cake.
b. Color Selection
For a unicorn cake, you’ll want to stick with pastel shades like soft pink, lavender, baby blue, or pale yellow for a dreamy effect. These colors complement the cake’s overall soft, whimsical vibe. However, don’t be afraid to experiment with bolder hues like silver, gold, or holographic glitters to add extra charm, especially on the unicorn’s horn or mane.
2. Where to Apply Edible Glitter
Now that you’ve chosen your glitter, the next step is figuring out where to place it on your unicorn cake. The placement of glitter can greatly enhance the magical and ethereal quality of your cake, making it feel like it’s straight from a fairytale.
a. Glitter on the Unicorn Horn
The unicorn horn is often the focal point of the cake, and applying edible glitter to it can create an eye-catching effect. You can either dust the entire horn with glitter or apply it to just the spiral part of the horn for a shimmering, enchanted look. Gold edible glitter or silver glitter works especially well for the horn, giving it a mystical glow.
b. Glitter on the Unicorn Mane
The unicorn’s mane is another perfect place for glitter. If your cake features a multicolored mane made from buttercream or fondant, gently dusting edible glitter over the top of the colors adds a magical dimension. Use a light hand to avoid over-saturating the colors. You can choose to apply glitter to the entire mane or just focus on specific strands, creating a gradient shimmer effect.
c. Around the Eyes or Ears
Apply a small amount of fine edible glitter around the unicorn’s eyes or the base of the ears to enhance the facial features and add depth. This subtle use of glitter creates a magical glow around the unicorn’s face without overwhelming the design. Pearl or white edible glitter can create a soft, luminous effect on these delicate features.
d. Covering the Entire Cake
For an overall enchanted effect, you can dust the entire cake with a fine layer of edible glitter. This method works especially well if your unicorn cake is covered with a smooth layer of fondant. Lightly sprinkle or dust the top and sides of the cake, focusing more on areas you want to stand out, such as the horn and mane. Holographic glitter or iridescent glitter can be sprinkled around the entire cake to give it a dreamlike, ethereal glow.
3. Using Sprinkles for Extra Fun and Texture
Sprinkles are another fun and easy way to add texture and dimension to your unicorn cake. While edible glitter provides a smooth shimmer, sprinkles add color, shape, and volume, giving your cake a playful, festive touch. When used thoughtfully, sprinkles can complement the unicorn theme beautifully.
a. Types of Sprinkles for Unicorn Cakes
There are several types of sprinkles you can use, including:
- Star-shaped Sprinkles: Perfect for adding a celestial touch, star-shaped sprinkles can be scattered around the unicorn’s horn or across the entire cake.
- Rainbow Sprinkles: These vibrant sprinkles are a staple in unicorn cake designs. Their multicolored, playful nature makes them ideal for creating the illusion of a magical, colorful world.
- Sugar Crystals: Larger, sparkling sugar crystals are perfect for adding a touch of frosted magic to your cake. These sprinkles can be applied around the edges of the cake or even on the unicorn’s mane to mimic the look of frosted magic dust.
b. Sprinkles for the Cake Top and Bottom
You can sprinkle small amounts of colorful nonpareils, confetti sprinkles, or jimmies around the base of the cake for a joyful, festive look. These add pops of color and texture to the lower portion of the cake, enhancing the overall playful vibe of your unicorn design. Place the sprinkles in clusters for a more uniform design, or scatter them randomly for a more whimsical appearance.
c. Creating a Sprinkle Border
A popular technique is creating a sprinkle border around the base of the cake. After covering the cake with fondant or buttercream, simply roll the cake’s edges in small round sprinkles for a fun, vibrant border that looks like a cascade of sparkling magic. This technique is a great way to introduce color and texture into your design while keeping the focus on the unicorn features.
4. How to Apply Glitter and Sprinkles
To ensure that your glitter and sprinkles are applied evenly and in the right amounts, follow these tips:
a. Use a Fine Mesh Sifter
For edible glitter dust, use a fine mesh sifter or a small brush to lightly dust the glitter over the desired areas. This helps you control the amount of glitter being applied and prevents uneven patches or over-saturation. For larger areas, such as the entire cake or unicorn horn, you can use a sprinkle shaker to evenly distribute the glitter.
b. Apply Sprinkles Gently
When adding sprinkles, gently press them into the buttercream or fondant to ensure they stay in place. For fondant-covered cakes, lightly spray the surface with water or edible glue to create a sticky surface for the sprinkles to adhere to. If you’re working with buttercream, the sprinkles will stick more easily, but be sure to avoid over-crowding the design.
c. Make Sure the Cake is Dry
Before applying any glitter or sprinkles, make sure the surface of the cake is either dry (for fondant) or has a slightly sticky texture (for buttercream). This ensures that the decorations adhere well and stay in place.
5. Tips for a Perfect Sparkle Effect
- Less is More: When using edible glitter, it’s best to start with a light hand. You can always add more, but it’s difficult to remove once applied. A little glitter goes a long way in achieving a sparkling effect.
- Play with Light: Glitter and sprinkles shine brightest under the light. Position your cake under natural light or use lighting that highlights the shimmer to create a mesmerizing effect that will wow your guests.
- Match Your Theme: Choose glitter and sprinkles that match the colors of your unicorn cake. For example, if you have a pastel-themed cake, go for soft, pearly glitter and pastel-colored sprinkles. For a more vibrant, rainbow unicorn, you can mix holographic glitter with colorful confetti sprinkles.
Final Thoughts on Using Edible Glitter and Sprinkles
By using edible glitter and sprinkles thoughtfully, you can add that final touch of magic and sparkle to your unicorn cake. These decorations will not only enhance the visual appeal but will make your cake shine with a dreamy, ethereal glow that’s sure to capture everyone’s attention. Whether you’re applying it to the horn, mane, or the entire cake, the sparkle from glitter and sprinkles will give your unicorn cake an enchanting, mystical finish worthy of any celebration.
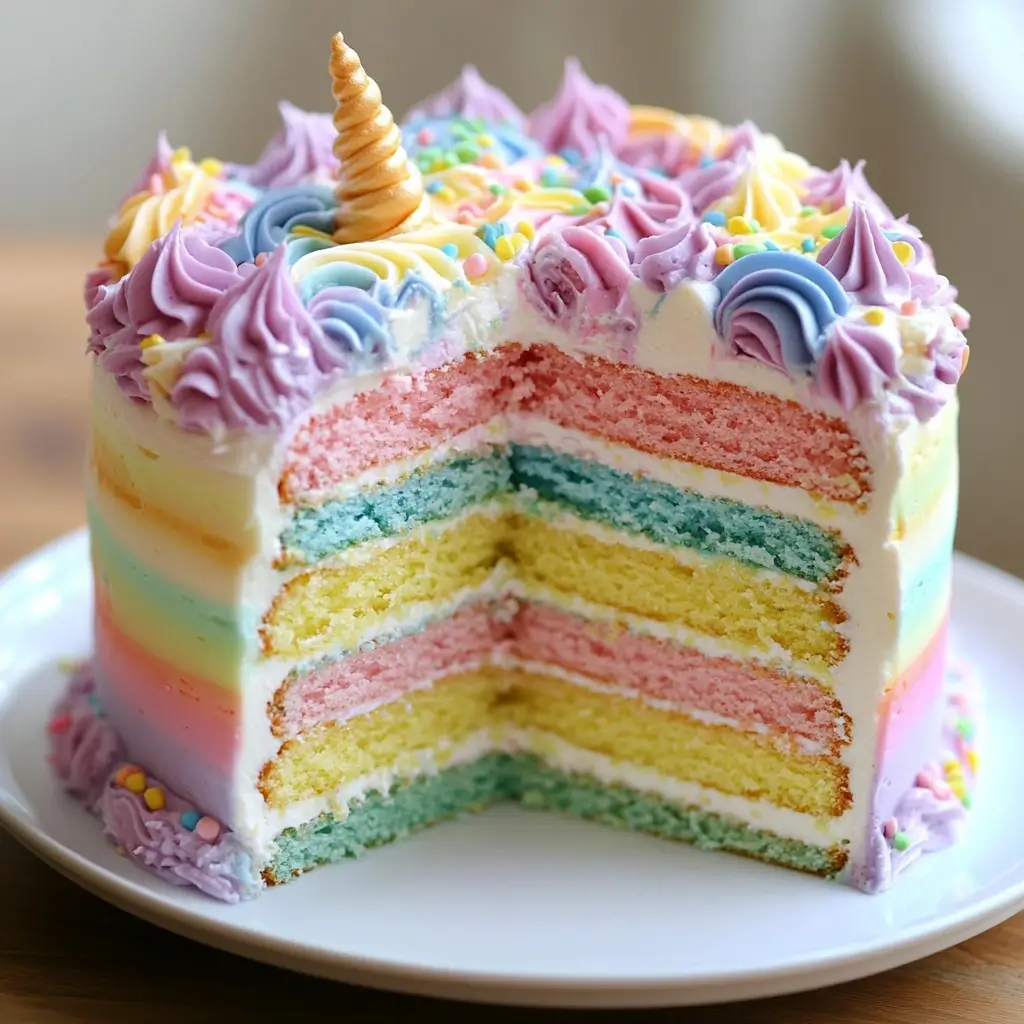
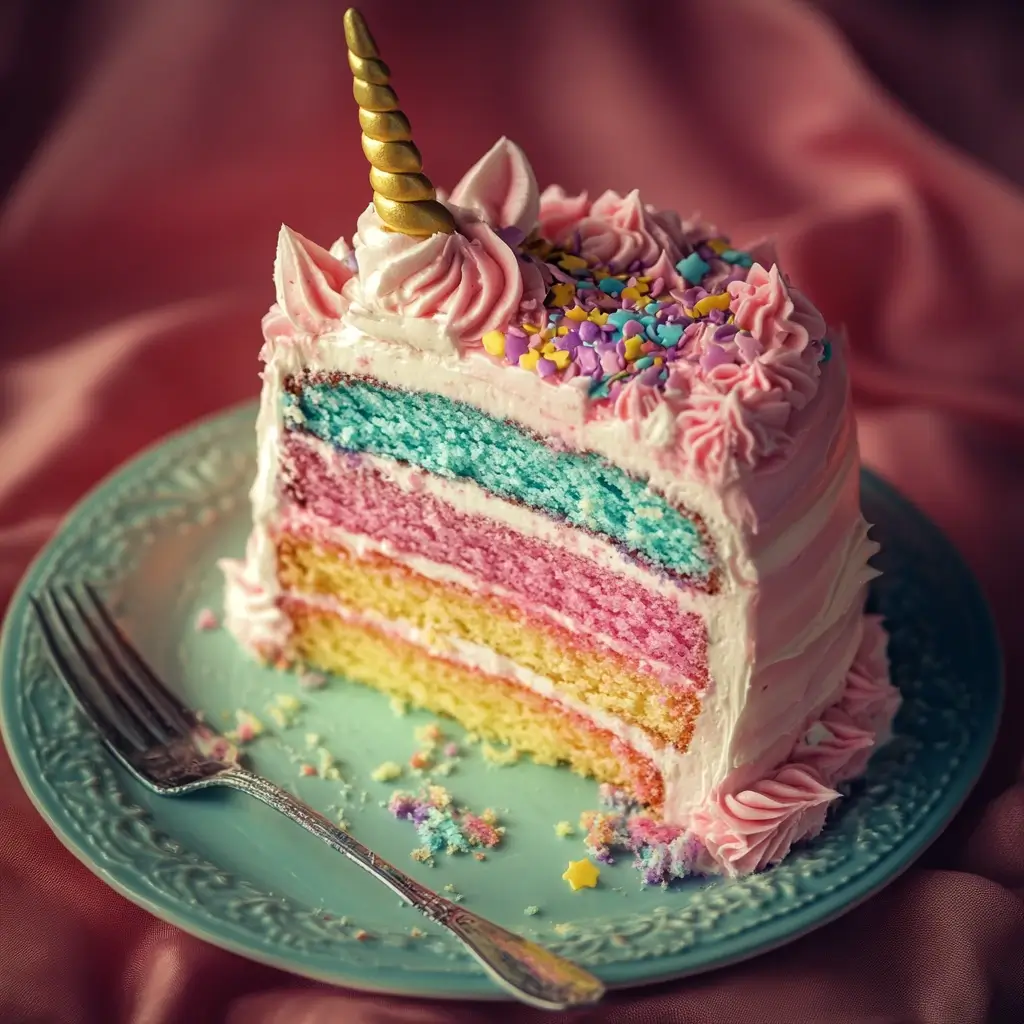
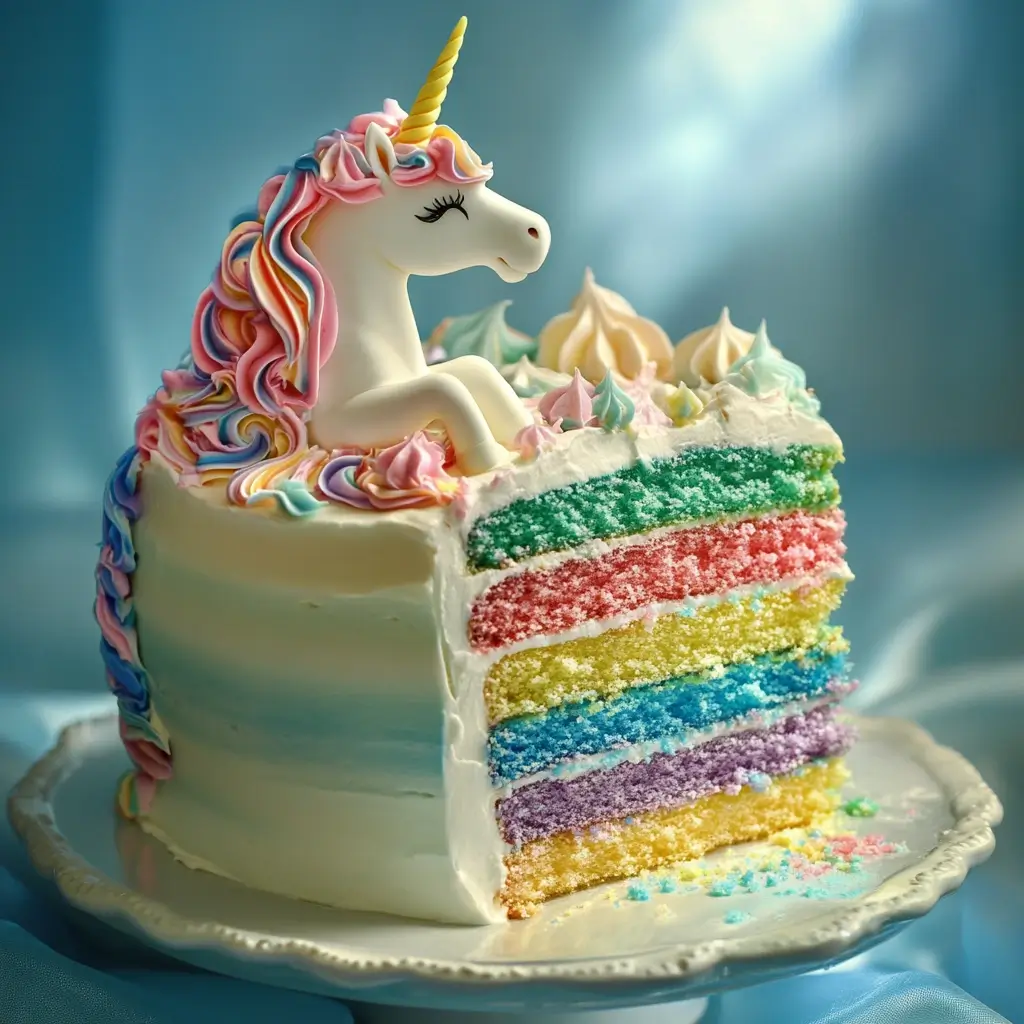
3. Rainbow Layer Unicorn Cake
How to Bake Vibrant Rainbow Layers – Using Food Coloring for a Colorful Surprise Inside
Creating a vibrant rainbow inside your unicorn cake is one of the most exciting and visually striking aspects of this dessert. The rainbow layers hidden within your cake create a delightful surprise when cut, adding an extra layer of magic and fun. Achieving a perfect rainbow cake requires careful planning, precision with food coloring, and some simple baking techniques. Here’s a step-by-step guide to help you bake colorful, vibrant rainbow layers that will captivate anyone who cuts into your cake.
1. Choosing the Right Food Coloring
The key to achieving a vibrant rainbow inside your cake is selecting the right food coloring. The quality of your food coloring will impact how bold and vibrant the layers turn out. For the best results, opt for gel food coloring or liquid concentrate food coloring, as these types of coloring provide intense hues without affecting the cake’s texture.
a. Gel Food Coloring
Gel food coloring is highly concentrated, meaning you need only a small amount to achieve bright colors. It’s perfect for rainbow cakes because it doesn’t thin out the batter and ensures that the color stays bold throughout the baking process. Some popular brands include Wilton, AmeriColor, and Chefmaster.
b. Liquid Food Coloring
Liquid food coloring is also commonly used but requires a bit more to achieve a vibrant effect. It may slightly alter the texture of the batter, so you should take extra care when mixing. If you use liquid food coloring, be sure to check the label for the recommended amount for achieving the desired color intensity.
c. Natural Food Colors
For a more natural approach, there are plant-based food colorings available that use ingredients like beet juice (red), spinach powder (green), and turmeric (yellow). These provide more muted shades but are a great option for those looking for a natural alternative.
2. Preparing the Cake Batter
To make your rainbow layers, you’ll need to prepare a basic cake batter. A vanilla or white cake batter works best, as it allows the colors to shine through without any interference from the batter’s original color. Here’s how to prepare the batter:
a. Make a Batch of White Cake Batter
Start by preparing a vanilla cake or butter cake batter. Use your favorite recipe or a store-bought mix as the base. Ensure that the batter is smooth and well-mixed, with no lumps. The texture should be light and fluffy so that the colors spread evenly when added.
b. Divide the Batter into Separate Bowls
Once the cake batter is ready, divide it into several equal portions. The number of portions depends on how many colors you want for your rainbow. Typically, six colors work well (red, orange, yellow, green, blue, and purple), but you can use as many as you like depending on your design.
c. Consistency of the Batter
Ensure that the batter remains thick enough to hold the color without being too runny. If the batter is too thin, the colors may blend together in the pan instead of staying separated.
3. Coloring the Cake Batter
Now comes the fun part—adding color to each portion of the cake batter! Each portion will be dyed a different color to create the rainbow effect. Here’s how to achieve vivid, saturated layers:
a. Adding the Food Coloring
Start by adding a few drops (or according to the instructions on the packaging) of gel food coloring into each separate portion of the batter. For vibrant colors, you may need to use a little more coloring, especially for pastel shades. Mix the food coloring thoroughly, scraping down the sides of the bowl to ensure even distribution.
b. Achieving the Right Color Intensity
After adding the food coloring, check the consistency and vibrancy of the batter. If the color seems too light, add a bit more food coloring until you reach the desired shade. For example, red might require a couple of extra drops, while yellow often needs less. Always use a clean spoon or spatula for each color to prevent contamination.
c. Mixing the Colors
Be gentle when mixing to avoid overmixing and losing the texture of the batter. Stir the batter until the color is fully incorporated, but don’t overwork it, or you may end up with streaks instead of a solid color.
4. Layering the Batter in the Pan
To achieve the beautiful rainbow layers, you need to layer the colored batter in the pan. Here’s how to ensure that each layer stays distinct and vibrant:
a. Preparing the Cake Pan
Line your cake pans with parchment paper or grease and flour the pans to ensure the cake layers come out easily. Use round cake pans (typically 8 or 9 inches) for a classic unicorn cake shape. You may also use square pans if you prefer a different look.
b. Layering the Batter
Start by spooning one color of batter into the center of the pan. Use about one-third of a cup of batter per color. Don’t spread the batter out; simply drop it in the middle of the pan. As you add more colors, the batter will naturally spread out toward the edges, forming concentric circles of color.
Add the next color of batter on top of the previous one, directly in the center, and repeat until all the colors are layered. The batter should form layers from top to bottom without mixing. The key is to drop each layer gently on top of the last one to maintain the integrity of the colors.
c. Optional: Swirl the Layers
For a more swirled rainbow effect, you can use a skewer or knife to gently swirl the batter from the center outward. Be careful not to swirl too much, or you’ll end up blending the colors instead of keeping them distinct. A light swirl will create a marbled effect within each layer.
5. Baking the Rainbow Cake
Once the layers are assembled, it’s time to bake the cake! Follow your recipe’s baking instructions. But be aware that rainbow cakes often require slightly longer baking times than a single-layer cake.
a. Check for Doneness
As the cake bakes. Check for doneness by inserting a toothpick or cake tester into the center of the cake. If it comes out clean (with no wet batter), the cake is done. Since your cake has multiple layers, it might need an extra few minutes, so be patient.
b. Avoid Overbaking
Keep a close eye on the cake to prevent overbaking. Overbaking can dry out the cake and cause the colors to lose their vibrancy. The edges should be golden brown, but the center should be soft and moist.
6. Cooling and Assembling the Cake
After the cake is baked, it’s important to let it cool completely before assembling and frosting. This helps prevent the layers from falling apart and ensures that the colors don’t smudge when you cut the cake.
a. Cooling the Layers
Let the cake layers cool in the pan for about 10 minutes, then carefully remove them and transfer them to a cooling rack. Allow them to cool completely before frosting. If you’re in a hurry, you can refrigerate the layers for about 20-30 minutes to speed up the process.
b. Trimming the Layers
Once cooled, you can trim the tops of the cake layers with a serrated knife to make them flat and even. This will help the cake layers stack properly and create a smooth surface for frosting.
7. Assembling and Frosting the Rainbow Cake
Now that the rainbow layers are baked and cooled, you can assemble your unicorn cake with frosting and other decorations.
a. Frosting Between Layers
Use a thick layer of buttercream or cream cheese frosting between each rainbow layer. Choose a white, pastel, or even colored frosting to complement the vibrant rainbow layers inside.
b. Finishing Touches
Once the layers are stacked and frosted, finish decorating the cake by adding a smooth layer of frosting on the outside. You can add unicorn-themed decorations such as edible glitter, sprinkles, or fondant features (like the horn and ears) to complete the magical effect.
8. Cutting into the Cake – The Big Reveal
When the time comes to cut into the cake, be ready for the exciting reveal. As you slice into the layers, the bright rainbow colors will be revealed, creating a stunning surprise for your guests. This vibrant burst of colors will make your unicorn cake even more magical and will surely impress everyone at your celebration.
Tips for Success:
- Even layers: To get consistent, evenly layered rainbow colors, try to pour the same amount of batter for each color.
- Prevent color bleeding: Make sure to drop each color in the center without spreading it out to prevent colors from mixing during baking.
- Experiment with hues: You can create custom hues by mixing different food colorings, like mixing red with orange for a peachy hue or blending purple with blue for a more violet tone.
By following these steps, you’ll have a stunning rainbow cake that’s not only visually beautiful but also packed with a delightful surprise inside!
Assembling the Cake for a Neat Finish – Stacking and Crumb-Coating Techniques
Once your unicorn cake layers are baked, cooled, and ready, it’s time for the exciting part: assembling your cake! A neat, professional finish depends on how well you stack and crumb-coat your cake layers. These techniques will help you achieve smooth, clean edges and a polished appearance, ensuring that your unicorn cake looks as perfect on the outside as it does on the inside. Let’s break down the process for stacking and crumb-coating your cake, along with tips for getting that flawless final look.
1. Preparing Your Tools and Workspace
Before you begin assembling your cake, it’s important to have all your tools in place and your workspace organized. A clean and well-prepared space will make the process go much smoother and allow you to focus on getting a beautiful result.
a. Tools You’ll Need:
- Cake boards: These provide a sturdy base for each layer and help stabilize the cake as you stack it.
- Offset spatula or bench scraper: These tools are essential for smoothing the frosting and creating clean, crisp edges.
- Turntable: A rotating cake stand is helpful for easily maneuvering the cake while frosting, allowing for an even finish.
- Piping bags and tips: For precision decorating and adding intricate designs.
- Cake dowels or skewers (if making a multi-tiered cake): These help provide structure to prevent the layers from shifting.
b. Prepare the Work Area:
- Clean your countertop or cake-decorating area.
- Line your cake board with a bit of buttercream to help the cake stick.
- If you’re working with multiple layers, make sure you have enough space to stack them securely.
2. Leveling and Trimming the Cake Layers
Before stacking your cake, ensure each layer is level and flat. If your cake layers have domed slightly during baking (which is common), you’ll need to trim them to create an even surface for stacking.
a. Leveling the Layers:
- Use a serrated knife to gently trim the tops of your cake layers. Hold the knife horizontally and carefully cut off any domed portions to create a flat surface.
- If you prefer, you can use a cake leveler for a more uniform cut, especially if you’re working with taller layers.
b. Trimming the Edges (Optional): If your cake layers have uneven edges or crumbs on the side, use a serrated knife to gently trim around the edges to create clean, straight sides. This can help with achieving a neater finish and ensure your frosting goes on evenly.
3. Crumb-Coating the Cake
The crumb coat is the thin layer of frosting applied to seal in any crumbs and create a smooth surface for the final layers of frosting. This step is essential for achieving a polished, professional look and helps prevent crumbs from mixing into your frosting.
a. Applying the Crumb Coat:
- Start by applying a thin layer of buttercream (or your choice of frosting) to the top and sides of your first cake layer. Use an offset spatula to spread the frosting evenly, making sure it covers the entire surface.
- Be gentle during this process so you don’t disturb the cake layers too much. The goal is to seal in the crumbs without building up too much frosting.
- Smooth the frosting gently over the top and around the sides. Use a bench scraper to scrape off any excess frosting and create a clean, smooth surface. The crumb coat should be thin and even.
b. Refrigerating the Cake: Once the crumb coat is applied, place the cake in the refrigerator to chill for about 30 minutes. Chilling the crumb coat helps to firm up the frosting and locks in any loose crumbs, making it easier to apply the next layer of frosting without disruption.
4. Stacking the Cake Layers
Now that your crumb coat is set, it’s time to stack the cake layers to form the final structure of your unicorn cake. The stacking process is critical to ensure that your layers are straight, stable, and visually appealing.
a. Stacking the First Layer:
- Begin by placing the first layer of your cake onto the cake board or turntable. Make sure it’s centered and level.
- Use a piping bag filled with frosting to pipe a small dam of frosting along the edge of the layer. This helps keep the filling from spilling out once the next layer is placed on top.
- If you’re working with a multi-layer cake, consider placing cake dowels or skewers through the bottom layer before stacking additional layers. This adds stability and prevents the layers from sliding out of place.
b. Adding Frosting Between Layers:
- Spread a generous layer of frosting over the first cake layer, filling the spaces around the dam with frosting to keep the layers stable. Use an offset spatula to spread the frosting evenly.
- Repeat this process for the next layers, making sure each layer is aligned and level with the previous one. Be careful not to press down too hard when adding layers to avoid crushing the cake.
c. Assembling Multiple Tiers: If you’re making a multi-tiered unicorn cake, it’s important to properly support each layer with dowels. Insert cake dowels through the bottom cake layer, cutting them to the height of the layer. Then, carefully place the next tier on top, ensuring the layers are aligned before adding the next set of frosting.
5. Applying the Final Coat of Frosting
Once your cake layers are stacked and stable, the next step is to apply the final, smooth coat of frosting that will give your unicorn cake a polished, professional look. This is the layer that will really showcase your unicorn design and help create a smooth canvas for any additional decorations.
a. Applying the Final Coat:
- Use an offset spatula to apply a thicker layer of frosting to the entire cake. Start at the top and spread the frosting evenly over the surface, working your way down the sides.
- When spreading the frosting, use long, smooth strokes to ensure a uniform coating. The goal is to create a perfectly smooth layer of frosting that covers the entire cake evenly.
b. Smoothing the Frosting:
- Once the frosting is applied, use a bench scraper to smooth the sides of the cake. Hold the scraper vertically against the side of the cake and rotate the turntable to create an even, smooth surface.
- For a sleek finish, run the bench scraper or offset spatula around the sides to remove any excess frosting and create sharp edges.
- For the top, you can create a smooth, flat surface or add some texture, depending on the look you’re going for.
6. Final Touches for a Neat Finish
Once your cake is stacked and frosted, it’s time for the final touches to enhance the overall appearance.
a. Use Piping to Enhance the Design: You can use piping bags filled with colored buttercream to create delicate borders, rosettes, or other decorations. Piping helps add dimension and texture to your cake, especially around the base or top. If you’re creating a unicorn cake, this is a great time to add extra details like mane decorations, horn designs, or other fantasy features.
b. Adding Edible Glitter, Sprinkles, or Other Decorations: To make your unicorn cake shine, add edible glitter, sprinkles, or fondant decorations like the unicorn horn and ears. These decorative elements will bring your cake to life and complete the magical look.
c. Final Refrigeration: After decorating, refrigerate your cake for 10–15 minutes before serving to ensure everything sets properly and the cake holds its shape. This also helps to solidify the frosting and keep it in place during the cutting process.
Tips for a Clean and Neat Finish:
- Work in a cool environment: If your buttercream is too soft, it will be harder to smooth out. Keep your workspace cool, and if the frosting starts to soften, chill the cake briefly before smoothing.
- Use a spinning turntable: A turntable makes it easier to apply frosting evenly and achieve smooth edges.
- Don’t rush: Take your time when assembling the layers and frosting the cake. A neat finish requires patience and attention to detail.
By following these stacking and crumb-coating techniques, you’ll be able to assemble your unicorn cake with a flawless, neat finish. These steps not only help achieve a smooth and stable structure but also lay the foundation for all the fun and whimsical decorations that will make your unicorn cake truly magical!
Best Frosting Options for a Rainbow Cake – Buttercream vs. Whipped Cream
When it comes to frosting a rainbow cake, the frosting choice can make a big difference not only in the visual appearance of your cake but also in the flavor and texture. Two of the most popular options are buttercream frosting and whipped cream frosting. Each has its own set of advantages, and the right one for your cake will depend on your preferences, the type of cake you’re making, and the final look you want to achieve. Here’s a breakdown of each frosting type to help you decide which one is best for your unicorn rainbow cake.
1. Buttercream Frosting – Rich, Smooth, and Versatile
Buttercream is a classic frosting choice for cakes, especially for designs like a rainbow or unicorn cake. It’s rich, flavorful, and holds up well under various decorating techniques. Here’s a closer look at why buttercream is such a popular choice:
a. Flavor and Texture
Buttercream has a rich, buttery flavor that pairs wonderfully with sweet, light cakes like vanilla, chocolate, or rainbow sponge cake. It has a smooth, creamy texture that can be easily spread and piped, making it ideal for creating clean lines, borders, and other intricate designs. The texture is firm enough to support decorations like unicorn horns, ears, and other fondant accents, giving your cake structure and stability.
- Swiss Meringue Buttercream (SMBC): If you want a smoother, less sweet option, consider Swiss meringue buttercream. It’s made with egg whites, sugar, and butter, creating a silky-smooth texture that’s slightly less sweet than traditional buttercream. SMBC is great for cakes that require a polished finish, as it’s easy to smooth out and holds its shape well.
- American Buttercream: This is the most common type of buttercream and is typically made with butter, powdered sugar, milk, and vanilla extract. It’s sweeter than SMBC and can be a bit denser. It’s perfect for frosting and decorating rainbow cakes because it can hold vibrant colors without losing its structure.
b. Holding Colors Well
One of the most significant advantages of buttercream is its ability to hold vibrant colors, which is perfect when making a rainbow cake. Buttercream can be easily tinted with gel food coloring, allowing you to create those brilliant rainbow layers. It’s also easy to pipe using various tips, making it the go-to frosting for creating delicate flowers, rosettes, and intricate patterns that are often part of unicorn cakes.
- Gel Food Coloring: When coloring buttercream, gel food coloring works best as it provides rich, saturated hues without altering the frosting’s texture. Start by adding a small amount and gradually increase until you reach the desired intensity.
c. Durability
Buttercream is known for its stability. If you’re planning to make a large or multi-layer cake, buttercream will ensure that your cake stays intact and doesn’t slide apart. It’s also ideal for transporting the cake since it holds up well even at room temperature.
d. Pros of Buttercream for Rainbow Cakes:
- Smooth and creamy texture that’s easy to spread and pipe.
- Rich, buttery flavor that pairs well with most cake types.
- Holds vibrant colors and designs well.
- Perfect for intricate piping and creating a polished look.
- Sturdy enough for multi-layer or multi-tiered cakes.
2. Whipped Cream Frosting – Light, Airy, and Less Sweet
Whipped cream frosting is a lighter, fluffier alternative to buttercream, and it offers a completely different texture and flavor profile. It’s perfect if you’re looking for a lighter and less sweet option for frosting your rainbow cake. Here’s what makes whipped cream frosting a great choice for some bakers:
a. Flavor and Texture
Whipped cream frosting has a light, airy texture and a mildly sweet flavor. It’s made by whipping heavy cream with sugar and sometimes a bit of vanilla extract or stabilizer to help it hold its shape. This frosting is much lighter than buttercream and gives the cake a soft, almost cloud-like finish.
- Stabilized Whipped Cream: Since regular whipped cream can deflate quickly at room temperature, many bakers prefer to use stabilized whipped cream, which incorporates gelatin or cornstarch to help the whipped cream hold its shape longer. This option is especially beneficial for cakes that need to be kept at room temperature for longer periods or during warm weather.
b. Flavor Profile
Unlike the rich, buttery taste of buttercream, whipped cream frosting has a milder, less sweet flavor, which makes it a great choice if you prefer a more delicate, less sugary taste. This can be ideal if the cake itself is very sweet, as the frosting will balance out the overall flavor profile.
- If you’re looking for something light and not overwhelmingly sweet, whipped cream might be the better choice, especially when paired with fruit-flavored cakes or lighter sponges.
c. Easy to Spread and Pipe, but Less Stable
Whipped cream frosting is easy to spread and pipe, but it’s less stable than buttercream, especially at room temperature. It doesn’t hold up as well in the same way buttercream does, so it’s important to be careful when using whipped cream for intricate designs or stacked cakes.
- Whipped Cream Piping: While whipped cream can be piped into soft rosettes or used for filling and covering the cake, it’s generally best for simpler designs, as more complex piping may not hold up as well without the frosting melting or deflating.
d. Pros of Whipped Cream for Rainbow Cakes:
- Lighter, less sweet flavor that can balance out sweeter cake layers.
- Airy, fluffy texture that gives a soft, cloud-like appearance.
- Easier to work with for simple piping and spreading.
- Great for cakes that need a more delicate or subtle finish.
3. Which Is Best for Your Rainbow Cake?
Choosing between buttercream and whipped cream frosting depends on the look, texture, and flavor profile you’re aiming for with your rainbow cake.
Buttercream is ideal if:
- You want a rich, buttery flavor to complement the sweet layers of cake.
- You need the frosting to hold up well for piping and intricate designs (like unicorn horns, ears, or flowers).
- You need a sturdy, stable frosting for multi-layered or multi-tiered cakes, especially if the cake will be transported or stored for long periods.
- You want a frosting that holds vibrant colors for your rainbow layers.
Whipped cream is ideal if:
- You’re looking for a lighter, less sweet frosting that lets the cake shine.
- You prefer a softer, airier texture that contrasts with a dense or moist cake.
- You’re making a cake with a lighter flavor profile, such as fruit-flavored cakes or angel food cake.
- You don’t mind a simpler design and are okay with less stability when it comes to detailed decorations.
4. Combining Both Frostings
Another option is to use both frostings in your rainbow cake! You can use buttercream for the base and intricate details while incorporating whipped cream for lighter layers or as a filling between the layers. This gives you the best of both worlds: the stability and color-holding power of buttercream, along with the lightness and airiness of whipped cream.
Tips for Both Frostings:
- Chill your frosting: For buttercream, refrigerate it if it becomes too soft, and for whipped cream, use it immediately after whipping to avoid deflation.
- Make sure the cake is cooled: Both buttercream and whipped cream are best applied to a completely cooled cake to prevent melting or sliding.
- Add stabilizers: If using whipped cream, adding a stabilizer like gelatin or cornstarch can help keep the frosting in place for longer periods.
By carefully considering the attributes of both buttercream and whipped cream, you can choose the perfect frosting for your rainbow cake and create a visually stunning and delicious dessert for your unicorn-themed celebration!
Best Frosting Options for a Rainbow Cake – Buttercream vs. Whipped Cream
When it comes to decorating a rainbow cake, the frosting you choose plays a crucial role in not only the appearance of the cake but also its flavor and texture. Both buttercream and whipped cream frosting are popular choices, each offering unique advantages and characteristics. The decision of which to use depends on your preferences for taste, texture, stability, and the type of effect you want to achieve on your unicorn-themed rainbow cake. Here’s a more detailed breakdown of each frosting type, including how they perform with a rainbow cake design.
1. Buttercream Frosting – The Classic, Creamy Choice
Buttercream is by far the most commonly used frosting for rainbow cakes because of its versatility, texture, and ability to hold vibrant colors. There are several types of buttercream, including American buttercream and Swiss meringue buttercream (SMBC), each offering different benefits.
a. Texture and Taste
Buttercream frosting has a rich, creamy, and slightly sweet flavor due to its main ingredients: butter and powdered sugar. When made correctly, buttercream is smooth and easy to work with, making it ideal for achieving a clean, polished look on your rainbow cake.
- American Buttercream: The most common type, known for its thicker, sweet taste. It’s easy to make and can hold up well for intricate piping and detailed designs, making it perfect for creating the swirling colors of a rainbow cake. It can also be flavored with vanilla, chocolate, or fruit extracts to suit the taste.
- Swiss Meringue Buttercream (SMBC): SMBC has a lighter, less sweet taste compared to American buttercream, and a silkier texture, thanks to the whipped egg whites incorporated into it. It’s easier to smooth over a cake for a professional, sleek finish and has a rich flavor that isn’t overpowering.
b. Color and Design
When it comes to rainbow cakes, buttercream is a dream come true because of its ability to hold bold, vibrant colors. Buttercream can be tinted with gel food coloring to create the striking layers of red, orange, yellow, green, blue, indigo, and violet that form a rainbow pattern. Gel food coloring is ideal because it doesn’t thin out the frosting, keeping its consistency intact while achieving bright, rich hues.
You can divide the frosting into multiple bowls and color each portion to create the distinct layers of a rainbow. Buttercream’s thick consistency also makes it easy to pipe designs, including roses, swirls, and smooth finishes. If you want to add a more intricate look, buttercream is the ideal choice to create a beautifully decorated unicorn mane or detailed horn.
c. Stability and Durability
Buttercream is highly stable, especially in comparison to whipped cream, making it ideal for multi-layered cakes or cakes that need to be transported. It holds its shape at room temperature and doesn’t melt or soften as quickly, making it perfect for designs that require a little more time and precision to execute.
- If you plan on stacking several layers or adding decorations like a unicorn horn, ears, or intricate piping work, buttercream will support these elements without becoming too soft.
- Multi-tier cakes benefit from buttercream’s firmness and ability to hold up under the weight of additional layers, especially if the cake is being transported.
d. Pros of Buttercream for Rainbow Cakes:
- Thick, smooth, and easy to work with.
- Holds vibrant colors well.
- Ideal for detailed designs and intricate piping.
- Durable for multi-layer or multi-tier cakes.
- Rich flavor that complements many cake types.
2. Whipped Cream Frosting – Light and Airy
Whipped cream frosting, in contrast, offers a light, fluffy, and airy texture. It’s made by whipping heavy cream with sugar and sometimes a stabilizer (like gelatin or cornstarch) to help it hold its shape. Whipped cream frosting is known for its mild sweetness, making it a good choice for cakes where you want a less sugary finish.
a. Texture and Taste
Whipped cream frosting is light and fluffy, almost like whipped cream itself, with a soft, smooth texture. It has a much lighter sweetness than buttercream, and this can help to balance out the sweetness of the cake itself. Whipped cream gives the cake a soft, melt-in-your-mouth texture that’s more delicate compared to the dense, rich feel of buttercream.
- Since whipped cream is lighter and fluffier, it’s perfect for cakes that are delicate and airy, like angel food cake or cakes with a lighter crumb. It has a refreshing and creamy flavor, without the heaviness of buttercream.
b. Color and Design
While whipped cream can be tinted with food coloring, it doesn’t hold colors as well as buttercream, which could be a limiting factor when decorating a rainbow cake. Whipped cream frosting tends to lose its color saturation after a short time, especially if it’s exposed to heat or humidity. The lighter texture of whipped cream also makes it more challenging to pipe intricate designs or build up decorative details.
- Stabilized whipped cream is a good option if you want to maintain its structure for longer periods, as it helps prevent the whipped cream from deflating.
- Whipped cream works better for a minimalistic look, such as a smooth frosting coat or a light, fluffy filling between cake layers. For rainbow cakes, this frosting is typically used in simpler designs where the color layers are less prominent.
c. Stability and Durability
While whipped cream is much lighter than buttercream, it’s also less stable, particularly when it’s left at room temperature. Whipped cream tends to deflate and lose volume over time, especially in warm conditions, which could cause issues if you plan on decorating a large or multi-tier cake.
- If you’re decorating with whipped cream, you’ll need to keep the cake chilled at all times to prevent it from melting. This limits its usability for cakes that need to sit out for extended periods.
d. Pros of Whipped Cream for Rainbow Cakes:
- Lighter, airier texture for a more delicate cake finish.
- Less sweet than buttercream, offering a lighter flavor profile.
- Works well with cakes that are moist and fluffy, like sponge cakes or fruit-flavored cakes.
- Perfect for simple decorations or soft finishes.
3. Choosing Between Buttercream and Whipped Cream for Your Rainbow Cake
The best frosting choice for your rainbow cake depends on your design goals, the type of cake, and your personal taste preferences. Here’s a quick comparison of buttercream vs. whipped cream to help you decide which is right for you:
| Factor | Buttercream | Whipped Cream |
|---|---|---|
| Texture | Thick, creamy, smooth, and easy to pipe | Light, airy, fluffy, and delicate |
| Flavor | Rich and sweet, buttery flavor | Mildly sweet, creamy flavor |
| Color Retention | Holds colors well, perfect for vibrant rainbow layers | Tends to lose color intensity and may not hold for long |
| Stability | Holds its shape well and remains firm at room temperature | Less stable, can deflate and soften over time |
| Ease of Decoration | Perfect for intricate piping and detailed designs | Works best for simple finishes or light piping |
| Suitability for Multi-Layer Cakes | Great for multi-tiered and large cakes | Best for single-tier cakes or cakes that are chilled |
| Best For | Detailed rainbow swirls, piped unicorn designs, sturdy multi-tier cakes | Light, fluffy cakes, simpler designs |
Use Buttercream if:
- You want a rich, stable frosting that will hold up for detailed designs and intricate piping.
- You’re looking to create bold, vibrant rainbow layers with distinct colors.
- You need a frosting that can withstand transportation and multi-tier cakes.
- You prefer a sweeter, buttery flavor.
Use Whipped Cream if:
- You prefer a lighter, less sweet flavor and want a delicate texture.
- You’re working with a moist, airy cake that doesn’t need heavy frosting.
- You’re aiming for simple, clean designs or a light frosting coat on your rainbow cake.
- The cake will be kept chilled and doesn’t need to sit out for long periods.
4. Combining Both Frostings
For a unicorn rainbow cake, you can also combine the best of both worlds by using buttercream and whipped cream together. For example, you can use whipped cream as the base layer for a light, soft texture and then pipe buttercream designs on top, creating a beautiful contrast of textures. This allows you to enjoy the lightness of whipped cream with the ability of buttercream to hold detailed designs and colors.
Conclusion
Choosing between buttercream and whipped cream for your rainbow cake ultimately depends on the look and feel you want to achieve. Whether you go for the richness of buttercream or the lightness of whipped cream, both options can be used to create a magical, colorful cake that will delight everyone at your celebration.
4. Simple DIY Unicorn Cupcakes for Beginners
Easy Cupcake Decorating Ideas – Swirl Frosting for a Unicorn Mane
When it comes to creating a unicorn-themed dessert, cupcakes are a perfect choice because they are individual and easy to serve. The centerpiece of any unicorn cupcake design is often the unicorn mane, and one of the most eye-catching ways to bring this magical detail to life is by using a swirl frosting technique. Swirl frosting adds a sense of movement and whimsy to your cupcakes, making them look like they have a lively, flowing unicorn mane.
Here’s how you can easily create a unicorn-inspired swirl frosting on your cupcakes that will instantly elevate their look.
1. Choose Your Frosting – Buttercream is Key
For creating a stunning unicorn mane, buttercream frosting is the best choice. It has the perfect consistency for swirling, and it holds its shape well enough to create a textured, fluffy mane that looks as though it’s moving. Buttercream is also versatile and easy to color, allowing you to create the classic pastel hues of a unicorn mane.
- American Buttercream works well for a thicker, more structured swirl, while Swiss Meringue Buttercream creates a smoother, lighter swirl that still holds its shape.
- Make sure your buttercream is thick enough to hold the swirl shape. If it’s too soft, it may droop or lose its form, so chill the frosting for a short period to help firm it up if needed.
2. Color Your Frosting – Pastel Shades for a Dreamy Look
A unicorn’s mane is typically multicolored with soft pastel shades of pink, purple, blue, yellow, and lavender. To create these colors, use gel food coloring to avoid altering the texture of your frosting. Gel food coloring allows you to achieve rich, vibrant colors with only a few drops, keeping your frosting firm and stable.
- Divide your buttercream frosting into separate bowls, depending on how many colors you want in your unicorn mane.
- Add a few drops of gel food coloring to each bowl and mix until you get the desired shades. The classic unicorn mane typically includes soft pinks, purples, and blues, but feel free to get creative and add yellow, mint green, or lavender to your collection of colors.
3. Piping the Swirl – Technique and Tools
To create the unicorn mane swirl, you’ll need a piping bag and a large star piping tip (such as a Wilton 1M or 2D). The star tip is perfect for creating a textured swirl that mimics the flow of a unicorn’s mane. You’ll also need to fill the piping bag with your colored buttercream in a rainbow order (e.g., pink, purple, blue, etc.) for a seamless, beautiful swirl effect.
- Layer the Frosting in the Piping Bag: Use a technique called the “rainbow stripe method” to layer your colored buttercream in the piping bag. Simply load the different colors into the piping bag next to each other (not on top of each other). This will allow you to create a perfect swirl of colors as you pipe.
- Swirl the Frosting onto the Cupcake: Begin piping at the center of the cupcake and gently work your way outward in a circular motion. You can either pipe a tight swirl or make the swirl a bit more relaxed by extending the frosting outward. This gives the appearance of a flowing, natural-looking mane.
- Practice Swirling: If you’re new to piping, it might take a few tries to get the perfect swirl. Practice on parchment paper or wax paper before moving to the cupcakes themselves.
4. Layering the Swirls for Volume
To give the unicorn mane more dimension and volume, layer multiple swirls of frosting on top of each other. This creates a full, fluffy effect, as though the mane is made of soft, silky locks.
- Pipe one swirl and then follow it up with another swirl of frosting next to the first one, slightly overlapping.
- This layering effect adds height and creates a dynamic, flowing appearance, making it look like the unicorn’s mane is coming to life.
5. Additional Embellishments – Adding Magical Details
Once the basic swirl frosting is in place, it’s time to add some fun and magical details to complete the unicorn cupcake design. Here are some easy, creative ways to make your cupcakes even more enchanting:
- Unicorn Horn: You can make a fondant or sugar paste unicorn horn by rolling the fondant into a cone shape and lightly twisting it to create the spiral effect. Place this on top of the cupcake, gently pushing it into the frosting.
- Unicorn Ears: Craft small unicorn ears using fondant or marshmallows. Shape the ears from fondant and place them at the base of the horn to complete the unicorn’s face. If you use marshmallows, cut them into ear shapes and stick them into the frosting.
- Edible Glitter or Sprinkles: Add a touch of magic by sprinkling some edible glitter or confetti sprinkles on top of the swirled frosting. Glitter will give the cupcakes a shimmering, magical appearance, while colorful sprinkles can add a bit of whimsy.
- Sugar Flowers or Stars: Tiny fondant flowers, star sprinkles, or edible beads can be arranged around the swirls to enhance the magical, dreamy effect of your unicorn-themed cupcakes.
6. Alternative Swirl Designs – More Ideas to Explore
While the classic swirl method creates a beautiful unicorn mane, there are other ways you can explore creative frosting techniques for your unicorn cupcakes:
- Ombre Effect: Create a soft ombre effect on your frosting by gradually transitioning from one color to another. This technique works especially well for pastel shades and adds depth to the cupcake’s design.
- Twisted Swirl: For a more dramatic effect, pipe two or three different colors of frosting into your piping bag and twist them together as you pipe. This will create a unique twisted swirl pattern for the mane.
- Fluffy Clouds: For a more whimsical, cloud-like effect, use a piping tip like a round tip (Wilton 12 or 2A) and pipe small puffs of frosting in a soft cloud pattern around the cupcake.
7. Finishing Touches – Adding Personality
The fun of unicorn cupcakes is that there are no rules when it comes to their decoration, and you can add your own personality and flair to each one. Here are a few additional ways to make your cupcakes stand out:
- Cute Faces: Draw a cute, happy face with edible markers or pipe black icing for the eyes and mouth.
- Mini Stars: Add mini star-shaped sprinkles around the mane to make it sparkle like stardust.
- Rainbow Confetti: Use rainbow-colored confetti or sugar pearls to add a playful touch to the frosting.
Conclusion
Swirling frosting to create a unicorn mane on cupcakes is a fun, easy, and highly customizable decorating technique that can turn simple cupcakes into magical unicorn treats. Whether you’re celebrating a birthday, a special event, or just making something fun, these colorful, whimsical cupcakes will bring a smile to anyone’s face. With just a few simple techniques, you can bring your unicorn dream to life and add a bit of sparkle to your dessert table!
Using Cake Toppers and Sprinkles – Quick Ways to Make Cupcakes Unicorn-Themed
When you’re looking to create quick, yet stunning unicorn-themed cupcakes, cake toppers and sprinkles are your secret weapons. These easy-to-use decorations can transform simple cupcakes into magical treats without requiring intricate piping or advanced baking skills. Whether you’re making cupcakes for a birthday party, a baby shower, or just a fun treat, cake toppers and sprinkles can help you achieve a unicorn-inspired look in no time.
Here’s how to elevate your cupcakes using a mix of cake toppers and sprinkles that will leave your guests in awe of your creativity.
1. Unicorn Cake Toppers – Instant Magic for Your Cupcakes
Cake toppers are one of the fastest ways to add a magical, unicorn-inspired touch to your cupcakes. These pre-made, decorative items come in a wide variety of shapes and styles, from mini unicorn figurines to fondant decorations that perfectly match the magical theme. They’re easy to use, and they save you time while still offering a polished, professional look.
- Unicorn Horn and Ears Toppers: One of the most iconic features of any unicorn is its horn, and you can easily find unicorn horn and ear cake toppers made from edible materials like fondant or non-edible materials like plastic. These ready-to-use toppers can be gently pressed into the top of the cupcake frosting to create a whimsical, unicorn-inspired look. Look for toppers that come with sparkles, gold accents, or rainbow colors for added magic.
- Mini Unicorn Figurines: Another great option is using mini unicorn figurines as toppers. These can be made of plastic, fondant, or even chocolate, and they add a playful, whimsical touch to each cupcake. Mini unicorn figurines are perfect for themed parties, and they can be removed before eating if made of non-edible materials.
- Unicorn Face Toppers: Many unicorn cake toppers come as pre-designed faces—complete with eyes, a nose, and a cute smile. These toppers are especially charming and can be placed directly onto the frosting of the cupcake. If you want a more playful look, you can add a rainbow mane using colorful sprinkles or buttercream around the face to complement the theme.
- Fondant Unicorn Toppers: If you prefer a more customized, handcrafted look, you can make your own fondant unicorn toppers. These small, edible figures can be sculpted in advance and placed atop the cupcakes. It’s a great option if you’re looking to create a more personalized design.
2. Sprinkles – The Ultimate Unicorn Finishing Touch
No unicorn cupcake is complete without a sprinkle of magical sprinkles! Sprinkles are the easiest and quickest way to add that final touch of whimsy and color to your cupcakes, making them look as though they’ve come straight from a fairy tale. The great thing about sprinkles is that they can match any color scheme, so you can create your own rainbow or pastel-themed unicorn cupcakes with just a few types of sprinkles.
- Rainbow Sprinkles: The classic choice for any unicorn-themed dessert, rainbow sprinkles bring vibrant colors and a fun, celebratory look. These sprinkles are typically small, cylindrical, and come in multiple colors like red, yellow, green, blue, and purple, which are perfect for mimicking the magical rainbow mane of a unicorn.
- Pastel Sprinkles: For a more soft and dreamy unicorn design, opt for pastel-colored sprinkles. Pastel pinks, blues, purples, and yellows will give your cupcakes a gentle, enchanting vibe that’s perfect for a more subtle unicorn theme. Look for mixes that combine small, round sprinkles with edible pearls or sugar crystals to add a touch of sparkle.
- Unicorn Confetti Sprinkles: If you want something fun and distinctive, choose sprinkles that are specifically marketed as “unicorn confetti.” These often include whimsical shapes like stars, hearts, and moon shapes, along with colorful edible bits that can help elevate your unicorn cupcakes to the next level.
- Edible Glitter and Shimmer Sprinkles: For the ultimate sparkle effect, edible glitter and shimmer sprinkles are a must. These sprinkles catch the light, creating a magical, shimmering effect that’s perfect for a unicorn-themed dessert. Use them to add a touch of enchantment to the mane or horn of your cupcakes, or even sprinkle them on top for an overall shimmering effect.
- Sugar Crystals: Sugar crystals are another excellent sprinkle option to give your cupcakes that extra touch of magic. These are larger than regular sprinkles and have a sparkling, gem-like appearance. They can make the cupcakes look like they’re dusted with fairy dust, adding a touch of elegance to the whimsical unicorn theme.
3. How to Arrange Cake Toppers and Sprinkles on Your Cupcakes
The beauty of using cake toppers and sprinkles is that you can be as creative as you like with their arrangement. Here’s a simple guide to help you arrange your toppers and sprinkles for maximum impact:
- Step 1: Base Frosting
Start by frosting your cupcakes with a smooth layer of buttercream or your frosting of choice. You can use a piping bag with a star or round tip to create a textured or swirled effect, or just spread a thin layer for a smooth finish. - Step 2: Position the Cake Toppers
Once your frosting is in place, position your unicorn horn and ears toppers (or any other toppers) in the center of each cupcake. You can gently press them into the frosting to ensure they stay in place. - Step 3: Add Sprinkles for Extra Color
After placing the toppers, it’s time to sprinkle on the magic! Use rainbow sprinkles to cover the base of the cupcake or accentuate the swirls of the unicorn’s mane. Consider adding edible glitter around the edges of the cupcake to give it a touch of sparkle, or sprinkle confetti sprinkles for a more playful look. - Step 4: Use Larger Sprinkles for Focus
For a striking visual impact, place larger sprinkles, such as sugar crystals or edible stars, near the unicorn horn or at the base of the cupcake to draw attention to the focal point of the design. This will create a layered effect that guides the eye to the most important elements of the cupcake.
4. Fun Ways to Customize Your Unicorn Cupcakes
While cake toppers and sprinkles are excellent tools for adding magic, you can always go the extra mile with some creative touches to personalize your unicorn cupcakes even more:
- Custom Unicorn Faces: Use edible markers to draw personalized unicorn faces on your cupcakes. You can create smiling faces with large, expressive eyes or even add cheeky blushing cheeks for a sweet touch.
- Add Edible Flowers: Mini edible flowers like pansies or violets can enhance the whimsical nature of the unicorn theme. Place them delicately on top of the frosting or around the base of the horn to add natural, organic beauty.
- Mini Unicorn Sprinkles: If you want an extra magical touch, you can find mini unicorn-shaped sprinkles that resemble tiny unicorns, rainbows, and stars. These can be sprinkled on top or pressed into the frosting to reinforce the unicorn theme.
5. Time-Saving Unicorn Decorations
The best part about using cake toppers and sprinkles is that they save you a lot of time while still allowing you to achieve a fun and professional-looking cupcake design. If you’re making unicorn cupcakes for a large crowd, these quick and easy decoration methods ensure you can make a lot of cupcakes in a short period without sacrificing creativity or style.
- Pre-made Toppers: If you’re short on time or not very confident with cake decorating, opting for pre-made unicorn toppers (like unicorn horns, mini figurines, or pre-made unicorn faces) will save you a lot of time. Simply apply them to your frosted cupcakes and add sprinkles for the final magical touch.
- Mix and Match: Mix different types of sprinkles and cake toppers to create cupcakes that have unique designs. You can even create a themed assortment of cupcakes, each with different unicorn features—some with a unicorn horn, others with unicorn ears, and so on. This adds variety and excitement to your cupcake table!
Conclusion
Using cake toppers and sprinkles is the quickest and most effective way to turn simple cupcakes into magical unicorn-themed treats. Whether you use unicorn horn toppers, rainbow sprinkles, or edible glitter, these decorations allow you to create an enchanting, whimsical look that will impress your guests. Perfect for birthday parties, themed events, or even a fun weekend baking project, these simple, time-saving techniques help you create cupcakes that are both visually stunning and deliciously fun. With minimal effort and a little sprinkle of creativity, you can make every cupcake a magical unicorn masterpiece.
Great for Kids’ Birthday Parties – Fun and Mess-Free Options
Unicorn-themed cupcakes are an excellent choice for kids’ birthday parties because they bring a burst of magic, whimsy, and color that children absolutely adore. However, when it comes to kids, you also want to ensure that the decorating process is fun, easy, and as mess-free as possible. Fortunately, there are several creative ways to make unicorn cupcakes that will not only wow the little ones but also keep the cleanup minimal. Here’s how you can design unicorn cupcakes that are both exciting for kids and practical for parents.
1. Pre-Made Unicorn Toppers – Minimal Mess, Maximum Fun
One of the simplest and most effective ways to keep your unicorn cupcakes fun yet mess-free is by using pre-made cake toppers. These come in a variety of shapes and designs, such as unicorn horns, ears, and even complete unicorn faces. These toppers can be quickly placed onto the cupcakes without the need for any messy frosting techniques or intricate decorating skills.
- Unicorn Horn and Ear Toppers: These can be bought in either edible or non-edible forms. Edible toppers like fondant horns and ears are great because they tie directly into the theme and can be easily eaten with the cupcake. Non-edible options like plastic or silicone horns are great for keeping things clean and for kids to play with after eating. You can quickly attach these toppers to the cupcakes and focus on adding a small, colorful border of sprinkles for extra flair.
- Complete Unicorn Face Toppers: For an even quicker decorating option, look for complete unicorn face toppers. These usually consist of a pre-designed unicorn face with eyes, nose, and a smile. They add an adorable touch to each cupcake and can be easily placed on top of your frosting.
Using pre-made toppers ensures that you won’t have to spend much time decorating and that the kids’ hands stay clean—no frosting mess or squishing the decorations. Plus, these toppers come in a variety of materials (such as fondant, plastic, or paper), allowing for personalization and customization to match your party’s theme.
2. Cupcake Liners – Easy and Colorful
Another mess-free option for creating unicorn cupcakes is to use fun cupcake liners. These liners are a great way to add color and excitement without needing to frost the entire cupcake. Choose liners that feature unicorn-themed designs like rainbows, stars, or unicorns to tie everything together.
- Pastel-colored Cupcake Liners: Pastels are a staple for unicorn themes. Light pinks, purples, and blues in the cupcake liners can instantly evoke the softness and magic of a unicorn’s mane.
- Printed Unicorn Cupcake Liners: If you’re looking for something with a bit more flair, you can find printed liners that feature unicorn illustrations or rainbows, adding that extra level of detail to the cupcakes without requiring additional decorating effort.
Not only do cupcake liners help keep the cupcakes in perfect shape and prevent the frosting from sticking to the baking tray, but they also make cleanup a breeze since everything stays contained within the liner. Plus, kids will love seeing their cupcakes in those cute liners—they’ll make every bite feel special and magical.
3. Swirl Buttercream with Rainbow Colors – Simple, Fun, and Clean
While some cupcake decorating techniques can be a little messy, creating a simple rainbow swirl on top of your cupcakes using buttercream frosting is a clean, easy, and fun way to add a unicorn touch. The rainbow effect mimics the unicorn’s colorful mane, and the kids will love watching the frosting transform into a magical swirl.
- Use Gel Food Coloring: Gel food coloring is the best option for creating vibrant hues without changing the texture of your frosting. Divide your buttercream into small bowls and color each batch with different colors—classic pastel pink, blue, purple, and yellow work perfectly.
- Piping Bag with Star Tip: Fill a piping bag with the rainbow-colored buttercream and use a large star-shaped piping tip (like a Wilton 1M or 2D) to pipe a fluffy swirl on top of each cupcake. Starting from the center of the cupcake, gently swirl the frosting outward for a whimsical and clean finish.
This method allows you to create colorful unicorn cupcakes quickly and easily, while still maintaining a clean appearance. The piping bag method prevents frosting from getting on your hands or counter, reducing the mess associated with traditional frosting techniques. Plus, it’s a fun activity for kids to watch, and they’ll be fascinated by the magical rainbow effect as the frosting swirls into a beautiful display.
4. Sprinkles and Edible Glitter – Minimal Fuss, Maximum Fun
For an extra unicorn sparkle, add a few magical sprinkles and edible glitter to your cupcakes. These can be sprinkled on top of the frosting without the need for elaborate designs, making them a fast and fun addition that kids will enjoy. Sprinkles and glitter provide color and texture to the cupcakes, giving them that magical feel without creating a mess.
- Unicorn-Themed Sprinkles: Look for sprinkles that feature unicorns, rainbows, stars, or even hearts. These sprinkles are perfect for adding a whimsical touch to each cupcake, and they are easily scattered over the frosting.
- Edible Glitter: A light dusting of edible glitter or shimmering sugar crystals can make your cupcakes look like they are straight out of a fairy tale. This tiny detail is fun, sparkly, and easy to apply without the mess that traditional glitter might cause.
- Rainbow Confetti Sprinkles: These are a quick way to make the cupcakes even more vibrant. Sprinkle a handful of multicolored confetti sprinkles on top of each cupcake to complement the rainbow swirl and add extra flair.
Both sprinkles and glitter are non-messy and can be added in seconds, making them an ideal choice for busy party planning. Plus, they give your cupcakes the finishing touch that will leave kids marveling at their magical treats.
5. Cupcake Decorating Stations – Let Kids Get Creative
For a more interactive experience and a fun activity for kids, consider setting up a cupcake decorating station at the party. Keep it simple and mess-free by providing the basics: cupcakes, frosting, and easy-to-use toppings like sprinkles and toppers. This way, kids can decorate their own cupcakes without the mess of multiple piping bags or frosting tools.
- Set Up Easy Decorating Supplies: Provide pre-made frosting in piping bags, mini cake toppers like unicorn horns and ears, and a variety of sprinkles. Let the kids decorate their cupcakes as they wish, allowing them to add their favorite unicorn features.
- Personalize Their Cupcakes: Consider offering additional options like edible markers for them to draw faces or decorations on their cupcakes. This gives the kids the chance to make their cupcakes unique while keeping the process neat and fun.
By setting up a decorating station, you can make the party more engaging without the worry of too much mess. It’s a fun way to let the kids express their creativity, and parents can rest assured that the cleanup will be minimal since everything stays in its designated area.
6. Cupcake Jars – No Frosting, No Mess
If you’re looking for an alternative to traditional cupcakes, consider unicorn-themed cupcake jars. These are essentially cupcakes served in clear jars, where the frosting, cake, and decorations are layered in a neat, compact manner. Kids can simply grab their jar and enjoy their unicorn treat without worrying about any frosting spills or messes.
- Layered Cupcakes in a Jar: For an easy and mess-free twist, bake your unicorn cupcakes and layer them in jars with colorful frosting and sprinkles. These individual servings eliminate the need for plates or utensils, and each child gets their own cupcake without worrying about the frosting getting on their clothes.
This method is not only clean and fun, but it also adds a unique presentation to the party that will stand out.
Conclusion
Unicorn cupcakes for kids’ birthday parties can be both fun and mess-free with the right approach. By using pre-made cake toppers, colorful sprinkles, simple swirl frosting techniques, and even interactive decorating stations, you can create magical treats that both parents and kids will love. These quick and easy decorating options allow the cupcakes to be the highlight of the party, without the stress of complicated techniques or cleanup. Whether you go for classic toppers or creative cupcake jars, unicorn cupcakes will ensure a birthday full of color, sparkle, and joy—with minimal mess.
5. Tips for Perfect Unicorn Cake Designs Decorations
Best Tools for Cake Decorating – Piping Bags, Fondant Tools, and Cake Stands
When it comes to creating stunning, professional-looking unicorn cakes or unicorn cupcakes, the right tools can make all the difference. Whether you’re designing a whimsical rainbow mane or crafting intricate fondant unicorn features. Having the best tools for cake decorating ensures that your designs are not only beautiful but also easier to execute. From piping bags to fondant tools and cake stands, each tool has a specific purpose that helps bring your vision to life. Let’s dive into the essential cake decorating tools that every unicorn-themed baker should have in their arsenal.
1. Piping Bags – Essential for Detailed Designs
Piping bags are one of the most important tools when it comes to creating those intricate, precise decorations for your unicorn cake or cupcakes. Whether you’re swirling colorful frosting to create a magical unicorn mane. Adding details to your unicorn horn, or writing messages on the cake, piping bags make these tasks easier and more controlled.
- Disposable vs. Reusable Piping Bags: Disposable piping bags. Are convenient for a quick, no-fuss decorating experience, especially if you’re using different colors or fillings. Simply use, and then toss the bag. However, reusable piping bags are more eco-friendly and durable. They’re great if you’re planning to bake often and want a tool that lasts through multiple uses. Many decorators recommend using silicone piping bags, which are easy to clean, flexible, and able to withstand frequent use.
- Various Piping Tips: Piping bags are only effective when paired with the correct piping tips. A variety of tips allows you to create a range of textures and effects on your unicorn cake. For example, you can use a star tip (Wilton 1M or 2D). To create soft, textured swirls for the unicorn mane. For more intricate designs, like fine lines or delicate detailing, use a round tip. If you’re aiming for a ruffled effect, consider using a petal tip to create waves in the frosting.
- Couplers: Couplers are an essential part of piping. As they allow you to switch between different piping tips without changing the piping bag itself. This is especially useful if you’re using multiple colors of frosting and want to create different textures or effects on your unicorn cake without wasting bags.
2. Fondant Tools – Perfect for Shaping and Detailing
Fondant is the go-to material for creating the most detailed and professional-looking unicorn cake decorations. Such as the unicorn horn, ears, eyes, and other features. To shape and mold fondant into these intricate designs. You’ll need the right set of fondant tools to make the process easier and the results more polished.
- Fondant Rolling Pin: A fondant rolling pin is essential for rolling out fondant to a smooth, even thickness. Some fondant rolling pins even come with adjustable rings. That ensure you roll your fondant to a consistent thickness every time. For unicorn cakes. You’ll often need a thin layer of fondant to cover the cake or create detailed shapes like unicorn ears.
- Fondant Smoothers: Once you’ve covered your cake with fondant, a fondant smoother helps create a perfectly smooth surface. It also eliminates air bubbles and creases, giving your cake a clean, professional finish. Use this tool to smooth the fondant on the cake before decorating with details like the unicorn horn or rainbow accents.
- Fondant Cutters and Molds: To create specific shapes like unicorn ears, flowers, or even stars, fondant cutters and molds are indispensable. Mini flower cutters, leaf molds, and unicorn horn molds help you craft detailed designs in no time. There are also cookie cutters in unicorn shapes that you can use for larger fondant pieces or to create uniform details.
- Ball Tool: The ball tool is a small, pointed tool that helps you shape and thin the edges of your fondant pieces. Such as when making the details of a unicorn horn or flower petals. This tool is perfect for adding curved edges or detailing the unicorn’s eyes, making them look more realistic and polished.
- Veining Tool: The veining tool creates delicate patterns or lines on fondant. Which is particularly useful when you want to add texture to fondant decorations. For example, you could use a veining tool to add texture to fondant flowers or make a more realistic look for the unicorn’s ears.
3. Cake Stands – Display Your Masterpiece in Style
Once your unicorn cake or cupcakes are decorated, it’s time to showcase your creation! Cake stands not only serve a practical purpose in displaying your cake but also elevate the overall presentation. Whether you’re hosting a birthday party, a baby shower, or just baking for fun. A cake stand adds elegance and flair to your unicorn-themed desserts.
- Rotating Cake Stand: A rotating cake stand is a must-have tool for smooth, even decorating. The ability to rotate the cake 360 degrees while decorating it allows you to add consistent, symmetrical decorations. Around the cake, such as piping a unicorn mane or placing delicate fondant flowers. These stands make it easier to pipe frosting or add intricate designs without the awkwardness of turning the cake by hand.
- Fixed Cake Stand: While a rotating stand is ideal for decorating, a fixed cake stand is great for showcasing the cake once it’s complete. These stands can be made of various materials. Including wood, glass, or metal, and can be decorated with a ribbon or a themed cover to match your unicorn cake design. Choose a stand that complements the color scheme and style of your cake, creating a beautifully cohesive display.
- Mini Cake Stands for Cupcakes: For cupcakes, consider using smaller, multi-tiered cake stands. To display your treats in an organized and elegant way. These stands are perfect for showing off multiple unicorn cupcakes at once. And they create a striking, tiered effect that makes the cupcakes look even more magical.
- Cake Boards: Whether you’re creating a multi-layered unicorn cake. Or just decorating cupcakes, placing your cake on a sturdy cake board is important. Cake boards not only make the cake easier to handle. And transport but also provide a clean, solid base for decoration. Choose decorative cake boards with glitter, patterns, or unicorn designs to tie everything together.
4. Other Helpful Tools for Cake Decorating
While piping bags, fondant tools, and cake stands are some of the must-have tools for unicorn cake decorating. There are a few other items that can make the process smoother and more fun.
- Offset Spatula: An offset spatula is a versatile tool for spreading frosting smoothly over cakes. It helps you apply an even layer of buttercream frosting or fondant to your unicorn cake, ensuring a flawless finish. It also works well for scraping excess frosting off the sides and smoothing out any imperfections.
- Decorating Turntable: A decorating turntable is similar to a rotating cake stand but is often more adjustable and can spin freely as you decorate. This tool gives you more control over your cake’s surface, making it easier to create smooth, even layers of frosting.
- Silicone Baking Mats: If you’re working with fondant, silicone baking mats. Can help provide a non-stick surface for rolling out fondant without any mess. These mats are easy to clean and prevent fondant from sticking to your work surface. Making them a great addition to your cake decorating setup.
- Edible Markers: Edible markers are a fun and easy way to add extra details to your unicorn cake or cupcakes. Use them to draw on faces, add eyelashes, or create additional decorative accents like stars or hearts. These markers are great for achieving fine lines and details that may be too small for piping or fondant.
Conclusion
With the right set of cake decorating tools, creating a magical unicorn cake becomes an enjoyable and manageable process. Whether you’re using piping bags to create delicate designs. Fondant tools to shape intricate features, or a cake stand to display your masterpiece. Each tool plays an important role in ensuring your cake looks both professional and enchanting. By investing in high-quality cake decorating tools, you’ll find that your unicorn-themed creations become easier to make, more fun to decorate. And more impressive to show off.
How to Make an Edible Unicorn Horn – Step-by-Step Guide Using Fondant or Chocolate
Creating an edible unicorn horn. Is one of the most fun and magical parts of making a unicorn-themed cake or cupcakes. The unicorn horn is the focal point of the design, often representing the most iconic feature of this mythical creature. Whether you prefer to make your horn out of fondant for a smooth, elegant look. Or chocolate for a more textured, rich finish, the process is relatively simple and incredibly rewarding. Here’s a step-by-step guide to creating a beautiful and edible unicorn horn. Using both fondant and chocolate, so you can choose the best method that fits your vision.
Materials Needed
- For Fondant Unicorn Horn:
- White fondant (you can use store-bought or homemade)
- Gel food coloring (gold, silver, or pastel colors)
- Cornstarch or powdered sugar (for dusting)
- Rolling pin
- A small paintbrush or pastry brush
- Edible glitter (optional)
- Skewer or lollipop stick (optional, for extra support)
- For Chocolate Unicorn Horn:
- White chocolate or milk chocolate
- Gel food coloring or powdered food coloring
- Piping bags or plastic squeeze bottles
- Parchment paper or silicone mat
- Edible gold dust or edible glitter (optional)
How to Make a Fondant Unicorn Horn
Making a unicorn horn from fondant is one of the most common methods because it’s easy to shape and decorate. Fondant provides a smooth, polished look that is perfect for elegant and whimsical designs. Follow these steps to create your own fondant unicorn horn.
1. Prepare the Fondant
Start by kneading the fondant to make it soft and pliable. You may want to add a tiny bit of cornstarch or powdered sugar. To prevent it from sticking to your hands or work surface.
- Tip: If you want to add color to your horn, knead in a bit of gel food coloring. You can choose a metallic gold or silver to mimic the magical look of a unicorn horn. Or go for a soft pastel color to match the overall theme of your cake.
2. Shape the Horn
Roll out a small piece of fondant into a long, thin rope. The length and thickness of the rope will depend on the size of the horn you want to create.
- Tip: For a smooth and tapered look, gradually taper the rope as you roll. Making one end thinner than the other. The thinner end will be the top of the horn, while the wider end will sit in the cake.
Once you have the desired length, gently twist the fondant rope into a spiral shape. The twisted spiral effect gives the unicorn horn its signature look.
3. Add Details to the Horn
To make the horn look more realistic, you can lightly twist the fondant rope as you shape it. Press the two ends gently together at the bottom to secure the shape and create a point.
- Tip: If you want extra stability for larger cakes, insert a lollipop stick or skewer into the bottom of the fondant horn. This will act as a support system for the horn, preventing it from toppling over when placed on the cake.
4. Smooth and Finish the Horn
Once the horn is shaped, you can smooth the surface with your hands. Or use a fondant smoother to give it a polished appearance. If you’ve used any color or glitter, this is also the time to brush the horn with a bit of edible glitter for extra shimmer.
5. Dry the Fondant Horn
Leave the fondant horn to dry and harden for a few hours or overnight. The drying time will depend on the humidity in the environment, but fondant can dry fairly quickly. Once it’s set, your fondant unicorn horn is ready to be placed on top of your cake or cupcakes.
How to Make a Chocolate Unicorn Horn
If you want a rich, sweet, and indulgent alternative to fondant, a chocolate unicorn horn is a wonderful choice. This method involves using melted chocolate to create a shiny, glossy horn. That is just as edible as it is beautiful. The process requires a little more finesse, but the results are definitely worth it.
1. Melt the Chocolate
Begin by melting your choice of white chocolate or milk chocolate. You can melt the chocolate in a microwave-safe bowl, heating it in 30-second intervals. Or use a double boiler to gently melt the chocolate over simmering water.
- Tip: Add a tiny amount of vegetable oil or coconut oil. To your chocolate if you want a smoother consistency that’s easier to pipe.
2. Color the Chocolate
Once the chocolate is melted and smooth, divide it into separate bowls if you plan to make a multi-colored horn (such as a rainbow effect). Add gel food coloring to the melted chocolate, mixing it in until you achieve the desired color. For a unicorn horn, metallic gold and pastel shades like pink, lavender, and baby blue are great choices.
3. Pipe the Chocolate
Transfer the colored chocolate into separate piping bags or squeeze bottles. If you don’t have piping bags, you can use plastic sandwich bags with a small tip cut from one corner.
To make the horn, pipe the chocolate in a twisted shape onto a parchment paper or silicone baking mat. Start at the top with a thin line. And gradually make the piping wider as you move downward to mimic the shape of a unicorn horn.
- Tip: You can also create a swirled or spiral design by alternating colors of the chocolate as you pipe. This will give your horn a more colorful and magical appearance.
4. Shape and Dry the Chocolate
Once you’ve piped the desired shape, you can carefully use your fingers or a small tool to shape and adjust the chocolate horn if needed. After that, place the horn in the fridge to harden for about 30 minutes. Or until the chocolate has fully set.
- Tip: For an extra shiny effect, you can lightly spray the chocolate with an edible gloss or shimmer spray once it has dried completely.
5. Finishing Touches
Once the chocolate horn is firm, gently peel it off the parchment paper. To add a magical finishing touch, dust the horn with a little edible gold dust or edible glitter to make it sparkle.
Placing the Unicorn Horn on the Cake
Once your horn—whether made from fondant or chocolate—is ready. Carefully place it on top of your unicorn cake or cupcakes. Make sure it is securely positioned, especially if using fondant, as it can be top-heavy. If needed, use a small amount of buttercream frosting or chocolate ganache. As glue to attach the base of the horn to the top of the cake or cupcakes.
For added effect, surround the horn with swirled buttercream. Or fondant flowers to complete the look and give your unicorn design a more whimsical touch.
Conclusion
Making an edible unicorn horn is a fun and creative way to add a magical touch to your cakes or cupcakes. Whether you choose fondant for its smooth, elegant look or chocolate for a rich. Indulgent treat, both methods provide a beautiful and edible centerpiece for your unicorn-themed desserts. With these easy-to-follow steps, you can create a stunning unicorn horn. That’s sure to impress your guests and bring your whimsical cake vision to life!
Where to Buy Unicorn Cake Toppers – Online and Store Recommendations
Unicorn cake toppers are the perfect way to enhance the magical charm of your unicorn-themed cake or cupcakes. These whimsical decorations can turn an ordinary dessert into something extraordinary, adding a playful. Imaginative touch that’s sure to wow your guests. Whether you’re hosting a birthday party, baby shower, or any special event. Having the right unicorn cake topper is essential to complete the look. Here’s where you can buy these delightful cake toppers both online and in physical stores. Along with some tips on choosing the perfect one for your creation.
1. Online Stores for Unicorn Cake Toppers
Shopping online gives you access to a wide range of unicorn cake toppers. Allowing you to choose from various designs, styles, and price points. Below are some top online retailers that specialize in unique and high-quality unicorn cake toppers.
a. Amazon
Amazon is one of the largest online marketplaces, offering an extensive selection of unicorn cake toppers. Whether you’re looking for plastic unicorn figurines, fondant-style toppers. Or even edible unicorn cake toppers, you’re bound to find a perfect match for your cake. You can filter your search by customer ratings, delivery speed, and price to find the best deals.
- Popular Products: Unicorn horn and ears sets, unicorn figurines, unicorn-themed edible toppers, and mini unicorn plushies for a whimsical touch.
- Why Amazon?: Amazon offers competitive prices, fast shipping, and a vast variety. With thousands of customer reviews to help you make an informed decision. Many products also come with Prime delivery, making it perfect if you need your toppers quickly.
b. Etsy
Etsy is known for handmade, vintage, and unique items, and unicorn cake toppers are no exception. If you’re looking for a custom or handcrafted touch. Etsy is a great place to find personalized unicorn toppers, hand-painted unicorn figurines. And one-of-a-kind designs that can’t be found anywhere else.
- Popular Products: Handcrafted unicorn horns and ears, customized unicorn cake toppers, wooden unicorn figures, and personalized unicorn name toppers.
- Why Etsy?: Etsy offers a range of artisanal and custom-made cake toppers. Perfect if you’re aiming for something unique or special for a themed event. You can also communicate directly with sellers for custom orders.
c. Walmart
Walmart provides both online and in-store shopping options with a diverse selection of unicorn-themed party supplies, including cake toppers. Their offerings range from affordable, plastic unicorn figurines to glittery. Stylish cake toppers that add a pop of magic to your cake.
- Popular Products: Unicorn cake toppers, unicorn figurines, balloon cake toppers, and mini unicorn toys that can double as decorations.
- Why Walmart?: Walmart is ideal for shoppers who want a budget-friendly option. With the convenience of picking up their items in-store or receiving them at home. They also offer fast delivery times and free shipping on orders over a certain amount.
d. Cake Supply Websites (e.g., Wilton, Party City)
Websites dedicated to cake decorating and party supplies, such as Wilton and Party City. Feature a variety of unicorn cake toppers, often focusing on themed, high-quality products designed for easy cake decoration.
- Popular Products: Wilton’s unicorn figurines, unicorn cupcake toppers, fondant unicorn cutters. Edible unicorn decorations, and unicorn silicone molds for making your own cake toppers.
- Why These Sites?: Sites like Wilton and Party City are cake-decorating specialists. So you can find high-quality, event-specific cake toppers that are both durable and easy to use. These toppers often come in a variety of sizes, perfect for both cakes and cupcakes.
e. Zazzle
Zazzle is known for offering custom-designed items, and their collection of unicorn cake toppers is no exception. You can find personalized options that feature your favorite unicorn artwork, your child’s name, or a custom message.
- Popular Products: Custom unicorn cake toppers with text, personalized unicorn designs, unicorn-themed party sets.
- Why Zazzle?: Zazzle provides options for those who want to create a truly unique and personalized cake topper for special events. You can work with designers to create something specific to your needs, whether it’s a birthday or a special occasion.
2. Physical Stores for Unicorn Cake Toppers
If you prefer to shop in person. There are several places where you can find unicorn cake toppers to bring home the same day. Many stores carry unicorn-themed party supplies, and some also specialize in baking or cake-decorating tools.
a. Michaels
Michaels is a well-known craft and party store that offers a great selection of cake-decorating supplies, including unicorn cake toppers. They carry both plastic unicorn figurines and edible toppers along with a range of baking tools for DIY decorators.
- Popular Products: Plastic unicorn figurines, fondant unicorn molds, edible glitter, and unicorn cupcake toppers.
- Why Michaels?: Michaels offers a large selection of cake decorating products, and you can also find helpful items like cake stands, decorating tools, and craft supplies. Plus, their frequent sales and coupons make it a cost-effective place to shop.
b. Hobby Lobby
Hobby Lobby is another fantastic place for finding unicorn cake toppers. They carry a variety of decorative toppers, including ones that feature unicorns, rainbows, and sparkles, perfect for creating a magical unicorn-themed cake.
- Popular Products: Unicorn cake toppers, rainbow decorations, and unicorn-themed sprinkles.
- Why Hobby Lobby?: Hobby Lobby has a wonderful selection of seasonal and themed party supplies, and you can often find high-quality items for a reasonable price. The store also offers frequent discounts and sales, making it a good option for budget-conscious shoppers.
c. Target
Target carries a variety of unicorn-themed party supplies, including cake toppers. From plastic unicorn figurines to unicorn-shaped toppers that are both fun and affordable, Target offers an accessible and convenient option for last-minute party planners.
- Popular Products: Unicorn cake toppers, unicorn figurines, and unicorn-themed tableware.
- Why Target?: Target provides a good balance of affordable and stylish unicorn decorations. You can often find both high-quality and budget-friendly options in-store and online, perfect for a variety of occasions.
d. Party Supply Stores
Party supply stores, such as Party City and Dollar Tree, are fantastic for finding unicorn-themed decorations on a budget. These stores carry a wide range of unicorn-themed cake toppers. And they often have seasonal displays for birthdays and special occasions.
- Popular Products: Unicorn-themed balloons, cake topper sets, and unicorn-themed party decorations.
- Why Party Stores?: Party supply stores often carry items that are designed to create a festive atmosphere. And their unicorn toppers are no exception. These stores provide a wide selection of affordable, fun, and colorful options.
3. Tips for Choosing the Right Unicorn Cake Topper
When shopping for a unicorn cake topper. It’s important to consider the style of your cake and the overall theme of your event. Here are a few tips to help you choose the perfect topper:
- Size Matters: Make sure the topper is the right size for your cake. A small topper may get lost on a large cake, while a large topper may overwhelm a smaller one.
- Material: Decide whether you want an edible topper (like fondant or edible images). Or a non-edible one (like plastic figurines or resin).
- Match Your Theme: Consider the colors and overall aesthetic of your cake. If your cake has pastel colors, choose a pastel-colored unicorn topper. If the cake is bold and vibrant, go for a glittery or metallic topper for extra flair.
- Customization: If you’re looking for something special, opt for a customized topper. With a name, age, or message to make the cake even more personal.
Conclusion
Finding the perfect unicorn cake topper is easy with so many online and physical store options available. From custom-made designs on Etsy to affordable options at Party City, the possibilities are endless. Consider your cake design, budget, and desired style when choosing the right topper. And you’ll have a stunning unicorn cake that’s as magical as the creature itself.
Conclusion
In this blog post, we’ve explored a variety of creative and enchanting unicorn cake designs. That will bring a magical touch to any celebration. From pastel buttercream swirls creating a dreamy effect. To vibrant rainbow layers that surprise with colorful goodness. And even elegant unicorn horns and ears crafted from fondant or chocolate. These designs offer something for every baker and party planner. Additionally, techniques like piping a flowing unicorn mane and adding edible glitter and sprinkles. Will add that extra sparkle to your cakes and cupcakes.
We hope these unicorn cake design ideas inspire you to get creative in the kitchen! Don’t be afraid to experiment with different colors, textures, and toppers to create your own magical masterpiece. Share your beautiful creations with us. Or on social media — we’d love to see how you bring these ideas to life!
If you enjoyed this guide, make sure to check out some of our related topics. Such as “Unicorn Party Themes: How to Create a Magical Event”. Or “Best Frosting Tips for Perfect Cakes and Cupcakes.” These resources will help you take your party and baking skills to the next level. Happy baking and decorating!