
Crab Brulee is a luxurious twist on the classic crème brûlée. It combines the creamy custard of the French dessert with the sweet, delicate flavor of fresh crab meat. The result is a savory dish that’s both elegant and surprising. The crab adds a rich depth, while the caramelized sugar topping provides the perfect contrast.
This dish is ideal for special occasions or dinner parties. It’s sophisticated yet approachable, offering a unique way to showcase seafood. In this step-by-step guide, we’ll walk you through how to make the perfect crab brulee. From selecting the right ingredients to mastering the brulee torch, we’ve got you covered. Whether you’re a seasoned cook or a beginner, this recipe will elevate your cooking and impress your guests
The Key Ingredients for Crab Brulee
Fresh Crab Meat: Why Quality Crab Meat is Essential for the Perfect Recipe
When making a dish as unique and refined as crab brulee, the quality of your ingredients can make or break the final result. One of the most crucial elements is the fresh crab meat. It’s the star of the show and what will set your dish apart from ordinary seafood recipes. In this section, you’ll learn why choosing the right crab meat is so important and how it affects both the flavor and texture of your crab brulee.
Why Fresh Crab Meat Makes a Difference
Fresh crab meat doesn’t just taste better—it’s more flavorful, juicy, and offers a superior texture compared to canned or frozen alternatives. Here’s why it matters for your crab brulee:
- Enhanced Flavor: Fresh crab has a sweet, delicate taste that’s naturally enhanced when it’s in season. The subtle briny flavor can perfectly balance the richness of the custard in your brulee. Frozen or canned crab often lacks this depth, resulting in a dish that may taste more generic and less vibrant.
- Better Texture: When you use fresh crab, the meat tends to retain its natural, delicate texture, adding a tender bite to the creamy custard. Frozen or canned crab, on the other hand, can become mushy, especially once it’s heated. The texture is key to achieving that melt-in-your-mouth experience with each spoonful of crab brulee.
- No Unwanted Additives: Many canned or frozen crab products contain preservatives or added salt to extend their shelf life. These additives can alter the natural flavor of the crab, leaving your brulee tasting less authentic. Fresh crab meat, however, is clean and free from these artificial ingredients, allowing the natural flavors to shine through.
Where to Find the Best Fresh Crab Meat
Now that you understand why fresh crab meat is essential, the next step is knowing where to source it. Here are some tips for selecting the highest quality crab:
- Local Seafood Markets: Often, the best place to find fresh crab is at a local seafood market. These markets typically offer a variety of crab types, including blue crab, dungeness crab, and king crab, each of which has its own unique flavor and texture. Ask the fishmonger about the day’s catch for the freshest options available.
- Sustainable Sources: When selecting your crab, it’s important to consider sustainability. Look for crab that’s been sourced responsibly, ensuring you’re supporting fisheries that protect the environment. Sustainable crab options will have a better taste and are a great way to feel good about your cooking choices.
- Freshness: Fresh crab meat should have a clean, ocean-like scent, and it should not have any strong, off-putting odors. The meat should be moist but not overly wet, with a firm texture that flakes easily. Be sure to ask when the crab was caught and delivered to ensure you’re getting the freshest possible product.
Different Types of Crab Meat for Brulee
The type of crab you choose can also impact the flavor and texture of your dish. Here’s a quick guide to some popular options for your crab brulee:
- Blue Crab: Known for its sweet, tender meat, blue crab is a fantastic choice for dishes like crab brulee. The meat is delicate and moist, perfect for folding into the creamy custard base.
- Dungeness Crab: With its rich, slightly nutty flavor, Dungeness crab is another excellent option. The meat is succulent and slightly firmer than blue crab, offering a satisfying bite without overpowering the custard.
- King Crab: If you want to go all out with your crab brulee, consider using king crab. Its large, succulent legs provide a meaty, sweet bite that pairs beautifully with the smooth custard.
How to Prepare Fresh Crab Meat
Once you’ve selected your fresh crab, it’s time to prepare it for your brulee. Here are some simple steps to follow:
- Crack and Extract the Meat: If you’re using whole crabs, start by cracking the shells and removing the meat. Be careful to discard any shell fragments that may end up in your dish. For pre-picked meat, you can skip this step.
- Keep It Chunky: For the best texture, keep the crab meat in large, bite-sized chunks. Shredding or mashing the meat can cause it to lose its delicate consistency, which could affect the brulee’s final texture.
- Season Lightly: Fresh crab is naturally flavorful, so avoid overwhelming it with heavy seasoning. A light sprinkle of salt, pepper, and perhaps a touch of lemon zest is all you need to enhance its natural taste.
Tips for Storing Fresh Crab Meat
Fresh crab meat can be quite delicate and should be handled properly to ensure it stays at its best:
- Refrigeration: If you’re not using the crab immediately, store it in the coldest part of your refrigerator. Ideally, it should be cooked and used within 24 hours of purchase for the best flavor and texture.
- Freezing: If you can’t use the crab immediately, freezing it is an option, but keep in mind that freezing may slightly affect the texture. Wrap it tightly in plastic wrap or foil before freezing to prevent freezer burn. When you thaw it, do so slowly in the fridge to preserve the flavor.
Final Thoughts: Why Fresh Crab Meat is Worth It
Investing in high-quality, fresh crab meat is one of the easiest ways to elevate your crab brulee recipe. Its delicate, sweet flavor and tender texture are irreplaceable, ensuring that your dish will stand out as a true seafood delicacy. While fresh crab may cost a bit more, the result is well worth it. Your guests will notice the difference, and you’ll be rewarded with a stunning, restaurant-quality dish that’s a true showcase of your culinary skills.
Call to Action:
Now that you know why fresh crab is the secret ingredient to perfect crab brulee, it’s time to put this knowledge into action. Head to your local seafood market, grab some of the best crab meat available, and start cooking! Don’t forget to share your results with us—whether it’s your first time or your hundredth, we’d love to hear how your crab brulee turns out. Happy cooking!
Crème Brûlée Basics: The Fundamental Ingredients for the Creamy Base (Heavy Cream, Egg Yolks, Sugar)
When you think of crème brûlée, what probably comes to mind is its rich, velvety texture and sweet, smooth flavor. Achieving that perfect custard base for your crab brulee (or any crème brûlée variant) starts with the three key ingredients that make up the foundation of this dessert: heavy cream, egg yolks, and sugar. Understanding how each of these elements contributes to the final result will help you create a more balanced and refined crab brulee, so let’s break down each ingredient and its role in achieving the perfect custard.
1. Heavy Cream: The Secret to a Luxuriously Smooth Base
The first and most important ingredient in any crème brûlée is heavy cream. It’s the backbone of the custard, giving it its signature richness and creamy texture. The higher fat content of heavy cream (usually around 36-40%) is essential to creating that indulgent mouthfeel you expect from a top-quality crème brûlée.
- Why Heavy Cream Matters: Without enough fat, your custard would lack the smoothness and richness that make crème brûlée such a luxurious treat. The fat in the cream helps to emulsify the custard and create a stable mixture that will set beautifully without curdling or separating. It also aids in carrying the flavors of the crab, making your crab brulee more harmonious.
- Choosing the Right Cream: Always opt for fresh, high-quality heavy cream when making your custard. Some supermarket brands may contain added stabilizers, so look for pure heavy cream or whipping cream without additives. You can even use double cream for a richer taste, though regular heavy cream is usually sufficient.
- A Tip for Perfecting the Texture: Don’t overheat the cream. Gently warming it allows the fat to blend seamlessly with the egg yolks, creating the right consistency. Too much heat can cause the cream to separate, which can ruin the texture of your custard.
2. Egg Yolks: The Key to Setting the Custard
Egg yolks are essential for thickening your crème brûlée base and adding a rich, golden hue. They are the perfect balance between providing structure and contributing to the luxurious texture that’s central to a good crab brulee.
- What Egg Yolks Do: The proteins in egg yolks act as a natural thickener when combined with cream. They help the custard set to the right consistency without becoming overly firm or rubbery. The egg yolks also emulsify the mixture, binding the fat in the cream with the liquids for a smooth and cohesive texture.
- How Many Egg Yolks to Use: For every 1 cup of heavy cream, you’ll typically use 4-6 egg yolks, depending on the recipe. Using too few yolks can lead to a custard that’s too thin, while too many can make it overly firm. This balance is key to achieving that perfect custard-like consistency.
- Temperature Tip: Be mindful when adding the egg yolks to the warm cream. If the cream is too hot, it can cook the yolks too quickly, resulting in scrambled eggs. To prevent this, always temper the egg yolks by gradually adding a small amount of the warm cream to the yolks while whisking constantly. This step ensures that the egg yolks slowly heat up without curdling, leading to a smooth custard.
3. Sugar: Sweetness and Caramelization
Sugar is more than just a sweetener in crème brûlée; it plays an important role in balancing the richness of the cream and the savory notes from the crab. In your crab brulee, the sweetness of the sugar provides the contrast needed to highlight the briny, delicate flavor of the crab meat.
- The Role of Sugar: Sugar not only sweetens the custard, but it also contributes to the final caramelized topping. You’ll use sugar both in the custard base (to sweeten the cream and egg yolks) and on top, where it’s caramelized to create that signature crunchy shell. The sugar helps to enhance the flavor without overpowering the other ingredients.
- Types of Sugar to Use: The best sugar for crème brûlée is granulated sugar, as it dissolves easily in the custard mixture. For the topping, you can use either granulated sugar or demerara sugar, which will give you a larger, crunchier texture once torched.
- Caramelizing the Sugar: The key to achieving that crispy, golden-brown sugar topping lies in the use of a brulee torch. A thin layer of sugar is sprinkled on top of the custard and torched until it forms a perfect glassy crust. The sugar needs to melt and bubble, then harden into that satisfying crunch. You don’t want the sugar to burn, though—just enough to create the signature crackling top that contrasts beautifully with the creamy custard underneath.
How These Ingredients Work Together
When combined, heavy cream, egg yolks, and sugar create the perfect balance of rich, silky texture and sweet flavor. The cream gives you that smooth mouthfeel, the egg yolks provide structure and stability, and the sugar offers both sweetness and the coveted caramelized top. These ingredients are the backbone of any crème brûlée—and when you make them work together perfectly, they transform your crab brulee into a decadent dish that’s guaranteed to impress.
A Quick Recap: Getting the Right Balance for Perfect Crab Brulee
Here’s a quick recap of what each ingredient brings to your crab brulee:
- Heavy Cream: Provides richness and smooth texture.
- Egg Yolks: Thickens the custard and gives it the right structure.
- Sugar: Sweetens the custard and creates the signature caramelized topping.
By mastering these three ingredients, you’ll be well on your way to making the perfect crab brulee with a custard that’s silky, balanced, and just the right amount of sweet.
Call to Action: Ready to try making the perfect crab brulee? Now that you know the basics of crafting a smooth, rich custard, it’s time to gather your ingredients and dive into the recipe. Be sure to let us know how it turns out—whether you’re new to crème brûlée or a seasoned pro, we’d love to hear about your cooking experience!
Brulee Sugar: How to Choose the Best Sugar for the Perfect Caramelized Topping
One of the most distinctive features of crème brûlée—and its savory cousin, crab brulee—is the caramelized sugar crust that cracks when you tap it with a spoon. This delightful topping is what gives the dish its signature texture, offering a beautiful contrast to the creamy custard beneath. But to achieve that flawless golden-brown crust, the type of sugar you use matters. Not all sugars are created equal, and choosing the right one can elevate your dish from good to exceptional.
In this section, you’ll discover everything you need to know about brulee sugar—from the best types of sugar to use to expert tips on how to achieve the perfect caramelized top. Let’s dive in!
Why Sugar Matters for the Caramelized Topping
The sugar you choose plays a critical role in how the caramelized topping will turn out. While granulated sugar is the most commonly used for crème brûlée, there are other options to consider that can affect the final look, flavor, and texture of the crust. The goal is to create a thin, even layer of sugar that melts quickly under a brulee torch, then hardens into a crisp, glossy shell. Here’s why sugar selection is key:
- Meltability: Some sugars melt more easily than others, creating a smooth, even caramelized layer. You want a sugar that can melt without burning, forming that perfectly glossy top.
- Texture: The size and texture of sugar crystals will influence the final crust’s texture. Larger crystals can create a more textured, crunchy topping, while finer sugars may produce a smoother, more delicate finish.
- Flavor: Each type of sugar has its own flavor profile. The right choice can enhance the overall taste of your crab brulee, complementing the sweetness of the custard and the savory notes of the crab.
Best Types of Sugar for Brulee: A Breakdown
Here are the top sugars to consider when making your crab brulee. Each type has its benefits, and your choice will depend on the texture and flavor you’re aiming for.
1. Granulated Sugar (Standard Sugar)
Granulated sugar is the most common choice for brulee topping. It’s a staple in most kitchens and works perfectly for creating a thin, even caramelized layer.
- Why It’s Ideal: Granulated sugar has the right crystal size for even melting and caramelization. When torched, it melts quickly and forms a nice, smooth crust.
- Pros: Easy to find, affordable, and effective in creating a traditional caramelized brulee topping.
- How to Use It: Sprinkle a thin, even layer of granulated sugar over the custard just before torching. A little goes a long way, so you don’t need to use too much.
2. Demerara Sugar (Larger Crystals)
Demerara sugar has large, coarse crystals that give your brulee topping a unique texture. It’s light brown in color and has a slight molasses flavor, making it a great choice if you want to add complexity to the sweetness.
- Why It’s Ideal: The larger crystals of demerara sugar don’t dissolve as easily as granulated sugar, giving your brulee a more crunchy and textured crust. This can be particularly appealing for those who enjoy a bit more crunch in their desserts.
- Pros: Adds a unique caramel flavor with a hint of molasses. The large crystals give a more rustic, crunchy finish to the topping.
- How to Use It: Sprinkle generously over your custard. Since demerara doesn’t dissolve as quickly, you may need to use a little more heat to achieve a smooth caramelization. But once it melts, it will give you a lovely, textured topping.
3. Turbinado Sugar (Raw Cane Sugar)
Turbinado sugar is another great option for brulee, made from the first pressing of sugar cane. It’s golden brown and has a mild molasses flavor, which can add extra depth to your caramelized topping.
- Why It’s Ideal: Turbinado sugar has a slightly finer grain than demerara sugar but is still coarser than regular granulated sugar. It gives the brulee a caramelized crunch without being too harsh.
- Pros: The sugar crystals are large enough to create a crunchy topping, but they melt faster than demerara sugar, offering a balance between smoothness and texture.
- How to Use It: Like demerara, turbinado sugar can be used in a thin, even layer. It works well for a balanced mix of caramelized crunch and smooth sweetness.
4. Brown Sugar (Light or Dark)
Brown sugar comes in two varieties: light and dark. Both types are made by adding molasses to white sugar, with dark brown sugar containing more molasses, which gives it a deeper flavor.
- Why It’s Ideal: Brown sugar can lend a more complex, rich flavor to your brulee topping, especially if you enjoy a bit of warmth and depth to your sweetness. It’s perfect if you want to experiment with flavors beyond the traditional.
- Pros: Adds a rich molasses flavor that complements both the sweetness of the custard and the savory notes of the crab. It also caramelizes nicely under heat.
- How to Use It: Brown sugar can be sprinkled on top just like granulated sugar. However, because of its moist texture, it might need a little more time under the torch to achieve the right crispness.
Tips for Achieving the Perfect Caramelized Brulee Topping
- Even Layering: Regardless of which sugar you choose, it’s important to apply a thin, even layer over your custard. Too much sugar can result in a clumpy, uneven crust, while too little may not give you the satisfying crack that’s a hallmark of a good brulee.
- Torching Technique: Use a brulee torch to evenly melt and caramelize the sugar. Hold the torch about 3-4 inches above the sugar and move it in small, circular motions. This ensures that the sugar melts evenly, creating a uniform, golden crust.
- Watch for Burnt Sugar: Keep an eye on the sugar while torching. Sugar can burn quickly once it’s caramelized, turning bitter if overdone. Aim for a golden amber color, which signals the perfect balance of sweetness and crispness.
Final Thoughts: The Right Sugar Makes All the Difference
Choosing the right sugar for your brulee topping can dramatically improve the flavor and texture of your crab brulee. Whether you go with the classic granulated sugar for a smooth finish or opt for the rustic demerara or turbinado sugars for added crunch, each type will bring something unique to the dish. Don’t be afraid to experiment with different sugars to find the perfect match for your taste.
Call to Action:
Now that you know all about brulee sugar and how to use it to create the perfect caramelized topping, it’s time to put your knowledge to the test! Try using different sugars and torch techniques to discover which one gives your crab brulee the perfect finish. And once you’ve created your masterpiece, we’d love to hear about it—share your tips and results with us, and let’s keep the culinary conversation going!
Optional Add-ins: Explore Variations Like Adding Lobster, Seafood Stock, or Herbs to Elevate the Flavor
While crab brulee is already an impressive dish on its own, sometimes you might want to take it up a notch. Whether you’re looking to intensify the flavors, add a luxurious twist, or make the dish truly unique, optional add-ins can transform the recipe and leave your guests in awe. In this section, we’ll explore several ways to elevate your crab brulee using lobster, seafood stock, herbs, and other creative ingredients.
These optional additions can introduce new textures, flavors, and complexity to your brulee, making it a standout dish for special occasions or elegant dinner parties.
1. Adding Lobster: A Luxurious Twist for an Extra Rich Flavor
Lobster and crab are both part of the same rich seafood family, so combining them in a single dish makes perfect sense. Adding lobster to your crab brulee not only elevates the dish’s luxury factor but also deepens the seafood flavor profile while maintaining a delicate balance of sweetness and richness.
- Why Lobster Works: Lobster meat is tender, sweet, and slightly more delicate than crab, which complements the custard base of your brulee. When added to the mix, lobster provides a slightly more refined texture and adds a more complex seafood flavor. Its natural sweetness and subtle brininess contrast beautifully with the richness of the cream and egg yolks in the custard.
- How to Add Lobster:
- Lobster Tail: For the best results, use lobster tail meat. Steam or poach the lobster briefly to preserve its flavor and tenderness. Once cooked, chop the lobster into bite-sized pieces and fold it gently into the custard base before baking.
- Infuse the Cream: Another way to incorporate lobster flavor is by infusing your heavy cream with lobster shells. Simply simmer the lobster shells in the cream for about 15-20 minutes to extract the flavors. Strain out the shells, then proceed with the recipe as usual.
- Flavor Tip: When adding lobster, be sure to taste the custard before baking. Since lobster can be quite sweet, you may want to slightly adjust the seasoning by adding a touch more salt or lemon zest to balance the flavors.
2. Using Seafood Stock: Intensify the Seafood Flavor
Another excellent way to elevate your crab brulee is by swapping out a portion of the cream for seafood stock. This substitution imparts a subtle depth of flavor that ties the whole dish together, reinforcing the seafood elements without overwhelming the custard.
- Why Seafood Stock Works: Seafood stock, especially when made from shrimp shells, crab shells, or other fish bones, is rich in natural umami and brininess. It infuses the custard base with a savory seafood note that adds complexity. If you love the idea of a savory brulee that has a more pronounced seafood taste, this method will take your dish to the next level.
- How to Use Seafood Stock:
- Swap about 1/4 to 1/3 of the cream with seafood stock. This will give the brulee a deeper, richer flavor, while still maintaining the creaminess of the custard.
- If you’re making your own stock, keep it mild so that it doesn’t overpower the dish. It’s best to strain the stock well to remove any solids before adding it to the cream.
- Flavor Tip: A little goes a long way with seafood stock, so be careful not to add too much. You want the flavor to enhance the dish, not overpower the delicate sweetness of the crab.
3. Adding Fresh Herbs: A Burst of Freshness and Aroma
While crab brulee is primarily a rich, creamy dish, a touch of fresh herbs can cut through the richness and bring an added layer of freshness to the dish. Herbs add a natural fragrance that complements the seafood and balances the savory flavors with a hint of green brightness.
- Herbs to Consider:
- Tarragon: This herb’s slight aniseed flavor pairs beautifully with seafood and can elevate your brulee in a subtle yet impactful way. Add a few sprigs of fresh tarragon to the cream while it’s heating to infuse its flavor, or finely chop and sprinkle it over the finished brulee.
- Chives: Their mild, onion-like flavor works well with crab and lobster. You can add a few finely chopped chives to the custard or sprinkle them on top just before serving.
- Thyme: Thyme’s earthy, slightly citrusy notes add a nice contrast to the richness of the cream. You can infuse the cream with a few sprigs of fresh thyme for a gentle, aromatic flavor.
- Basil: If you prefer something a bit brighter, fresh basil can be a fantastic addition. Pair it with crab for a more Mediterranean flair.
- How to Use Herbs:
- Infuse them in the cream. When warming your cream, add the herbs of your choice and let them steep for a few minutes. Once infused, strain them out and proceed with your brulee recipe.
- Add them to the finished dish as a garnish. Fresh herbs like chives or tarragon can be sprinkled on top just before serving for a burst of freshness.
- Flavor Tip: Use herbs sparingly, as their flavors can be potent. A little bit goes a long way, and you want the herbs to enhance, not dominate, the seafood flavors.
4. Other Flavor Boosters: A Touch of Citrus or Spice
If you’re feeling adventurous, there are other ingredients that can add layers of flavor to your crab brulee:
- Citrus Zest: Adding a zest of lemon, lime, or even orange can help balance the richness of the cream and seafood. Citrus works particularly well with lobster and crab, bringing a bright, fresh contrast.
- Try adding a small amount of lemon zest to the custard before baking, or sprinkle a bit on top before serving for an added burst of freshness.
- Spices: A touch of spice can really elevate the flavors in your crab brulee. Consider adding a pinch of cayenne pepper, white pepper, or even a dash of nutmeg to the custard base to introduce some warmth.
- Cayenne or white pepper pairs wonderfully with seafood, while nutmeg adds an unexpected but delightful warmth.
5. Combining Add-ins for Maximum Flavor
Why stop at just one add-in when you can combine a few to create a truly unforgettable crab brulee? For instance:
- Lobster with seafood stock and tarragon can give you a luxurious, herbaceous seafood flavor.
- A dash of citrus zest with fresh chives can bring a refreshing, zesty note to your brulee, lightening the richness.
- Cayenne pepper with lobster adds a little kick to balance out the sweetness of the crab and lobster.
The beauty of crab brulee lies in its versatility. Whether you want to enhance the seafood flavor with lobster, deepen it with seafood stock, or add a burst of freshness with herbs and citrus, the possibilities are endless.
Final Thoughts: Get Creative with Your Crab Brulee Add-ins
By experimenting with lobster, seafood stock, and fresh herbs, you can easily take your crab brulee to new heights. The key is to balance the rich, creamy custard with complementary ingredients that enhance both the flavor and texture. Whether you opt for a luxurious lobster twist or choose to keep it simple with a touch of fresh thyme, these optional add-ins will allow you to create a unique and unforgettable dish every time.
Call to Action:
Now that you have some fresh ideas for optional add-ins, it’s time to get cooking! Try out one of these variations in your next crab brulee and see how the flavors transform. We’d love to hear how it turns out—whether you stick to the classic or get creative with lobster and herbs, share your results with us! Let’s keep the culinary conversation going!
Step-by-Step Instructions to Make Crab Brulee
Preparing the Crab Meat: How to Properly Prepare and Cook Crab Meat for Your Dish
When it comes to crab brulee, the crab meat is the star of the show, so it’s essential to know how to prepare it correctly. Whether you’re using fresh, frozen, or canned crab meat, the way you handle and cook the crab will significantly affect the final flavor and texture of your dish. The key to a perfect crab brulee lies in achieving that delicate balance between tender, flaky crab and the creamy custard that surrounds it.
In this section, we’ll guide you through the steps to properly prepare your crab meat, ensuring that it enhances your brulee rather than overpowering it. Let’s dive in!
1. Choosing the Right Crab Meat for Brulee
Before you begin preparing the crab, the first step is to select the best type of crab meat. The flavor and texture of your brulee will largely depend on this choice. Here are some options:
- Fresh Crab Meat: If you have access to fresh crab, this is usually the best option for a rich, sweet, and tender flavor. Fresh crab meat, particularly from blue crabs or king crabs, will offer the most authentic and vibrant flavor.
- Frozen Crab Meat: While not quite as fresh as the real thing, frozen crab meat can still deliver a high-quality product if you buy from a reputable source. Look for flash-frozen crab meat, as it’s often better preserved and retains much of its original flavor.
- Canned Crab Meat: Canned crab is convenient, but its quality can vary depending on the brand. If you choose canned crab meat, look for high-quality options with minimal additives. The best canned crab meat comes from lump crab, which offers a nice texture for the brulee.
- Imitation Crab Meat: While cost-effective, imitation crab (also known as surimi) lacks the flavor and texture of real crab. We recommend avoiding this for your crab brulee if you’re seeking an authentic, high-quality dish.
2. Preparing Fresh Crab Meat: The Step-by-Step Process
If you’re using fresh crab, it’s essential to know how to handle and cook it properly to preserve its flavor and texture. Here’s how to prepare your crab meat:
A. Crack the Crab (If Using Whole Crab)
If you’re starting with whole crabs, follow these steps:
- Boil or Steam the Crab: Begin by bringing a large pot of salted water to a boil. Add the live crabs and cook for about 10-15 minutes until they turn bright orange. Alternatively, you can steam them for about 15 minutes.
- Cool the Crab: Once cooked, transfer the crabs to an ice bath or allow them to cool down before handling.
- Crack the Shell: Using a crab cracker or a heavy knife, crack open the legs and body. Remove the meat from the shell carefully, being sure to discard any cartilage or shell fragments. If you’re working with blue crab or king crab, you’ll need to remove the meat from both the legs and body.
- Pick Through the Meat: As you pick through the meat, separate the lump meat from the flaky meat. You’ll want to use the lump meat for a more refined texture in your brulee. Ensure there are no bits of shell left in the meat.
B. Using Pre-Cooked Crab Meat (Frozen or Canned)
If you’re using frozen or canned crab meat, follow these simple steps:
- Thaw Frozen Crab Meat: Place the frozen crab meat in the refrigerator to thaw overnight. If you’re short on time, you can place it in a sealed plastic bag and submerge it in cold water for about 30 minutes.
- Drain Excess Liquid: Canned and frozen crab meat often releases excess moisture, so be sure to drain it well. Place the meat in a fine mesh strainer to remove any liquid. You can also gently press the meat with a paper towel to absorb excess moisture.
- Check for Shell Fragments: Even if your crab meat is pre-cooked, you should still check it carefully for any small bits of shell. Use your fingers or tweezers to remove any stray pieces.
3. Cooking Crab Meat for the Brulee
Now that your crab meat is prepared, you need to cook it just enough to enhance its flavor without making it tough or overcooked. Here’s how to do it:
A. Sautéing the Crab Meat (Optional)
Sautéing the crab meat in a bit of butter or olive oil can intensify its natural sweetness and add a layer of richness. Here’s how to do it:
- Heat a Pan: Place a sauté pan over medium heat and add a tablespoon of butter or oil.
- Add the Crab: Once the butter is melted or the oil is hot, add your crab meat. Sauté it gently for 1-2 minutes to allow the crab to absorb the butter and heat through. Be sure not to overcook the crab—just enough to warm it up and allow it to pick up the buttery flavor.
- Season Lightly: A pinch of salt, pepper, and a dash of lemon juice can brighten the flavors. You can also add a sprinkle of paprika or garlic powder for a subtle depth of flavor.
B. Infusing Flavor with Seafood Stock (Optional)
If you want to infuse the crab with even more seafood flavor, consider bathing the crab meat in seafood stock for a few minutes. This works especially well if you’re using frozen or canned crab meat that may not have as strong of a flavor on its own. Here’s how to do it:
- Simmer the Crab Meat in Seafood Stock: In a small saucepan, heat a few tablespoons of seafood stock. Once it’s simmering, add your crab meat and let it cook for 2-3 minutes to allow the flavors to meld.
- Drain the Crab: After simmering, remove the crab meat from the stock and drain it thoroughly. This extra step can impart a richer, more robust flavor to the crab, which complements the custard beautifully in the brulee.
4. Incorporating the Crab Meat into the Brulee
Once your crab meat is perfectly prepared, it’s ready to be incorporated into the brulee custard. Here’s how to do it:
- Chop the Crab: Depending on your preference, you can either leave the crab meat in large chunks for a more textured bite or shred it for a finer consistency. If you want a more refined dish, opt for larger chunks so the crab is more prominent in each bite.
- Add to the Custard: After preparing your brulee custard base (heavy cream, egg yolks, and seasonings), gently fold the crab meat into the custard mixture. Be careful not to break up the chunks too much—ideally, the crab should be incorporated evenly, so it maintains its texture when baked.
- Top the Brulee: Spoon the custard mixture with crab into individual ramekins. Be sure to distribute the crab meat evenly so every bite gets a perfect ratio of crab to custard.
5. Final Thoughts on Preparing Crab Meat
Preparing crab meat for your crab brulee is an essential step in achieving a delicious and well-balanced dish. Whether you’re starting from fresh crab or using frozen or canned options, the key is to handle the meat carefully, cook it just enough to enhance its flavor, and ensure it’s properly incorporated into the custard. With the right technique, your crab brulee will feature perfectly cooked, tender crab that complements the creamy custard and the caramelized sugar topping.
Call to Action:
Now that you know how to properly prepare and cook crab meat for your crab brulee, it’s time to put this knowledge into action! Whether you’re using fresh, frozen, or canned crab, follow these steps to ensure your crab brulee turns out flavorful and perfectly cooked. We’d love to hear how it turns out—share your crab brulee adventures with us, and let’s continue this culinary conversation!
Making the Brulee Custard: A Guide to Creating the Creamy Base, Including Tips on Tempering Eggs
The custard base is the heart and soul of your crab brulee. It’s where the magic happens, blending the richness of heavy cream, the smooth texture of egg yolks, and the sweetness of sugar into a perfect, velvety mixture that complements the delicate crab meat. However, making the custard can be a bit tricky, especially when it comes to tempering eggs. But don’t worry—by following a few simple steps, you’ll be able to create a creamy base that’s both smooth and flavorful.
Let’s break it down step-by-step so you can get this essential part of your crab brulee just right.
1. The Basic Ingredients for the Custard
Before diving into the technique, let’s first go over the key ingredients you’ll need to make your brulee custard:
- Heavy Cream: The creamy, rich base that gives the custard its luxurious texture.
- Egg Yolks: They provide the structure and smooth consistency of the custard. The yolks are key to achieving that rich mouthfeel without it being too thick.
- Sugar: Adds sweetness to balance the natural savory flavor of the crab and create that signature caramelized topping once the brulee is baked.
These three ingredients come together to form the classic brulee custard. The challenge lies in tempering the eggs correctly, so they don’t scramble when combined with the hot cream.
2. What Is Egg Tempering and Why Is It Important?
Tempering eggs is a crucial technique in making custards or sauces. It involves gradually raising the temperature of the eggs to prevent them from cooking too quickly when mixed with the hot cream, which could result in scrambled eggs instead of a smooth custard. You want the eggs to thicken the mixture, not cook.
Here’s why tempering is so important for your brulee custard:
- Prevents Curdling: Without tempering, the eggs could cook unevenly when exposed to the heat of the cream, causing an undesirable curdled texture.
- Creates a Smooth, Silky Texture: By gently increasing the temperature of the eggs, you achieve a delicate, smooth custard that is perfect for the creamy texture of crab brulee.
3. Step-by-Step Guide to Making the Custard
Now that you understand the importance of tempering, let’s break down the custard-making process step-by-step.
A. Heat the Cream
- Pour the Cream into a Saucepan: Start by pouring your heavy cream into a medium saucepan.
- Warm the Cream Over Medium Heat: Slowly heat the cream over medium heat, stirring occasionally. You’re not trying to bring the cream to a boil, but to scald it (heat it until it’s just about to boil). You’ll see steam rising from the cream, and small bubbles will begin to form at the edges of the saucepan. This is the point where the cream is hot enough to temper the eggs but not so hot that it will curdle the eggs.
- Optional Flavor Add-ins: If you want to infuse your cream with extra flavor, now’s the time to do it. For instance, you could add a vanilla bean pod, lemon zest, or even a sprig of thyme. Let it steep in the cream for a few minutes, then strain out the flavorings before moving on to the next step.
B. Whisk the Egg Yolks and Sugar
- Separate the Eggs: While your cream is heating, separate the egg yolks from the whites. You’ll only need the yolks for the brulee.
- Whisk the Yolks with Sugar: In a separate bowl, whisk together the egg yolks and sugar until the mixture becomes slightly lighter in color and smooth. You should whisk vigorously to help dissolve the sugar into the yolks, creating a uniform base.
- Optional Flavor Adjustments: You can also whisk in a pinch of salt to help balance the sweetness, but this is optional.
C. Temper the Eggs
Now it’s time for the critical step: tempering the eggs.
- Slowly Add the Hot Cream: Once the cream is ready, remove it from the heat. With one hand, begin to slowly pour a small amount of the hot cream into the egg yolks while continuously whisking. This helps gradually increase the temperature of the eggs without cooking them. Start with just a couple of tablespoons of hot cream, then increase the amount as you whisk. The goal is to gently warm up the egg yolks.
- Pour in the Rest of the Cream: Once the yolks are warmed, slowly add the rest of the hot cream into the egg mixture while whisking constantly. This steady process ensures the eggs don’t cook prematurely.
- Strain the Custard: Once all the cream has been incorporated into the egg mixture, strain the custard through a fine-mesh sieve or cheesecloth. This step helps remove any potential bits of cooked egg and ensures your custard is silky smooth.
D. Baking the Custard
- Fill Your Ramekins: Pour the custard into individual ramekins or a baking dish of your choice. Be sure not to fill the ramekins all the way to the top, as the custard will puff up slightly while baking.
- Bake in a Water Bath: To ensure gentle and even cooking, place your ramekins in a larger baking dish and fill the dish with hot water until it reaches halfway up the sides of the ramekins. This water bath helps regulate the temperature as the custard bakes, preventing it from curdling or becoming too firm.
- Bake at Low Temperature: Bake the custard at 325°F (163°C) for 30-40 minutes, or until the edges are set but the center is still slightly wobbly when you gently shake the ramekin. The custard will continue to firm up as it cools, so don’t worry if it’s a little soft in the center when you remove it from the oven.
- Cool the Custard: Let the custard cool at room temperature, then refrigerate it for at least 2 hours before adding the sugar topping.
4. Troubleshooting Tips for the Perfect Custard
Sometimes, making the perfect custard can be a bit tricky. Here are a few common issues and how to avoid them:
- Custard Is Too Runny: If your custard doesn’t set properly, it might be because the eggs weren’t cooked enough. Ensure that the custard is baked at a low temperature and check that the center wobbles just slightly. You can also try increasing the ratio of egg yolks to cream next time.
- Eggs Scrambled: If the eggs start to scramble, it means the cream was added too quickly or was too hot. Always temper slowly and whisk continuously.
- Too Sweet or Too Rich: If your custard ends up too sweet, cut back on the sugar next time. If it’s too rich, try using slightly less cream and more milk to balance it out.
5. Final Thoughts on Making the Perfect Brulee Custard
Making the brulee custard is a delicate process that requires attention to detail, especially when it comes to tempering the eggs. With the right techniques, you’ll be able to create a velvety smooth custard that pairs perfectly with your crab brulee. Remember, the secret is in the slow and steady process—taking your time with the cream, eggs, and sugar will result in a perfect balance of richness and creaminess.
Call to Action:
Now that you’ve mastered the art of making a smooth, creamy brulee custard, it’s time to get cooking! With these techniques in hand, you’re well on your way to creating the perfect crab brulee. Don’t forget to share your results with us—whether you’re making it for a special occasion or a casual dinner, we’d love to hear how your custard turns out. Ready to bake the perfect crab brulee? Let’s make it happen!
Assembling the Dish: How to Combine the Crab and Custard in Ramekins for the Perfect Texture
Now that you’ve prepared both the crab meat and the creamy brulee custard, the final step is to assemble everything into individual ramekins before baking. This step is crucial because the way you layer the crab and custard will directly influence the texture and flavor of the finished dish. It’s not just about adding the crab to the custard—it’s about getting the balance just right, so every bite has a perfect amount of tender crab and silky custard.
Let’s break down the best method for assembling your crab brulee, ensuring that you achieve a harmonious texture in every serving.
1. Choosing the Right Ramekins
The first step in assembling your dish is selecting the appropriate ramekins. The size of the ramekin will affect the cooking time and texture of your crab brulee, so it’s important to use the right ones.
- Size Matters: Typically, for crab brulee, individual ramekins that hold about 6 ounces (180 ml) of custard work best. This size allows the custard to set properly and ensures an even, controlled cooking process.
- Material Choice: Porcelain or ceramic ramekins are ideal for even heat distribution. They help the custard bake gently, giving it a smooth, creamy texture without overcooking or curdling.
2. Layering the Crab and Custard
Once you’ve chosen your ramekins, it’s time to layer the ingredients. This is where the magic happens, and getting the right amount of crab and custard in each ramekin will elevate the final dish.
A. Start with the Crab Meat
- Evenly Distribute the Crab: Begin by spooning the prepared crab meat into the bottom of each ramekin. For the best texture, aim for 1 to 2 tablespoons of crab meat per ramekin, depending on the size of your dish and how crab-forward you want the flavor to be.
- If you used lump crab meat, it’s best to keep the pieces slightly chunky for texture. This will create a nice contrast against the smooth custard. If you’re using shredded crab meat, it can be mixed more easily into the custard, but the texture may not stand out as much.
- Press Down Gently: Lightly press the crab meat down with a spoon, ensuring it’s even. This will help prevent the crab from floating to the top when you pour in the custard, creating a more balanced texture.
B. Pouring in the Custard
Once the crab is evenly distributed in the ramekins, it’s time to add the custard mixture. This is where you’ll see the magic of the brulee come together.
- Slowly Add the Custard: Using a spoon or a small ladle, carefully pour the custard over the crab meat. You want to fill each ramekin to about 3/4 full. Make sure the custard gently covers the crab, allowing it to sink slightly into the mixture. However, avoid overfilling, as this could result in a messy bake.
- Avoid Air Bubbles: Pouring the custard slowly helps minimize air bubbles, which can affect the smooth texture of the final dish. If you notice any air bubbles forming on top, you can tap the ramekins gently on the counter to release them.
- Ensure Even Coverage: Check that the crab meat is evenly submerged in the custard. The custard should rise around the crab, holding it in place but allowing the texture of the crab to remain somewhat distinct.
3. Creating the Perfect Texture with a Water Bath
Before you place your ramekins in the oven, it’s essential to create a water bath. This technique ensures that the custard cooks slowly and evenly, leading to a smooth and creamy texture without curdling.
- Prepare the Water Bath: Place a large baking dish (or a roasting pan) on the counter. Place the filled ramekins into the baking dish, making sure they fit snugly but are not touching each other.
- Add Hot Water: Fill the baking dish with hot water until it reaches halfway up the sides of the ramekins. The water should be hot (but not boiling) to help regulate the cooking temperature and prevent the custard from setting too quickly or unevenly.
- Why a Water Bath?: The water bath provides gentle, even heat, allowing the custard to cook slowly. This prevents the risk of the custard curdling or developing an undesirable texture. It also helps avoid over-baking, which could make the custard too firm.
4. Baking the Crab Brulee
Now that the crab and custard are assembled and your ramekins are in the water bath, it’s time to bake your crab brulee. The baking process is where the flavors meld together, and the custard reaches that perfect, creamy consistency.
- Bake at the Right Temperature: Preheat your oven to 325°F (163°C). This low temperature ensures that the custard bakes evenly and gently, resulting in a smooth texture that’s not too firm or watery.
- Bake Until Set: Place the ramekins in the preheated oven and bake for 30-40 minutes, or until the edges are set, but the center still has a slight wobble when you gently shake the ramekin. The custard should be firm around the edges but slightly jiggly in the center.
- Check for Doneness: To test for doneness, insert a small knife into the center of the custard. If it comes out clean, it’s ready. If it has custard on it, continue baking for a few more minutes.
5. Cooling and Chilling
Once your crab brulee is baked to perfection, remove it from the water bath and allow the ramekins to cool at room temperature. This step is important because it helps the custard firm up further.
- Cool to Room Temperature: Allow the ramekins to cool for at least 30 minutes before transferring them to the refrigerator.
- Chill Before Serving: Let the brulee chill in the refrigerator for at least 2 hours. This ensures the custard sets properly and achieves that perfect texture. Chilling also allows the flavors to develop and the crab to settle into the custard.
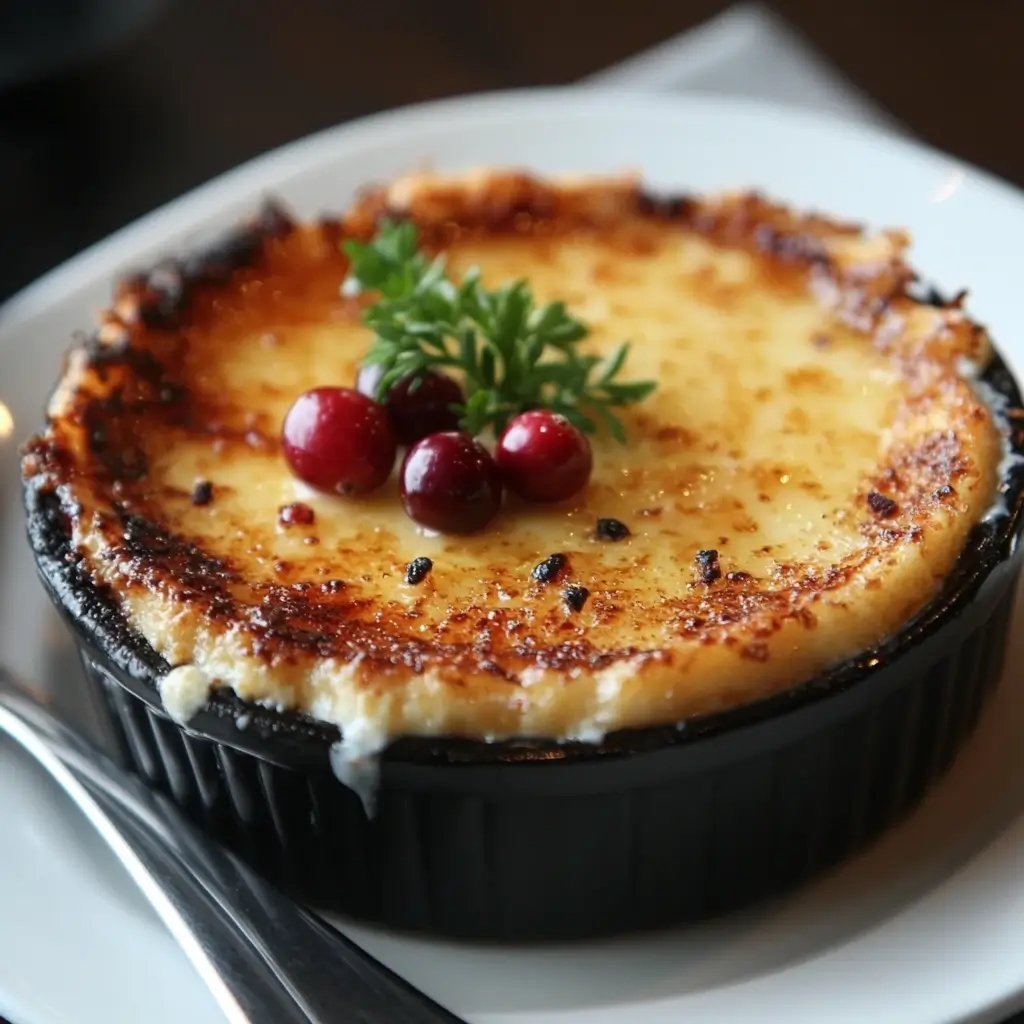
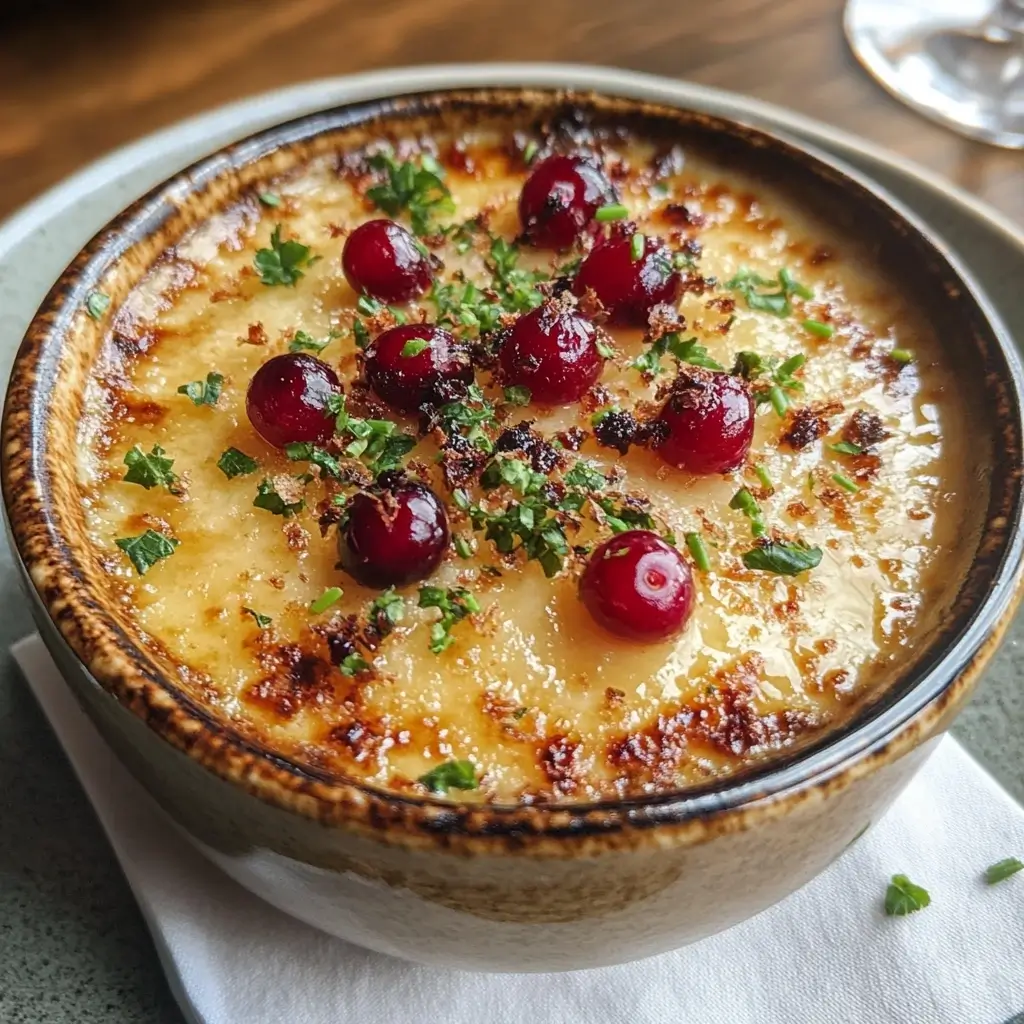
6. Final Touch: The Sugar Topping
While the crab brulee is chilling, you can prepare the caramelized sugar topping. This final touch is essential for the signature brulee experience—the crispy, golden caramelized sugar layer that contrasts beautifully with the creamy custard beneath.
- Sprinkle Sugar Evenly: Just before serving, sprinkle a thin, even layer of turbinado sugar or granulated sugar on top of each ramekin.
- Caramelize the Sugar: Use a kitchen torch to caramelize the sugar, moving the torch back and forth to create an even golden-brown color. If you don’t have a torch, you can place the ramekins under a preheated broiler for about 1-2 minutes, watching closely to avoid burning the sugar.
Call to Action:
Now that you’ve mastered the art of assembling the perfect crab brulee, it’s time to give it a try! Follow these steps to create a beautifully balanced dish that’s both elegant and satisfying. Don’t forget to share your experience with us—whether you’re hosting a dinner party or enjoying a special meal at home, we’d love to hear how your crab brulee turns out! Ready to impress your guests? Let’s get cooking!
Torching the Sugar: Step-by-Step Guide on Using a Brulee Torch to Caramelize the Sugar
The final touch on your crab brulee is the caramelized sugar topping, which provides that signature crunchy contrast to the creamy custard beneath. Achieving that perfectly golden, crispy layer of sugar requires precision and the right technique. Fortunately, using a brulee torch (or kitchen torch) is a straightforward and fun way to get it just right.
Torching sugar might seem intimidating at first, but once you understand the basics, it’s simple and rewarding. Here’s your complete guide to torching sugar for the perfect brulee.
1. Preparing the Ramekins for Torch Work
Before you start torching, it’s important to prepare your crab brulee ramekins properly.
- Chill the Custard: Ensure your crab brulee is fully chilled in the refrigerator. The custard should be set, cool to the touch, and firm before you torch the sugar. This step prevents the custard from melting or becoming runny when you apply heat.
- Even Sugar Layer: After the custard has chilled, sprinkle a thin, even layer of sugar over the top of each ramekin. You want enough sugar to cover the surface but not so much that it forms a thick layer. Typically, 1 to 2 teaspoons of sugar per ramekin should be sufficient.
- Tip: Use granulated sugar or turbinado sugar for a nice, crunchy texture. Turbinado sugar, with its larger crystals, will give you a coarser, more pronounced caramelization.
2. Choosing the Right Brulee Torch
To caramelize the sugar effectively, you need a good brulee torch. Here’s what to look for:
- Fuel Type: Most brulee torches use butane as the fuel. Make sure your torch is filled and ready to go. If you’re new to using a brulee torch, choose one with adjustable flame settings for better control.
- Size and Design: A handheld kitchen torch is ideal because it allows you to move the flame over the sugar evenly. Look for a model with a comfortable grip and easy ignition for ease of use.
If you don’t have a brulee torch, you can use your oven’s broiler, but a torch will give you much better control over the caramelization process.
3. Lighting the Torch
Now it’s time to fire up the brulee torch! Follow these steps carefully for safety and precision:
- Ignite the Torch: Hold the torch upright, away from your face and body. Ignite the flame by pressing the ignition button (usually located on the side or front) while adjusting the fuel to achieve a low to medium flame. Make sure the flame is steady and not too large.
- Test the Flame: Before getting too close to your dessert, test the flame on a non-food surface. A small, controlled flame is perfect for caramelizing the sugar. The torch should produce a blue or yellow flame—aim for a steady, controlled blue flame for the best results.
4. Caramelizing the Sugar
This is where the magic happens! Using a kitchen torch to caramelize the sugar can feel like a mini cooking adventure. Here’s how to do it correctly:
- Position the Torch Above the Sugar: Hold the torch about 2 to 3 inches above the surface of the sugar. You want the flame to be slightly angled and not directly touching the sugar. Move the flame around in a slow, circular motion to ensure even caramelization.
- Torch Until the Sugar Melts and Turns Golden: As the flame hits the sugar, you’ll begin to see it melt and bubble slightly. The sugar will turn golden and then gradually brown as it caramelizes. Keep the flame moving constantly to avoid burning one spot.
- Tip: Watch closely! The sugar can go from golden to burnt very quickly, so it’s important to keep the torch moving and monitor the color. The goal is a deep amber color with a glossy finish.
- Achieving the Perfect Crust: The sugar should form a crisp, glass-like shell. As it cools, it will harden into the perfect crunchy layer that contrasts beautifully with the creamy custard below.
5. After Torching: Let the Sugar Set
Once the sugar is perfectly caramelized, give it a few moments to cool and harden. This allows the caramelized sugar to fully set into a crunchy topping, giving you that signature crack when you dig into the brulee with your spoon.
- Tip: If you notice any areas that didn’t caramelize fully, feel free to touch up those spots with a quick burst of flame. Just be cautious—more heat could potentially melt the custard underneath.
6. Enjoy Your Perfect Crab Brulee
Once the sugar has cooled and the crunchy layer has formed, your crab brulee is ready to serve! The golden, crispy sugar top should contrast perfectly with the smooth, creamy custard and tender crab beneath.
- Optional Garnish: If you want to add a final flourish, sprinkle some finely chopped herbs (such as chives or parsley) or zest over the top for a fresh pop of color and flavor that complements the rich brulee.
Troubleshooting Tips for Perfectly Caramelized Sugar
Sometimes, things don’t go as planned when using a brulee torch. Here are a few tips to troubleshoot common issues:
- Sugar Burns Too Quickly: If the sugar turns too dark or burns before you’ve achieved that golden amber color, try lowering the flame on your torch and moving it farther from the sugar. Also, keep the torch moving in circular motions to avoid over-browning any particular spot.
- Uneven Caramelization: If you notice uneven caramelization, this could be due to the sugar not being spread evenly or the flame not being moved consistently. Make sure you’re using a light hand when sprinkling the sugar and keep the torch moving in a slow, deliberate motion.
- Sugar Not Melting: If the sugar isn’t melting, the flame might be too low. Increase the flame slightly, but still keep it at a controlled level to avoid burning the sugar.
Call to Action:
Now that you’ve learned how to torch the perfect sugar topping, it’s time to try it out on your crab brulee! The caramelized sugar adds a finishing touch that elevates your dish from good to extraordinary. Whether you’re impressing guests or enjoying a special meal at home, this is the moment where your crab brulee truly shines. Don’t forget to share your experience with us! How did your sugar topping turn out? What creative twists did you add? Let us know in the comments below!
Tips for Perfecting Your Crab Brulee
Controlling the Texture: How to Get the Custard Smooth Without Curdling
Creating the perfect crab brulee begins with a smooth, creamy custard. The custard is the foundation of the dish, and its texture can make all the difference between a perfectly executed recipe and one that falls short. The trick to getting the custard just right is to control the texture and prevent curdling, which can result in an unpleasant, grainy consistency. Luckily, with a few key techniques, you can ensure that your custard is silky-smooth and creamy every time. Let’s break it down step by step.
1. Why Custards Curdle and How to Avoid It
Before diving into the techniques, it’s essential to understand why custards curdle. The primary culprit is overheating the eggs, causing the proteins in the egg yolks to coagulate and form clumps. This results in a texture that is anything but smooth. Here’s how you can avoid that and achieve the perfect texture for your crab brulee:
- Gentle Heat: High heat can cook the eggs too quickly, resulting in curdling. To control the texture, cook the custard over low to medium heat, allowing it to thicken slowly and evenly without overheating.
- Gradual Heating: To prevent the sudden temperature shock that leads to curdling, you’ll need to gradually introduce heat to the eggs. This can be done by tempering the eggs with the warm cream (which we’ll cover in more detail shortly). By doing this, the eggs can adjust to the temperature of the hot cream without cooking too quickly.
2. The Importance of Tempering the Eggs
Tempering is one of the most critical techniques in making a smooth custard. It allows you to gently raise the temperature of the eggs without scrambling them, ensuring a perfectly smooth texture. Here’s how to do it:
- Whisk the Egg Yolks and Sugar Together: In a bowl, whisk together your egg yolks and sugar until the mixture becomes smooth and pale. This will help dissolve the sugar and prevent any graininess in the custard.
- Heat the Cream: In a saucepan, heat your heavy cream over medium heat until it is steaming and just about to boil. You don’t want it to boil, as this could create bubbles and affect the smooth texture. Stir occasionally to prevent the cream from scorching.
- Slowly Add the Cream to the Egg Mixture: Now comes the key part: slowly add the hot cream to the egg mixture, a little at a time, while whisking constantly. This allows the eggs to gently warm up, preventing them from cooking too quickly.
- Combine Everything: Once the eggs have been gradually tempered with the cream, return the mixture to the saucepan and continue cooking on low heat. Stir constantly with a wooden spoon or silicone spatula to prevent the eggs from sticking to the bottom or cooking too quickly.
3. Stir Constantly and Carefully
One of the most important things you can do while cooking the custard is to stir constantly. Stirring helps to keep the egg yolks moving and prevents them from coagulating too quickly. Here’s how to do it right:
- Use a Gentle Hand: Stir with a wooden spoon or a silicone spatula. This allows you to control the temperature better, and both tools are great for scraping the sides and bottom of the pan to make sure the custard doesn’t burn.
- Avoid High Heat: When cooking the custard, always keep the heat low or medium-low. High heat can cause the eggs to cook too quickly, so it’s essential to take your time and stir continuously to keep everything even.
- Watch for the “Coat the Back of a Spoon” Test: The custard is ready when it thickens enough to coat the back of a spoon. At this point, you should be able to run your finger through the custard on the spoon, leaving a trail. This is a sign that the custard is thick enough without being overcooked.
4. Use a Fine-Mesh Strainer for Extra Smoothness
Even after careful tempering and stirring, there may still be small bits of cooked egg in the mixture that could affect the texture. To ensure your custard is as smooth as possible, it’s a great idea to strain it through a fine-mesh sieve.
- Strain After Cooking: Once the custard has thickened to the desired consistency, pour it through a fine-mesh sieve into a clean bowl. This step helps catch any curdled bits and ensures that your custard remains perfectly smooth and silky.
- Straining Tip: If you don’t have a fine-mesh sieve, you can use a cheesecloth or a fine tea towel to strain the custard. Just make sure that the fabric is clean and won’t affect the flavor of the custard.
5. Chill the Custard Before Using
Once your custard has been carefully prepared and strained, it’s important to cool it gradually before using it in your crab brulee. Cooling the custard too quickly can cause it to separate or lose its smooth texture. Here’s how to do it:
- Room Temperature Cooling: Let the custard cool at room temperature for about 15 to 20 minutes. This helps it cool evenly without condensation forming.
- Refrigerate: After the custard has cooled slightly, transfer it to the refrigerator to chill completely before assembling your crab brulee. This allows the custard to set and helps it achieve that smooth, silky texture that’s perfect for baking.
6. Troubleshooting Common Custard Issues
Sometimes, despite your best efforts, the custard might not turn out perfectly smooth. Here are a few common issues and how to resolve them:
- Curdling: If you notice curdling in your custard, it’s usually because the heat was too high. To prevent this next time, cook on lower heat and ensure that you’re tempering the eggs properly. If curdling does occur, strain the custard through a fine-mesh sieve to remove any cooked bits.
- Too Thin or Runny Custard: If your custard is too thin, it may not have been cooked long enough to thicken. Make sure to cook the custard over low heat until it’s thick enough to coat the back of a spoon. If it’s still too thin, you can return it to the heat and continue cooking, but do so gently to avoid curdling.
- Grainy Texture: A grainy texture usually means that the sugar hasn’t dissolved properly or the eggs were overcooked. Stirring constantly and using a fine strainer will help solve this issue.
Call to Action:
Now that you know how to control the texture of your crab brulee custard, it’s time to give it a try! These simple yet effective techniques will help you achieve the smooth, velvety custard that’s essential for a perfect brulee. If you encounter any challenges or have tips of your own, be sure to share them with us! We’d love to hear how your custard turned out and any variations you tried. Let’s get cooking and create the ultimate crab brulee!
Ideal Crab-to-Custard Ratio: Balancing the Richness of the Crab with the Creaminess of the Custard
One of the most important factors in making a perfect crab brulee is getting the crab-to-custard ratio just right. If the crab is too overpowering, the delicate flavor of the custard can be lost. On the other hand, too little crab will make the dish feel lacking in seafood flavor and texture. The key is to achieve a balance where the richness of the crab is complemented by the creaminess of the custard, allowing both components to shine.
In this section, we’ll explore the ideal balance between crab and custard, as well as how to adjust the ratio based on your taste preferences and the type of crab you’re using.
1. The Perfect Ratio: How Much Crab to Use in Each Ramekin
For the perfect crab brulee, a good rule of thumb is to aim for around 1 to 2 tablespoons of crab meat per ramekin. The exact amount can vary depending on your taste preferences and the size of your ramekins, but this range typically allows the crab to be present in every bite without overwhelming the custard. Here’s a breakdown:
- Smaller Ramekins (6 oz): For a 6-ounce ramekin, aim for 1 to 1.5 tablespoons of crab meat. This will give you just the right balance of crab and custard, allowing the seafood flavor to come through without overpowering the creamy base.
- Larger Ramekins (8 oz or more): If you’re using larger ramekins, you can increase the amount of crab to 1.5 to 2 tablespoons. This will ensure the crab isn’t lost in the custard, providing a more prominent seafood flavor.
You don’t want the crab to dominate the dish, but you also don’t want it to be hidden by the custard. The goal is to maintain a symbiotic balance, where each spoonful offers a perfect ratio of crab to custard.
2. Adjusting the Ratio Based on Crab Type
Different types of crab meat have distinct flavors and textures, so the ideal crab-to-custard ratio may vary slightly depending on which type of crab you’re using. Here’s how to adjust based on the type of crab you choose:
A. Blue Crab
Blue crab is tender and sweet, making it a popular choice for crab brulee. Its delicate flavor means you can use slightly more crab in the mixture without overwhelming the custard. If you’re using blue crab, consider using 1.5 tablespoons of crab meat per 6-ounce ramekin. The mildness of blue crab pairs beautifully with the richness of the custard.
B. Dungeness Crab
Dungeness crab has a slightly more robust flavor than blue crab, with a subtle sweetness and firmness to the meat. Due to its richer flavor, you can keep the ratio of crab to custard around 1 tablespoon per ramekin. This will allow the flavor of the crab to shine through without being too heavy.
C. King Crab
King crab has large, meaty pieces that can hold up well in the custard. Since its flavor is stronger and more pronounced, you may want to reduce the amount of crab slightly to 1 to 1.5 tablespoons per ramekin. If you love the flavor of king crab, you can always increase the amount a bit, but be mindful that it can easily overpower the custard if used in excess.
D. Snow Crab
Snow crab : is another option, with a sweet and slightly salty flavor. Snow crab tends to be more delicate than king crab but still substantial enough to pair well with the custard. Use around 1 tablespoon per ramekin for a balanced dish that showcases the crab without overshadowing the creamy custard.
3. Achieving a Balanced Texture
Beyond the flavor, the texture of the crab should complement the smooth custard. This means using lump or claw meat for a chunkier, more satisfying bite, while avoiding overly shredded crab that can get lost in the custard. Here’s how to think about the texture:
- Lump Crab Meat: Larger chunks of crab will provide more texture and bite in the brulee. This type of meat works best when you want to make the crab a focal point of the dish. If you’re using lump crab, you can increase the amount slightly, ensuring that each bite has a satisfying piece of crab.
- Shredded Crab Meat: While shredded crab meat can be used, it often blends more seamlessly with the custard, making it harder to distinguish the crab from the custard. If you prefer a smoother texture, you can use shredded crab, but you may need to reduce the amount to avoid the custard becoming too crab-heavy.
- Mixing Crab into the Custard: Gently fold the crab into the custard mixture after you’ve prepared both components. This ensures that the crab is evenly distributed throughout, allowing every spoonful to have a little bit of crab. Be careful not to stir too vigorously, as this can break the crab into smaller bits.
4. Balancing the Richness of the Crab with the Creaminess of the Custard
The richness of the crab and the creaminess of the custard should complement each other. If you use too much crab, the dish might feel too heavy, especially considering the rich nature of the custard. On the other hand, using too little crab may leave the brulee feeling overly creamy and lacking in seafood flavor.
To strike the right balance:
- Test the Flavor: Before you finish assembling the dish, taste the custard and crab mixture together. If the crab flavor isn’t strong enough, add a little more crab. If the custard feels too rich or the crab flavor is being lost, scale back the amount of crab for a more balanced dish.
- Consider Adding Herbs or Seasonings: If you find that the custard is overwhelming the crab, you can use a small amount of herbs (such as tarragon, chives, or lemon zest) to bring brightness and balance. These can cut through the richness of the custard and highlight the crab without changing the crab-to-custard ratio.
5. Experimenting with Different Crab-to-Custard Ratios
If you’re feeling adventurous and want to experiment, you can adjust the crab-to-custard ratio based on your preference:
- More Crab for a Stronger Seafood Flavor: If you’re a seafood lover and want the crab to be the star of the dish, feel free to increase the crab content slightly. Use about 2 tablespoons per ramekin and reduce the custard slightly to keep the texture in balance.
- Less Crab for a Creamier Experience: If you prefer a creamier brulee with just a hint of crab flavor, you can scale back on the crab to 1 tablespoon per ramekin and allow the custard to shine.
Call to Action:
Now that you understand how to balance the crab and custard in your crab brulee, it’s time to try out these ratios in your own kitchen! Whether you prefer a more pronounced seafood flavor or a rich, creamy custard base, finding the perfect crab-to-custard ratio will elevate your dish. Share your results with us—how did the crab-to-custard ratio turn out? Did you make any adjustments to fit your taste? Let’s continue the conversation and perfect this recipe together!
Achieving the Perfect Crust: How to Get the Ideal Caramelized Sugar Topping Without Burning It
One of the most distinct features of a crab brulee—and any crème brûlée—is the perfect caramelized sugar crust that forms on top. This golden, crunchy topping provides a delightful contrast to the smooth, creamy custard beneath, making each bite a true indulgence. However, achieving the ideal crust can be tricky: you want it golden and crispy, not burnt and bitter. Luckily, with a few helpful tips, you can master the art of torching sugar to get the perfect caramelized topping every time.
In this section, we’ll guide you through the steps to create the ideal sugar crust for your crab brulee, including tips on how to avoid burning the sugar and achieving a perfectly smooth, even top.
1. Choosing the Right Sugar for Caramelization
The type of sugar you use will significantly impact the texture and flavor of your brulee topping. While it’s tempting to use any old sugar in your pantry, granulated sugar or turbinado sugar are the best options for achieving that golden, crunchy topping.
- Granulated Sugar: This is the most commonly used sugar for crème brûlée. It has small, fine crystals that melt evenly and caramelize beautifully under the torch, creating a smooth, glossy finish.
- Turbinado Sugar: With its larger, coarser crystals, turbinado sugar adds a bit more crunch and texture to your brulee topping. It also offers a slight molasses flavor, which can add an extra layer of richness to the dish.
While you can experiment with different types of sugar, these two options are your best bet for a smooth, crisp, and delicious brulee topping.
2. Applying the Sugar: How Much is Just Right?
The amount of sugar you use for the topping is just as important as the type of sugar. Too much sugar can create a thick, clumpy layer, while too little will leave you with a lackluster crust that doesn’t crack when you tap it with a spoon.
- Evenly Sprinkle the Sugar: After your crab brulee has chilled in the refrigerator, it’s time to add the sugar topping. Sprinkle a thin, even layer of sugar over the surface of each ramekin. 1 to 2 teaspoons of sugar per ramekin should be enough to cover the custard. Avoid overloading it—more sugar will not always give you a better result.
- Distribute Evenly: Make sure the sugar layer is uniform, as uneven layers can lead to inconsistent caramelization. You can gently tilt the ramekin to help distribute the sugar, or use your fingers to spread it evenly.
3. Using the Torch: Step-by-Step for the Perfect Caramelization
Now comes the fun part: torching the sugar! A kitchen torch is your best tool for this job, allowing you to control the heat and evenly caramelize the sugar without overheating the custard. Here’s how to do it properly:
- Set Up Your Torch: Before you begin, make sure your torch is filled with fuel (usually butane) and that you have a steady flame. Set the flame to a low to medium setting—you want it strong enough to caramelize the sugar but not so intense that it will burn it quickly.
- Torch the Sugar: Hold the torch about 3–4 inches above the surface of the sugar and move it in small, circular motions. This ensures that the sugar melts evenly without focusing too much heat on one spot, which could lead to burning.
- Tip: Keep the torch moving constantly. If you hold it in one spot for too long, you risk burning the sugar. By using a circular motion, the heat will distribute evenly, and the sugar will melt and bubble without burning.
- Watch for the Golden Brown Color: As the sugar begins to melt, it will change from white to golden amber. This is the ideal color for your brulee crust. It should be shiny and smooth, with a slightly crispy texture. If it turns too dark or begins to smell burnt, you’ve gone too far.
4. Avoiding Over-Browning or Burning the Sugar
It can be easy to accidentally burn the sugar if you’re not careful. To ensure your sugar topping is golden and not bitter, here are a few tips:
- Watch the Flame: If your flame is too strong, the sugar will caramelize too quickly, leading to dark spots or burnt sugar. Keep the flame at a low to medium setting, which allows for more controlled caramelization.
- Move Quickly but Steadily: Don’t hover over one area of the sugar for too long. If you do, you’ll risk burning that spot while the rest of the sugar remains undercooked. Keep the torch moving continuously across the surface in small circles to achieve a uniform caramelization.
- Smell and Sight Test: As you torch the sugar, rely on your senses to help guide you. You’ll notice a sweet, toasty aroma as the sugar caramelizes. If the smell becomes bitter or burnt, it’s a sign that you’ve gone too far.
5. The Cooling Process: Letting the Sugar Harden
Once the sugar has reached the desired level of caramelization, it’s important to let it cool and set. The sugar will harden into a beautiful, crisp shell that you can crack with a spoon when eating your crab brulee.
- Let It Rest for a Few Minutes: After torching the sugar, allow the brulee to sit at room temperature for 5 to 10 minutes. This gives the sugar time to harden and set into a smooth, crunchy layer.
- Refrigerate if Necessary: If you plan to serve the brulee later, you can refrigerate it after the sugar has hardened. This will keep the crust intact and prevent it from becoming too soft or melting.
6. Troubleshooting: What to Do if Things Go Wrong
Even with the best intentions, things can sometimes go awry when torching sugar. Here are some common issues and how to fix them:
- Sugar Doesn’t Melt Evenly: This can happen if the flame is too low or too high, or if the sugar was applied unevenly. Try adjusting the height of the torch and move it around in slow, steady circles.
- Sugar Burns Too Quickly: If this happens, your flame may be too high. Turn it down to a lower setting and move the torch farther from the sugar. You can also adjust the angle at which you hold the torch for a more even distribution of heat.
- Soft Sugar Crust: If your sugar doesn’t harden into a crisp shell, it may not have been caramelized enough. Simply torch it a little more, ensuring the sugar reaches that golden amber stage.
Call to Action:
Now that you’ve learned how to achieve the perfect caramelized sugar crust for your crab brulee, it’s time to give it a try! With the right technique, you can achieve that beautiful, crunchy top every time. Remember to experiment with the torch and sugar amounts to find the perfect balance for your taste. Once you’ve mastered the art of torching sugar, don’t forget to share your results with us—how did your brulee crust turn out? Let’s continue the conversation and perfect this delicious dessert together!
Make-Ahead Tips: How to Prep the Dish in Advance and Store It
Making crab brulee for a special occasion or dinner party? The good news is that you can prep most of the dish in advance, so you don’t have to rush through every step on the big day. In fact, prepping ahead of time can enhance the flavors and give you more time to focus on perfecting the caramelized sugar crust at the end.
With just a few simple steps, you can assemble your crab brulee and store it in the fridge until you’re ready to bake or serve it. Here’s how to make sure your crab brulee stays fresh, flavorful, and ready to impress your guests.
1. Preparing the Custard in Advance
The custard for your crab brulee can be made ahead of time and refrigerated, saving you a lot of hassle during the final stages. Here’s how to prep the custard for easy use:
- Make the Custard: Once your crab brulee custard (cream, egg yolks, and sugar) is prepared, strain it through a fine-mesh sieve to remove any potential bits of egg or other solids. This will ensure the custard is as smooth and velvety as possible.
- Cool Before Storing: After cooking, allow the custard to cool slightly at room temperature for 10-15 minutes. Then, transfer it to a clean bowl and cover it with plastic wrap or wax paper, ensuring that the wrap touches the surface of the custard. This prevents a skin from forming.
- Refrigerate: Once the custard is cool, place it in the refrigerator and store it for up to 24 hours before using it. Chilling the custard overnight can actually help the flavors develop further, giving it a richer, more complex taste.
2. Storing the Crab Meat
The crab meat is the star of your crab brulee, so it’s essential to prepare it in advance without compromising its quality. Whether you’re using fresh or frozen crab, the following tips will help you store it properly:
- Fresh Crab Meat: If you’re using fresh crab, prepare it the day before and store it in an airtight container in the refrigerator. Fresh crab should ideally be used within 24 hours of purchasing it, so plan to assemble your crab brulee within that time frame. If you can’t use it right away, you can freeze it for up to 3 months. However, fresh crab will provide the best flavor and texture.
- Frozen Crab Meat: If you’re using frozen crab meat, allow it to thaw in the refrigerator overnight. Once thawed, drain any excess moisture by placing the crab meat on a clean paper towel or in a fine-mesh strainer for a few hours. Once it’s dry, store it in an airtight container in the fridge until you’re ready to add it to your custard.
3. Assembling the Dish in Advance
If you prefer to assemble your crab brulee ahead of time, you can easily prepare it up to the point where it needs to be baked. Here’s how:
- Layer the Crab and Custard: Once your crab meat is prepared and your custard has been chilled, assemble the brulee by layering the crab meat at the bottom of each ramekin, then pouring the custard mixture over the top. Make sure the crab is evenly distributed, and the custard covers it completely.
- Cover and Refrigerate: Once assembled, cover the ramekins with plastic wrap or foil and place them in the refrigerator. The brulee can be chilled for up to 24 hours before baking. The custard will set nicely in the fridge, and the crab will infuse its flavor into the custard, enhancing the overall taste.
4. Baking and Torch Work: Do It on the Day of Serving
While you can prep the custard and crab in advance, the final steps—baking and torch work—should ideally be done on the day you plan to serve the crab brulee. Here’s why:
- Baking the Brulee: Once you’re ready to bake, place the ramekins in a water bath (as discussed earlier), and bake at 325°F (163°C) for about 30-40 minutes. The water bath will ensure the custard cooks evenly, preventing any curdling. Allow the ramekins to cool at room temperature for a few minutes before refrigerating them to set.
- Torching the Sugar: The caramelized sugar topping should always be done just before serving. Torch the sugar to create that signature golden crust, and serve your crab brulee immediately. If you do the torching ahead of time, the sugar might lose its crispiness, so it’s best to add the final touch just before serving.
5. Storing Leftovers
If you happen to have leftover crab brulee, don’t worry—you can easily store it for later. Here’s how:
- Refrigerate Leftovers: If you’ve made extra crab brulee or have leftover custard and crab meat, store the ramekins in the refrigerator, tightly covered. The brulee should keep for 1-2 days. However, the caramelized sugar topping will lose its crispness over time, so you may need to torch the sugar again if you want to maintain that perfect crunch.
- Freezing: You can also freeze leftover crab brulee, but keep in mind that the texture of the custard might change slightly once thawed. To freeze, wrap the ramekins tightly in plastic wrap and foil, and freeze for up to 3 months. When you’re ready to enjoy it again, thaw it overnight in the fridge and torch the sugar right before serving.
Call to Action:
Now that you know how to prep your crab brulee in advance, it’s time to put these tips into action! Whether you’re making it for a dinner party or a special occasion, planning ahead will give you more time to focus on perfecting the final steps. How do you like to prep your crab brulee? Do you have any additional tips for making this dish in advance? We’d love to hear your thoughts and experiences—share them with us below!
Common Mistakes to Avoid When Making Crab Brulee
Overcooking the Crab: Why Overcooked Crab Can Ruin the Texture and Flavor
When it comes to making a perfect crab brulee, the quality of the crab meat is crucial. Crab meat is tender, sweet, and delicate—making it the star of your dish. But here’s the catch: overcooking the crab can completely ruin both the texture and flavor. If you’re not careful, you can easily end up with crab that’s tough, dry, and rubbery, which will detract from the otherwise rich and creamy custard in your brulee.
In this section, we’ll discuss the importance of cooking crab correctly, how overcooking affects the dish, and the best methods to cook and incorporate crab into your brulee without compromising its natural sweetness and tenderness.
1. How Overcooking Affects the Crab’s Texture
Crab meat is naturally tender and flaky, but it’s also very sensitive to heat. When crab is exposed to too much heat for too long, it becomes overcooked, and this affects its texture in a few key ways:
- Tough and Rubber-Like: The proteins in the crab meat start to coagulate and tighten, making the meat tough and chewy. Instead of having that succulent, delicate bite, overcooked crab becomes stringy and rubbery.
- Loss of Moisture: Overcooking causes the crab to lose its moisture, which leads to dry, stringy crab meat that doesn’t pair well with the creamy custard of the brulee. The natural sweetness of the crab is also diminished when it’s overcooked, resulting in a less flavorful dish.
- Cracked or Shredded Meat: When crab is cooked for too long, the delicate texture becomes brittle, and the meat can break apart. This leads to a messy, unattractive presentation, which is particularly noticeable when the crab is the main component of a dish like crab brulee.
2. How Overcooking Affects the Flavor of the Crab
Crab meat is prized for its sweetness and briny oceanic flavor. Overcooking it causes several flavor issues:
- Loss of Sweetness: The natural sweetness that makes crab meat so appealing is lost when the meat is overcooked. Excessive heat can also cause the delicate flavors to become muted, and you may end up with a less-than-appealing dish.
- Unpleasant Aftertaste: Overcooked crab can develop a slightly bitter taste that negatively impacts the overall flavor profile of the dish. This is especially noticeable in a refined dish like crab brulee, where the flavor balance between the crab and the custard is key to its success.
- Fishy Flavor: If crab is overcooked for too long, it can also take on a more “fishy” flavor, which is not ideal for a dish that should showcase the delicate, sweet notes of the crab.
3. Best Methods to Avoid Overcooking the Crab
Luckily, overcooking the crab is easily avoidable if you follow a few simple guidelines. Here are some tips for ensuring that the crab stays tender, juicy, and full of flavor:
A. Steam or Boil the Crab Gently
- Steaming is often the gentlest way to cook crab, as it preserves the meat’s natural flavor and moisture. To steam, simply place the crab in a steamer basket over simmering water. Cover and cook for 7-10 minutes, depending on the size of the crab.
- Boiling is another option, but be careful not to overcook the crab. Bring a large pot of salted water to a boil and cook the crab for 6-8 minutes. Be sure to check the crab’s doneness by looking for its bright orange color and firm texture. Overcooking can happen quickly, so keep an eye on it.
B. Use a Timer
Overcooking can easily happen when you’re distracted. Use a timer to keep track of the cooking time for your crab, whether you’re steaming or boiling. This ensures that the crab doesn’t stay in the heat too long, preserving both its texture and flavor.
C. Consider Crab Meat Already Cooked
If you’re short on time or prefer an easier route, you can use pre-cooked crab meat (either frozen or fresh). If using pre-cooked crab, be sure to avoid reheating it too much. Gently warm the crab meat through by sautéing or folding it directly into the custard, keeping the heat minimal. This prevents any further cooking or toughening of the meat.
4. How to Incorporate Crab into Your Brulee
After cooking your crab, it’s time to incorporate it into the custard. The goal here is to keep the crab as tender and flavorful as possible while maintaining a good balance with the smooth, creamy custard. Here’s how you can do it:
- Use Lump or Claw Meat: For the best texture, use lump or claw crab meat. These pieces retain their shape and texture better than shredded or flaked crab, making them ideal for a dish like crab brulee. You’ll get nice, meaty bites in each spoonful.
- Gentle Mixing: Once your crab meat is cooked, avoid stirring it too much when adding it to the custard. Gently fold it into the custard mixture to keep the chunks intact. If you stir too vigorously, you could break up the meat, resulting in a less appealing texture.
- Don’t Overheat After Adding Crab: After adding the crab to the custard mixture, be mindful not to overheat it. Since the crab is already cooked, all it needs is to be gently warmed in the oven or during the brulee process. There’s no need to subject it to additional heat that could ruin its texture.
5. What to Do If You Overcook the Crab
If you’ve accidentally overcooked the crab (it happens!), don’t panic. While the texture and flavor may be compromised, you can still salvage your dish with a few adjustments:
- Shred the Crab: If the meat has become too tough, you can shred it into smaller pieces and fold it into the custard. While the texture may not be ideal, it can still blend well with the custard and add flavor.
- Re-season the Crab: If the crab has lost some of its sweetness, you can try re-seasoning it with a small amount of lemon zest, paprika, or a touch of garlic to give it a fresher flavor and balance the overall dish.
Call to Action:
Now that you know how overcooking crab can negatively impact both the texture and flavor of your crab brulee, you’re ready to take control of the cooking process. Be mindful of the cooking time, and use gentle methods like steaming or careful boiling to preserve that perfect crab texture. Whether you’re a seasoned chef or just starting out, paying attention to these small details will elevate your crab brulee to perfection. Share your experiences—did you master the perfect crab texture? What methods worked best for you? Let us know in the comments below!
Overheating the Custard: The Risks of Cooking the Custard at Too High a Temperature
When making crab brulee, achieving the perfect custard is key to the dish’s success. The custard should be rich, smooth, and creamy, but overcooking it can quickly ruin the texture and flavor. One of the most common mistakes when making brulee is overheating the custard. Cooking the custard at too high a temperature can cause several issues that impact the final result, including curdling, separation, and an unpleasant texture.
In this section, we’ll explore the risks of overheating the custard and how to ensure that your custard is cooked to perfection without compromising the smooth, velvety texture that makes crab brulee so delicious.
1. Why Overheating the Custard is Problematic
The custard for your crab brulee is a delicate mixture of heavy cream, egg yolks, and sugar, all of which need to be carefully heated. When you cook the custard at too high a temperature, several things can go wrong:
- Curdling: If the custard gets too hot too quickly, the proteins in the egg yolks can coagulate, causing the custard to curdle. The texture will become grainy and unpleasant, and you’ll lose the smooth, velvety mouthfeel that makes crab brulee so special.
- Separation: Overheating can also cause the fat in the cream to separate from the other ingredients, resulting in a curdled, oily mixture. This will ruin the custard’s texture, making it greasy and unappetizing.
- Overcooked Eggs: The egg yolks in the custard provide the richness and structure. When exposed to too much heat, the egg proteins can form a solid mass rather than creating a smooth, creamy base. This leads to a scrambled egg-like texture, which is not what you want for a delicate crab brulee.
2. How High Heat Affects the Flavor
In addition to ruining the texture, overheating the custard can also diminish the flavor:
- Burnt Taste: When the custard is exposed to too much heat, the sugars in the mixture can burn, giving the custard a bitter, burnt flavor. This is particularly noticeable in dishes like crab brulee, where the sweetness of the custard should complement the savory crab, not compete with it.
- Loss of Creaminess: High heat can break down the fats in the cream, reducing the custard’s creamy texture and leaving it with a greasy, unpleasant mouthfeel. Overheating may also cause the custard to become too firm, detracting from the rich, custardy experience you’re aiming for.
3. The Right Temperature for Cooking the Custard
To ensure that your custard is cooked correctly, you need to keep the temperature low and steady. Here’s how to avoid overheating the custard:
A. Use a Low to Medium Heat
When heating the custard, always cook it over low to medium heat. This will allow the mixture to heat gently without causing the eggs to cook too quickly. Avoid using high heat, as it can lead to the issues mentioned above, including curdling and separation. Be patient—good custard takes time to develop!
B. The “Coat the Back of a Spoon” Test
The key indicator that your custard is ready is when it has thickened enough to coat the back of a spoon. To check:
- Dip a spoon into the custard and coat the back.
- Run your finger through the custard on the spoon. If it leaves a clean trail, your custard is thick enough and ready to be removed from the heat. This is usually when the temperature reaches around 170-175°F (77-80°C), which is warm enough to cook the eggs but not so hot that they’ll curdle.
C. Use a Double Boiler for Gentle Heating
For extra control over the temperature, consider using a double boiler. This method uses indirect heat to cook the custard, ensuring that it doesn’t get too hot too quickly. Here’s how to do it:
- Fill a saucepan with a few inches of water and bring it to a simmer.
- Place a heatproof bowl over the saucepan (making sure the bowl doesn’t touch the water) and pour your custard mixture into the bowl.
- Stir the custard constantly while it cooks in the steam. The heat from the steam will gently cook the custard, allowing it to thicken slowly without overheating.
This method helps prevent the custard from coming into direct contact with high heat, making it easier to achieve a smooth and creamy texture.
4. Using a Candy Thermometer
If you want to be extra precise, use a candy thermometer or a digital kitchen thermometer to monitor the temperature of your custard as it cooks. This is especially helpful when you’re worried about overheating the custard.
- Optimal Temperature: Keep the custard temperature between 170°F and 175°F. This range is ideal for cooking the egg yolks and achieving the right custard consistency without curdling.
5. Cooling and Storing the Custard
Once your custard has reached the ideal texture, it’s important to cool it gradually and store it properly:
- Cool at Room Temperature: Allow the custard to cool slightly at room temperature before transferring it to the fridge. Cooling it too quickly could cause condensation or uneven cooling, which might affect the texture.
- Refrigerate for Setting: After the custard has cooled, cover it with plastic wrap (making sure the wrap touches the surface of the custard to prevent a skin from forming) and refrigerate it for at least 2-3 hours before using. This helps it set and ensures the flavors meld together.
6. Troubleshooting: What to Do if You Overheat the Custard
If you find that your custard has overheated, don’t panic. While it’s difficult to completely reverse the damage, here’s what you can do to salvage it:
- Strain It: If you notice any curdling or lumps, strain the custard through a fine-mesh sieve. This will remove any bits of cooked egg and leave you with a smoother mixture.
- Whisk Vigorously: If the custard starts to separate but hasn’t curdled yet, you can try whisking it vigorously to bring it back together. This won’t always work, but it’s worth trying before you give up on the batch.
- Adjust the Flavor: If your custard has become overly sweet or bitter due to overheating, you can adjust the flavor by adding a pinch of salt or a squeeze of lemon juice to balance out the flavors.
Call to Action:
Now that you understand the risks of overheating the custard and how to avoid it, it’s time to get cooking! Keep your heat low, use the right tools, and test your custard carefully for that perfect creamy texture. Whether you’re a seasoned pro or trying crab brulee for the first time, these tips will help you get the custard just right. Have any tips or tricks of your own for perfecting the custard? Share your experiences with us in the comments below and let’s keep the conversation going!
Uneven Caramelization: How to Prevent the Sugar from Becoming Unevenly Caramelized
One of the most distinctive features of crab brulee (and any crème brûlée, for that matter) is the caramelized sugar topping. The perfect brulee topping is glossy, golden-brown, and crisp—but achieving that perfect, even layer can be tricky. If the sugar is caramelized unevenly, you may end up with dark, burnt spots and pale areas, leading to a less-than-ideal visual and textural experience.
In this section, we’ll explore the causes of uneven caramelization and share strategies to ensure you get a smooth, even sugar crust every time.
1. Why Uneven Caramelization Happens
Uneven caramelization is typically caused by one or more of the following factors:
- Inconsistent Sugar Layer: If the sugar is sprinkled unevenly over the custard, certain areas will caramelize faster than others, leading to uneven browning.
- Inconsistent Heat Distribution: Whether using a kitchen torch or broiler, uneven heat distribution can lead to some parts of the sugar melting and browning too quickly, while others remain untouched.
- Too High of a Flame: A high flame or one that’s held too close to the sugar can lead to over-browning or burning in some spots, while other areas don’t get enough heat to caramelize.
- Slow or Uneven Movement: If you hold the torch in one place for too long or move it too slowly, the sugar will heat unevenly. As a result, some parts will be dark and crispy, while others will be underdone and pale.
By understanding the causes, you can take steps to ensure the caramelization is smooth and even, leaving you with a perfect golden crust.
2. How to Ensure Even Caramelization
Now that we know what causes uneven caramelization, here are the key strategies to achieve that perfect, golden-brown crust every time.
A. Evenly Sprinkle the Sugar
The first step to preventing uneven caramelization is making sure that the sugar is distributed evenly over the custard:
- Use a Light Hand: Start by sprinkling a thin, even layer of granulated sugar (or turbinado sugar for added texture) on top of the custard. Use about 1 to 2 teaspoons of sugar per ramekin.
- Avoid Piles of Sugar: Make sure the sugar layer is not too thick. If the sugar is piled up in spots, it may melt too quickly in some places and burn before the other areas are properly caramelized.
- Gently Tap the Ramekin: After sprinkling the sugar, you can gently tap the ramekin on the counter to help spread the sugar evenly across the surface of the custard.
B. Use the Right Tool: A Kitchen Torch
Using a kitchen torch is your best option for controlling the heat and caramelizing the sugar evenly. Here’s how to use it effectively:
- Set the Flame to Low or Medium: Before you begin, set the flame on your kitchen torch to a low or medium setting. A strong, high flame can quickly burn the sugar, while a low flame allows for more controlled and even caramelization.
- Hold the Torch at the Right Distance: Hold the flame about 3-4 inches away from the sugar. If it’s too close, the sugar can burn too quickly. If it’s too far, the heat may not be strong enough to caramelize the sugar. A moderate distance ensures an even distribution of heat.
- Move the Torch in Small, Circular Motions: To caramelize the sugar evenly, keep the torch moving in small, circular motions. This ensures that the heat is distributed evenly across the sugar surface and prevents any areas from overheating or burning. Don’t hover over one spot for too long—this can cause localized burning and uneven color.
- Work Quickly but Steadily: While you need to keep the torch moving to achieve even caramelization, avoid moving it too fast. Give the sugar a chance to melt and turn golden-brown before moving to the next section. If you move the torch too quickly, certain areas may remain undercooked.
C. Use a Broiler (When Necessary)
If you don’t have a kitchen torch, you can use your oven’s broiler to caramelize the sugar. However, it requires a little more attention to avoid uneven caramelization:
- Preheat the Broiler: Set your oven to broil and let it preheat for a few minutes. Make sure the oven rack is positioned 6–8 inches below the broiler element.
- Watch Closely: Place the ramekins under the broiler and keep a close eye on them. Broiling works by applying intense heat from above, which can quickly cause the sugar to burn if left unattended. Rotate the ramekins gently to ensure even caramelization, but do so carefully so the sugar doesn’t move around too much.
- Evenly Spread the Sugar: Just as with the torch, make sure the sugar is evenly spread across the surface of the custard before broiling. If necessary, rotate the ramekins slightly to ensure the heat reaches every part of the sugar.
D. Check for Desired Color
As you caramelize the sugar, you’ll notice it change from white to golden and then to amber. Here’s what to aim for:
- Golden Amber: The perfect brulee topping should be a rich, golden amber color. This indicates that the sugar has been properly caramelized, resulting in a glossy, crispy top.
- Avoid Dark Brown or Black: If the sugar begins to turn too dark or black, it means that it has burned. Once the sugar starts to caramelize, keep an eye on it to avoid overcooking it.
3. Troubleshooting Common Issues with Caramelization
Even with the best intentions, things can sometimes go wrong. Here’s how to troubleshoot common issues when caramelizing sugar:
- Sugar Burns Too Quickly: If the sugar turns too dark or burns too fast, your flame may be too high. Lower the flame and move the torch farther away from the sugar.
- Sugar Doesn’t Melt Evenly: If the sugar is not melting evenly, you may be moving the torch too quickly or holding it too far away. Slow down and move the torch in small, controlled circles to distribute the heat evenly.
- Sugar Doesn’t Harden: If the sugar doesn’t harden into a crisp layer after caramelizing, it may not have been heated to the right temperature. Try torching it again briefly, ensuring you reach the right golden-brown color. You can also tap the ramekin gently to check if the sugar has set.
Call to Action:
Now that you know how to achieve the perfect, even caramelized sugar crust for your crab brulee, it’s time to put these tips into practice! Whether you’re using a torch or a broiler, remember to take your time and ensure the sugar is evenly distributed and properly caramelized. With these techniques, you’ll be able to create a golden, crispy topping that perfectly complements your rich, creamy custard.
Have you made crab brulee before? What methods do you use for caramelizing the sugar? Share your tips or experiences with us in the comments below, and let’s keep the conversation going!
Using the Wrong Type of Sugar: Why Using the Wrong Sugar Can Affect the Crust Quality
When it comes to making the perfect crab brulee, caramelizing the sugar to form that golden, crispy crust is a defining step. But did you know that the type of sugar you use can significantly affect the texture, flavor, and overall quality of the brulee topping? Using the wrong sugar may lead to an uneven, sticky, or overly thick crust that doesn’t have the satisfying crunch that everyone loves.
In this section, we’ll explore why using the wrong sugar can negatively impact your brulee, and we’ll also recommend the best types of sugar to use for that perfect brulee topping.
1. The Importance of Sugar in Caramelization
Caramelization is a chemical process that occurs when sugar is exposed to heat. As the sugar melts and browns, it forms a glossy, golden topping on your brulee. However, different types of sugar behave differently when exposed to heat, and some sugars are better suited for this process than others. Choosing the wrong sugar can lead to a crust that’s too soft, uneven, or burnt.
The right sugar should melt evenly, caramelize beautifully, and harden into a crisp crust. If you use the wrong kind of sugar, you may end up with a sticky or grainy topping instead of the perfect, crunchy shell.
2. The Best Types of Sugar for Caramelization
To achieve the perfect brulee topping, you need to use the right type of sugar. Here are some of the best options:
A. Granulated Sugar (Regular White Sugar)
- Why It’s Ideal: Granulated sugar is the classic choice for caramelizing. Its fine texture allows it to melt and caramelize evenly under the heat, forming a smooth, glossy crust.
- How It Helps: Granulated sugar creates the ideal texture for a crème brûlée topping: crispy, golden, and not too thick. When torched or broiled, it melts evenly and forms a glass-like shell, making it the go-to sugar for this dish.
- Tip: If you use granulated sugar, ensure that you apply it evenly over the custard to avoid any parts that might burn or undercaramelize.
B. Turbinado Sugar
- Why It’s Ideal: Turbinado sugar has larger, coarser crystals than granulated sugar. It’s slightly less processed, giving it a light brown color and a hint of molasses flavor, which adds a deeper, richer taste to the caramelized crust.
- How It Helps: Due to its large crystals, turbinado sugar forms a crunchier, more textured crust. This makes it an excellent choice if you want a more pronounced crunch in your brulee topping.
- Tip: Turbinado sugar is great for adding a bit more texture and flavor to your brulee. However, it may take a little longer to melt than granulated sugar, so be patient while torching.
C. Demerara Sugar
- Why It’s Ideal: Demerara sugar is similar to turbinado, with even larger crystals and a rich amber color. It’s often used for a caramelized finish and adds a slightly deeper flavor with hints of caramel and molasses.
- How It Helps: The large crystals create a thick, crunchy crust that’s perfect for a rustic, textured brulee topping. Its molasses flavor also pairs beautifully with the sweetness of the custard.
- Tip: Use demerara sugar if you want a larger, crunchier texture for the topping. It may take slightly longer to caramelize, so use a lower flame and work carefully to avoid burning.
3. Why Some Sugars Should Be Avoided
While some sugars work well for caramelizing, others can create undesirable results. Here are a few sugars that you should avoid using for your crab brulee:
A. Powdered Sugar (Confectioners’ Sugar)
- Why It’s Not Ideal: Powdered sugar is too fine and contains cornstarch (which prevents clumping). When exposed to heat, it can melt into a sticky, uneven layer that doesn’t caramelize properly.
- The Risk: Powdered sugar will likely result in a soft, sticky, or tacky topping instead of the desired crisp, crunchy shell.
B. Brown Sugar (Light or Dark)
- Why It’s Not Ideal: While brown sugar (both light and dark) does caramelize well, its moisture content and molasses can create a heavier, stickier crust. It can also result in an uneven caramelization process, as the molasses in the sugar can burn more easily than regular granulated sugar.
- The Risk: Using too much brown sugar can make the brulee topping soft and chewy rather than crisp. Additionally, its intense flavor can overwhelm the delicate sweetness of the crab custard.
- Tip: While brown sugar isn’t the best option for crème brûlée, it can be used in a pinch if you want to add a deeper flavor to your caramelized crust. However, use it sparingly and mix it with granulated sugar for a better balance.
4. Tips for Achieving the Perfect Caramelized Sugar Crust
Now that you know which sugar to use and why it matters, here are a few additional tips for ensuring the sugar is properly caramelized:
- Even Layering: Apply a thin, even layer of sugar across the surface of the custard. Too much sugar will result in a thick, uneven crust, while too little sugar won’t give you the signature caramelized finish.
- Use a Low, Even Heat: Whether you’re using a kitchen torch or your broiler, ensure that the heat is evenly distributed. Keep the flame moving in small, circular motions to avoid burning any spots.
- Watch for the Right Color: The perfect caramelized sugar crust should be golden amber in color. Watch closely as the sugar melts, ensuring that it doesn’t turn too dark or bitter.
- Don’t Overheat: Too much heat can cause the sugar to burn quickly. Use a low flame and be patient as the sugar melts and caramelizes slowly. This will give you the best results.
5. What Happens If You Use the Wrong Sugar?
Using the wrong sugar can lead to a variety of issues in your brulee:
- Sticky Texture: Sugars like powdered sugar or brown sugar can create a soft, sticky layer that doesn’t crisp up properly.
- Uneven Crust: Using sugar with uneven crystal sizes or inconsistent melting rates can result in a patchy, uneven crust. This affects both the visual appeal and the texture of your brulee.
- Burnt Sugar: Some sugars, especially those with higher moisture content, can burn more easily. This could result in a bitter, unpleasant flavor that will overpower the sweetness of your crab brulee.
Call to Action:
Now that you understand why using the right type of sugar is so important, it’s time to put this knowledge into action! Whether you prefer granulated, turbinado, or demerara sugar, selecting the right sugar can make all the difference in achieving the perfect caramelized sugar topping. Have you ever tried using a different type of sugar for your brulee? What was the result? Share your experiences or tips with us in the comments below, and let’s continue perfecting our brulee skills together!
Serving Suggestions and Pairing Crab Brulee
Perfect Pairings for Crab Brulee: Suggested Side Dishes Like a Light Seafood Platter or Fresh Greens
While the star of your dish is undoubtedly the crab brulee, pairing it with the right side dishes can elevate the entire meal. Given that crab brulee is a rich, creamy dish with delicate seafood flavors, you’ll want to balance it with light and refreshing sides that complement the richness of the custard and the sweetness of the crab.
Here, we’ll explore some perfect side dish ideas to serve alongside your crab brulee, from a light seafood platter to fresh greens, ensuring your meal feels harmonious and satisfying.
1. A Light Seafood Platter
Because crab is the centerpiece of the dish, a light seafood platter can offer a complementary and refreshing contrast to the creamy, sweet crab brulee. Opt for seafood that is delicate in flavor and doesn’t overpower the richness of the brulee.
A. Fresh Oysters on the Half Shell
- Why It Works: Oysters are light, briny, and naturally refreshing, making them the perfect complement to the rich and creamy crab brulee. Their fresh, clean flavor offers a delightful contrast to the custard.
- Serving Tip: Serve them chilled on a bed of crushed ice with a light mignonette sauce or lemon wedges. Their subtle flavors and textures won’t compete with the crab but will enhance the overall seafood theme of the meal.
B. Shrimp Cocktail
- Why It Works: Shrimp cocktail is another excellent choice because it’s a seafood option that feels luxurious yet light. The natural sweetness of shrimp pairs wonderfully with the savory notes of crab in the brulee, and the chilled shrimp offers a refreshing, cool bite that balances the creamy custard.
- Serving Tip: Serve with a tangy, spicy cocktail sauce for an extra layer of flavor. Alternatively, you could offer a garlic butter dip for a richer touch.
C. Smoked Salmon or Trout
- Why It Works: Smoked fish, such as salmon or trout, can be a delightful pairing because its smoky, slightly salty profile balances the sweetness of the crab. The mild smokiness won’t overpower the brulee and can enhance the depth of flavor in the crab.
- Serving Tip: Serve the smoked fish with a simple lemon wedge or a drizzle of olive oil and a sprinkle of fresh dill for a touch of brightness and freshness.
2. Fresh Greens and Light Salads
Fresh greens and salads work wonderfully as a side to crab brulee, as they provide a crisp, refreshing contrast to the richness of the custard. They also offer a burst of freshness and crunch that balances out the creamy texture of the crab.
A. Mixed Greens with Lemon Vinaigrette
- Why It Works: A simple salad of mixed greens (such as arugula, spinach, or baby kale) dressed with a light lemon vinaigrette provides a bright, citrusy contrast to the richness of the crab brulee. The lemon dressing adds a tangy zing that cuts through the creaminess of the custard.
- Serving Tip: Keep the salad light and avoid heavy dressings. A few thin slices of radish or cucumber can add an extra layer of freshness without overpowering the meal.
B. Arugula and Parmesan Salad
- Why It Works: Arugula’s peppery bite pairs beautifully with the sweetness of crab brulee, while shavings of Parmesan add a savory richness that complements the creamy custard. The balance of bitterness, sharpness, and saltiness works well to enhance the flavors of the crab.
- Serving Tip: Dress this salad lightly with a balsamic vinaigrette or simply olive oil and a squeeze of lemon. The bitterness of the arugula will contrast nicely with the smoothness of the custard.
C. Cucumber and Dill Salad
- Why It Works: A simple cucumber and dill salad offers a cool, crunchy texture that refreshes the palate after every bite of crab brulee. The mild flavor of cucumber complements the delicate crab without overpowering it, while the fresh dill brings a touch of herby flavor that adds depth.
- Serving Tip: Toss thinly sliced cucumbers with fresh dill, a light vinegar dressing, and a pinch of salt and pepper for a crisp, flavorful side that balances the richness of the brulee.
3. Light Vegetables: Steamed or Roasted
For a heartier side, light vegetables can offer a satisfying addition to your meal while still maintaining the delicate balance between crab and custard.
A. Roasted Asparagus
- Why It Works: The slightly earthy flavor of asparagus provides a great contrast to the creamy, rich crab brulee. Its tender texture pairs nicely with the smooth custard, while the natural sweetness of the asparagus complements the crab.
- Serving Tip: Roast the asparagus with a little olive oil and garlic for a simple, flavorful side. A squeeze of lemon juice and a sprinkle of sea salt will enhance its flavor without overwhelming the brulee.
B. Steamed Green Beans with Almonds
- Why It Works: Lightly steamed green beans with a sprinkle of toasted almonds offer a crunchy, earthy side that balances the richness of the crab brulee. The fresh, clean flavor of the beans enhances the overall seafood theme of the meal, and the almonds add a bit of crunch for texture.
- Serving Tip: Toss the green beans in a light butter or olive oil dressing and top with toasted slivered almonds for extra flavor and texture.
4. Bread and Crusty Rolls
A light crusty bread or soft dinner rolls can also work well as a side to crab brulee. The bread provides a neutral base that allows the flavors of the crab and custard to shine through without overpowering the dish.
A. Garlic Bread or Crostini
- Why It Works: A simple garlic bread or crostini provides a crisp, flavorful bite that contrasts nicely with the creamy, rich custard. The garlic adds a savory punch, while the crunchiness of the bread complements the smoothness of the crab brulee.
- Serving Tip: Serve the garlic bread or crostini on the side for a nice textural contrast. You could even drizzle it lightly with olive oil and herbs for added flavor.
Call to Action:
Now that you have some great ideas for side dishes to pair with your crab brulee, it’s time to plan your perfect meal! Whether you choose a light seafood platter, fresh greens, or a delicious vegetable side, the right pairing can elevate the flavors and create a balanced dining experience. Have you paired crab brulee with any unique sides? Share your favorite pairings in the comments below and inspire others to try new combinations!
Wine Pairings: Wines That Complement the Delicate Sweetness and Richness of Crab Brulee
When it comes to pairing wine with crab brulee, you need a wine that can balance the dish’s rich custard and delicate seafood flavors. The sweet and creamy nature of crab brulee calls for a wine that offers a refreshing contrast without overwhelming the subtle flavors of the dish. Whether you’re looking for a crisp white wine or a light, fruity red, choosing the right wine will enhance the experience and elevate your meal.
In this section, we’ll discuss wine pairing options that perfectly complement the richness of crab brulee, from Chardonnay to Champagne, and we’ll guide you through why each of these wines works so well.
1. Crisp Chardonnay: A Classic White Wine for Crab Brulee
One of the most classic and reliable white wine pairings for crab brulee is a crisp Chardonnay. This wine is known for its balance of acidity and buttery richness, which complements both the sweetness of the crab and the smooth texture of the custard.
Why Chardonnay Works
- Acidity and Freshness: A crisp Chardonnay, particularly one that has not been aged in oak, provides refreshing acidity that cuts through the richness of the brulee. This acidity balances the creamy custard and helps cleanse your palate between bites.
- Buttery and Fruity Notes: The wine’s natural buttery notes, often enhanced by malolactic fermentation, mimic the richness of the custard, while its citrus and apple flavors bring a layer of freshness that pairs beautifully with the sweetness of the crab.
What to Look For
- Unoaked Chardonnay: If you prefer a more refreshing style, look for unoaked Chardonnay from cooler climates like Chablis (France) or Sonoma Coast (California). These wines are crisp, with bright citrus flavors that balance the sweetness of the crab without overpowering it.
- Oaked Chardonnay: If you prefer a fuller-bodied wine, you might opt for an oaked Chardonnay, which will add a touch of vanilla and butteriness that complements the rich custard. Be careful, though, as too much oak can overwhelm the dish.
2. Champagne or Sparkling Wine: Bubbly Brightness to Cut Through Richness
For a celebratory touch or a light, refreshing pairing, consider serving Champagne or another quality sparkling wine with your crab brulee. The crispness and effervescence of sparkling wine not only cleanse your palate but also add a festive touch to the meal.
Why Champagne or Sparkling Wine Works
- Effervescence: The bubbles in Champagne or sparkling wine act as a natural palate cleanser, cutting through the richness of the custard and ensuring each bite feels light and fresh.
- Subtle Sweetness: Many sparkling wines, especially Prosecco or Cava, offer a slight sweetness that complements the sweetness of the crab brulee without overwhelming it.
What to Look For
- Brut or Extra Brut Champagne: For a crisp, dry experience, choose a Brut or Extra Brut Champagne. These wines have a light, citrusy quality with a dry finish that will not overshadow the brulee but will enhance the texture and flavor of the dish.
- Prosecco: If you prefer something slightly sweeter, go for a Prosecco from Italy. It provides a delicate sweetness and light effervescence that pairs beautifully with seafood.
3. Sauvignon Blanc: A Crisp, Herbal White Wine
If you’re looking for a wine that offers bright acidity and a herbal touch to contrast the rich flavors of crab brulee, Sauvignon Blanc is an excellent choice. Known for its crispness and refreshing qualities, Sauvignon Blanc offers a burst of citrus and green flavors that works well with the delicate seafood.
Why Sauvignon Blanc Works
- High Acidity: The acidity in Sauvignon Blanc provides a crispness that cuts through the richness of the crab brulee, refreshing your palate after each bite.
- Herbal Notes: The wine’s distinctive herbaceous and grassy notes, especially from regions like New Zealand and Loire Valley (France), offer a unique contrast to the sweetness of the crab, creating a balanced and complex pairing.
What to Look For
- New Zealand Sauvignon Blanc: Known for its vibrant citrus and tropical fruit notes, a New Zealand Sauvignon Blanc brings an explosive freshness that pairs beautifully with seafood dishes like crab brulee.
- Loire Valley Sauvignon Blanc: For a more mineral-driven style, look for Sauvignon Blanc from France’s Loire Valley, particularly from regions like Sancerre. These wines offer a more refined acidity and citrusy profile that complement the dish without overwhelming it.
4. Pinot Grigio: A Light, Easy-Going Option
If you’re seeking a more subtle wine that won’t compete with the delicate flavors of crab brulee, consider Pinot Grigio. This light, crisp white wine offers a smooth balance of acidity and fruitiness that pairs wonderfully with lighter seafood dishes.
Why Pinot Grigio Works
- Light and Crisp: The light body of Pinot Grigio and its refreshing acidity make it a perfect complement to the smooth and creamy texture of the crab brulee.
- Fruit-Forward Flavors: The wine’s notes of green apple, pear, and citrus enhance the sweet flavors of the crab while offering a clean, crisp finish.
What to Look For
- Italian Pinot Grigio: Italian Pinot Grigio is typically lighter and more delicate, with a clean, crisp profile that enhances the seafood flavors in your brulee without overpowering them.
- Oregon Pinot Gris: If you’re in the mood for something a bit more aromatic and fuller-bodied, try Pinot Gris from Oregon. It offers slightly richer flavors, making it a great match for crab brulee’s creaminess.
5. Light-Body Red Wines: A Unique Alternative
While white wines are generally the go-to option for pairing with seafood, you might want to try a light red wine for a unique alternative. Wines like Pinot Noir or a light Gamay (from Beaujolais) offer a nice balance of fruitiness and acidity that can complement the delicate sweetness of the crab without overpowering it.
Why Light Red Wines Work
- Subtlety and Balance: A light red wine like Pinot Noir has enough acidity and fruit-forward flavors to pair with seafood, but its light body won’t overshadow the delicate flavors of the brulee. The earthy and berry notes of Pinot Noir create an intriguing pairing with the sweetness of the crab.
What to Look For
- Pinot Noir: A cool-climate Pinot Noir from regions like Oregon or Burgundy offers light berry flavors and a subtle earthiness that enhances the crab’s natural sweetness without overwhelming it.
- Gamay (Beaujolais): A light-bodied Gamay from Beaujolais can bring fresh, fruity cherry and raspberry notes, making it an unexpected yet delightful choice for pairing with crab brulee.
Call to Action:
Now that you know which wines best complement the delicate sweetness and richness of crab brulee, it’s time to choose the one that will perfectly elevate your dining experience. Whether you opt for a crisp Chardonnay, a refreshing Sauvignon Blanc, or even a light red wine, the right pairing can make all the difference. Have you tried any of these wine pairings with crab brulee? What’s your favorite wine to serve with seafood? Let us know in the comments below—let’s share our favorite pairings and make every meal memorable!
Presentation Tips: How to Serve Your Crab Brulee for a Michelin-Star-Worthy Presentation
When it comes to serving your crab brulee, the presentation is just as important as the flavors. A beautifully presented dish sets the stage for an unforgettable dining experience, especially when it comes to a dish as elegant as crab brulee. Whether you’re preparing it for a special occasion or simply want to elevate your everyday dining, a few thoughtful touches can make your dish look like it’s straight out of a Michelin-star restaurant.
In this section, we’ll share professional tips for presenting your crab brulee, from choosing the right ramekins to adding stylish garnishes, ensuring your dish is as visually appealing as it is delicious.
1. Choosing the Right Ramekins
The ramekin is the vessel that holds your crab brulee, and selecting the right one can greatly impact the final presentation. Here are a few things to keep in mind when choosing ramekins for your dish:
A. Size and Shape
- Classic Size: For a traditional presentation, use individual 6-ounce ramekins. This size is perfect for serving a rich, creamy custard without overwhelming your guests.
- Shape: While traditional ramekins are typically round, feel free to get creative with oval or square ramekins to add a unique touch. Just be sure the shape is symmetrical and easy to eat from.
B. Color and Material
- Color: White ramekins are classic and help showcase the golden caramelized sugar crust. However, if you want a pop of color, choose neutral tones like cream, light gray, or soft blue. Avoid overly bright colors that may distract from the dish itself.
- Material: Opt for porcelain or ceramic ramekins. These materials are great at holding and distributing heat evenly, and their smooth surface adds a sophisticated touch. The glossy finish of porcelain also adds a refined look to the presentation.
2. Perfecting the Caramelized Sugar Crust
The caramelized sugar crust is one of the most visually striking elements of crab brulee. To achieve that Michelin-star-level appearance, it’s essential to ensure the sugar is perfectly caramelized. Here’s how:
A. Even Caramelization
- Uniform Coverage: Ensure the sugar is evenly sprinkled over the custard before torching. Use a fine, even layer of sugar to create a smooth and polished crust. Piles of sugar can cause uneven melting, which leads to inconsistent caramelization.
- Golden Brown Finish: Aim for a golden amber color when torching the sugar. This creates a glossy, professional-looking finish that contrasts beautifully with the smooth custard below. Avoid darker or burnt sugar, which can look unattractive and taste bitter.
B. Smooth, Glossy Texture
- No Bubbles or Cracks: The surface of the caramelized sugar should be smooth and free of air bubbles. After torching, let it sit briefly to set. The crust should be hard enough to “crack” when gently tapped with a spoon, giving it that signature brulee experience.
3. Serving Plates and Presentation
Choosing the right serving plate is crucial to showcasing your crab brulee. Follow these tips to create an elegant, well-balanced presentation:
A. Plate Selection
- Minimalist Design: Opt for a large, clean white plate with a wide rim. The neutral backdrop ensures that the brulee is the focal point of the presentation, and the wide rim gives you space for creative garnishes or sauces.
- Space Around the Ramekin: Place the ramekin neatly in the center of the plate, ensuring there’s enough space around it to avoid a crowded look. This gives the dish an airy, elevated feel.
B. Adding Texture and Dimension
- Vertical Layering: To add height and dimension to your presentation, consider serving the brulee with a side garnish that contrasts in texture. For example, you could place a few crispy crackers or toasted breadsticks next to the ramekin for a stylish touch. The crunch of the bread contrasts nicely with the smooth custard and provides a visually appealing layer to the dish.
- Using Sauces and Purees: Consider adding a light sauce or puree on the plate for a pop of color and flavor. A lemon cream sauce, citrus puree, or herb-infused oil can enhance the flavor of the crab brulee while adding a refined touch to the presentation.
4. Garnishing Your Crab Brulee
Garnishes add the finishing touch to your dish, making it visually stunning and adding flavor complexity. For crab brulee, the garnish should be simple yet sophisticated.
A. Fresh Herbs
- Why It Works: Fresh herbs like chives, parsley, or tarragon add a vibrant pop of color and a subtle flavor that complements the richness of the custard. A sprig of tarragon or finely chopped chives can be delicately placed on top or alongside the ramekin.
- How to Use: Sprinkle freshly chopped herbs lightly on the brulee just before serving. This adds visual appeal without overpowering the dish.
B. Edible Flowers
- Why It Works: For a more luxurious touch, consider adding edible flowers like violets, pansies, or nasturtiums. These flowers not only add a delicate, colorful touch but also bring a gourmet, high-end feel to the presentation.
- How to Use: Place one or two small flowers near the ramekin or on the edge of the plate. Keep the rest of the presentation minimal to let the flowers stand out.
C. Microgreens
- Why It Works: Microgreens like pea shoots or arugula offer a fresh, peppery taste and a pop of vibrant green that contrasts beautifully with the golden crust of the brulee.
- How to Use: Scatter a small amount of microgreens around the plate or place them neatly on top of the brulee for an elegant, fresh touch.
5. Attention to Detail: Final Touches
Finally, make sure to pay attention to the small details that elevate the overall look of your crab brulee:
- Clean the Rim: Before serving, wipe the edges of the ramekin with a clean cloth to ensure there are no smudges or spilled custard. A pristine presentation shows attention to detail.
- Consistent Portion Size: Ensure that each ramekin has a consistent portion of custard, with an even caramelized crust. This attention to detail will make your crab brulee look more professional.
Call to Action:
Now that you have the Michelin-star-worthy presentation tips for your crab brulee, it’s time to put them into practice! With the right ramekins, a perfectly caramelized sugar crust, elegant garnishes, and thoughtful plating, you can create a dish that looks as incredible as it tastes. What other presentation tricks do you use to elevate your dishes? Share your tips and experiences in the comments below, and let’s continue creating beautiful meals together!
Serving with Other Seafood Dishes: How to Balance Crab Brulee with Dishes Like Lobster Bisque
If you’re hosting a seafood dinner or a fine dining meal centered around seafood, crab brulee is a luxurious and sophisticated dish that can set the tone for an unforgettable evening. However, when serving multiple seafood courses, it’s important to ensure that each dish complements the others, rather than overwhelming your guests with similar flavors or textures.
In this section, we’ll guide you through balancing crab brulee with other classic seafood dishes, like lobster bisque or shrimp cocktail, so your guests can enjoy a harmonious dining experience.
1. Understanding the Role of Crab Brulee in a Seafood Meal
Crab brulee is a rich, decadent dish that combines the sweetness of crab with the smoothness of a creamy custard. It’s typically served as a starter or a main course, depending on the portion size. Given its rich and creamy nature, it’s essential to pair it with dishes that complement its sweetness and balance its richness.
While the crab brulee offers a delicate seafood flavor, you don’t want to overshadow it with heavier or overly complex dishes. Here’s how to strike the right balance:
- Lighter First Courses: If serving the brulee as a starter, keep the first courses light and refreshing, focusing on fresh seafood and bright flavors that won’t compete with the richness of the brulee. For example, a seafood salad or shrimp cocktail can offer a clean, crisp contrast.
- Heartier Main Courses: If the brulee is served as a main course, pair it with a seafood dish that’s flavorful yet not too heavy. Consider a lightly grilled fish or a lobster tail to maintain balance.
2. Balancing Crab Brulee with Lobster Bisque
Lobster bisque is a classic, velvety soup made with lobster, cream, and aromatic herbs. Its rich, smooth texture can be quite similar to that of crab brulee, so it’s important to serve these two dishes in a way that balances their creaminess without overwhelming the palate.
Why Lobster Bisque Works with Crab Brulee
- Flavor Profile Balance: Lobster bisque has a deep, savory, and slightly sweet flavor, which pairs beautifully with the delicate sweetness of the crab brulee. The lobster’s rich flavor complements the mild sweetness of the crab without overshadowing it.
- Texture Contrast: The smooth, creamy texture of the bisque provides a contrast to the slightly firmer texture of the crab in the brulee. This adds variety to the meal while still maintaining a cohesive seafood theme.
How to Serve Lobster Bisque with Crab Brulee
- Serve Lobster Bisque as a Starter: If serving both dishes, it’s best to serve the lobster bisque before the crab brulee as a first course. The bisque is rich, so having it at the beginning allows your guests to enjoy it without it competing with the crab brulee’s more delicate flavor.
- Portion Control: When serving both dishes, consider smaller portions for the bisque to avoid overwhelming guests with too much creaminess. A small bowl of bisque (about 4-6 ounces) will offer the perfect balance.
- Garnish: For a Michelin-worthy presentation, garnish your lobster bisque with a light drizzle of crème fraîche, a few herb sprigs (like thyme or tarragon), or lobster pieces to elevate the dish visually and add complexity to the flavors.
3. Pairing with Lightly Grilled or Steamed Seafood
If you’re serving crab brulee as a main course. You’ll want to pair it with seafood dishes that offer a lighter preparation. Grilled or steamed seafood maintains the purity of the natural flavors without overshadowing the richness of the crab brulee.
Why Lightly Grilled or Steamed Seafood Works
- Natural Seafood Flavors: Lightly grilled or steamed dishes highlight the natural sweetness of the seafood. Such as lobster tails, shrimp, or scallops. Which complement the sweet, delicate flavors of the crab brulee without competing with it.
- Texture Balance: The tender texture of grilled or steamed seafood offers a welcome contrast to the creamy crab brulee. Adding variety to the overall meal without overloading guests with too much richness.
Suggested Dishes to Pair with Crab Brulee
- Grilled Lobster Tail: Serve a succulent lobster tail, lightly grilled with butter and garlic. To bring out the sweet flavors of the seafood without overpowering the brulee.
- Shrimp Skewers: Lightly grilled shrimp skewers, seasoned with lemon and fresh herbs, provide a fresh, zesty contrast to the creamy crab brulee.
- Steamed Scallops: Steamed scallops are a perfect complement, offering a mild flavor and tender texture that won’t compete with the crab brulee but will instead highlight the delicacy of the seafood.
4. Offering Fresh Greens and Crisp Salads
A light, fresh salad or greens. Can help cut through the richness of both the crab brulee and other seafood dishes. The acidity and crisp texture of greens provide a refreshing contrast and cleanse the palate between courses.
Why Fresh Greens Work
- Crispness and Freshness: A crisp salad or fresh greens like arugula or spinach offers a refreshing, clean break from the richness of the brulee. The natural bitterness or peppery flavor of greens like arugula can also cut through the creaminess of the dish.
- Light, Zesty Dressings: Serve the greens with a light vinaigrette made from lemon, olive oil. And herbs for a tangy contrast to the richness of both the crab brulee and lobster bisque.
Suggested Salads to Pair with Crab Brulee
- Arugula and Parmesan Salad: A simple arugula salad with shaved Parmesan, lemon, and a drizzle of olive oil provides the perfect balance to the richness of crab brulee.
- Citrus and Fennel Salad: The light, refreshing flavors of citrus (like orange or grapefruit). Paired with thinly sliced fennel and a light dressing offer a perfect contrast to both the bisque and brulee.
5. Timing and Course Sequence
When serving multiple seafood dishes, the order of courses and portion sizes are key to ensuring the meal feels balanced.
- Start with a Light Course: Begin with a lighter appetizer like a seafood salad or shrimp cocktail. These dishes should be fresh and crisp to cleanse the palate without overwhelming the guests before the main courses.
- Serve the Richer Dishes Later: Serve the lobster bisque and crab brulee after the lighter courses to ensure guests aren’t overwhelmed with richness right away.
- Balance Portion Sizes: If you’re serving both lobster bisque and crab brulee, be mindful of the portion sizes. Keep the bisque portion small and serve the brulee in individual ramekins for easy, elegant servings.
Call to Action:
Now that you have some great ideas for balancing crab brulee with other seafood dishes like lobster bisque. It’s time to create your perfect seafood dinner! Whether you’re hosting a small gathering or a more formal fine dining experience. These pairing tips will ensure a harmonious and unforgettable meal. Have you paired crab brulee with any other dishes? Share your favorite combinations or experiences in the comments below and let’s keep the conversation going!
Conclusion: Why Crab Brulee is the Ultimate Gourmet Dish
Crab brulee is the epitome of luxury dining, combining the sweetness of crab with the rich, creamy texture of a perfectly prepared custard. Its unique blend of delicate seafood and velvety custard, topped with a crispy caramelized sugar crust, makes it a showstopper on any plate. Whether you’re hosting a special dinner, celebrating an occasion, or simply treating yourself to something extraordinary, crab brulee brings an element of sophistication and indulgence that few dishes can match.
What makes crab brulee stand out is not just its luxurious ingredients, but the balance it strikes between richness and delicacy. This dish offers a perfect contrast of textures, from the smooth custard to the crunchy caramelized sugar, while the sweetness of the crab adds a unique depth of flavor that is truly one-of-a-kind. It’s a dish that blends the finest qualities of seafood with the elegance of classic French cuisine, making it a true gourmet experience.
We encourage you to experiment with this recipe and make it your own! Whether you’re adjusting the crab-to-custard ratio. Experimenting with different sugars for the caramelized crust, or adding your own creative twists. Crab brulee offers endless opportunities to impress. Share your results with us – we’d love to hear how your version turned out and any unique touches you added to this luxurious dish!
Call to Action:
Try this crab brulee recipe today and let us know how it turned out! Whether you’re serving it at a fine dining event or enjoying it as a special treat at home. We’re excited to hear about your experience. Share your photos, tips, and results in the comments below – and don’t forget to tag us when you post! We can’t wait to see your take on this ultimate gourmet dish!
thank you
Greetings,
I hope this message finds you well. We are seeking strategic business partners and individuals interested in collaborating on exclusive investment opportunities. We represent a network of high-net-worth individuals (HNWIs) from Ukraine, Russia, Africa and the Middle East
Given the nature of the funds, further details will be shared upon request including amount involved. If it interests you to collaborate with us at no risk, please feel free to reach out for a confidential discussion.
Looking forward to your response.
Best regards,
Alex Amin
Email:[email protected]
Thank you for reaching out. I am interested in learning more about this collaboration opportunity. To proceed, could you please provide additional details, including:
• The name and registration details of your organization.
• A summary of the investment structure and how collaboration would work.
• Any legal documentation or agreements related to the opportunity.
• References from past partners or investors.
I appreciate your time and look forward to your response. Please note that I will be conducting due diligence to ensure this aligns with my business interests.
Best regards,
[ kawaii]